How to Set Up a WordPress Staging Site with BackupBuddy Deployment
BackupBuddy Deployment is a new feature in BackupBuddy 6.0 that allows you to easily push or pull changes between two WordPress sites. In this post, we'll cover how to set up a WordPress staging site with the WordPress backup plugin, BackupBuddy. With Deployment in BackupBuddy, you can push or pull a WordPress site's database, media files, plugins and active theme back and forth between a Staging Site (or Test/Development Site) and a Live Site, allowing you to develop on one site and then push changes to another, so you never have to develop on a live site again.

With Deployment in BackupBuddy, you can push or pull a WordPress site’s database, media files, plugins and active theme back and forth between a Staging Site (or Test/Development Site) and a Live Site, allowing you to develop on one site and then push changes to another, so you never have to develop on a live site again.
Using a WordPress Staging Site in Your WordPress Development Workflow
WordPress Staging is a method of developing WordPress websites at a different location than your live WordPress site. WordPress staging may consist of two or three separate sites at separate URLs. For instance, you may have a Staging (Test) Site and Live (Production) Site.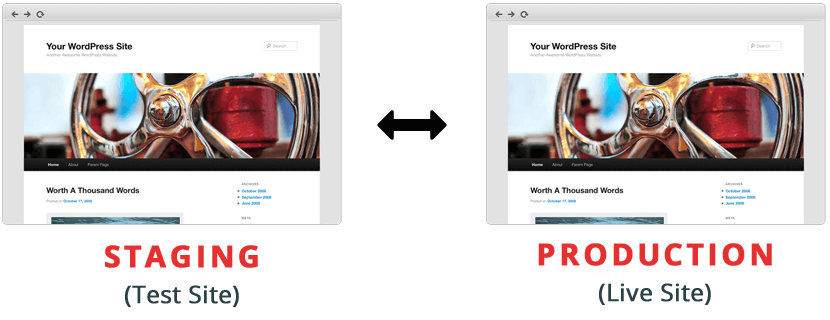
- Example: You could develop your site locally on your computer for convenience, then deploy it to the Staging (Test) site on the same server (but at a different URL) as the Live Site to demo to clients or ensure server compatibility, etc. Once satisfied, you can then push changes to the Live Production site.
- Example: If you want to try out a major plugin update, but want to confirm it doesn’t break the Live Site, you could go to your Staging Site and then pull the Live Site down. After verifying everything works as expected, you could then either push the changes back to the Live Site or go directly to the Production Site and update the plugin there.
Deploy Changes from a Staging Site to Live Site with a Few Clicks with BackupBuddy Deployment
BackupBuddy uses a new “BackupBuddy Deployment” Remote Destination to connect your WordPress staging site and live site. When you initiate the Deployment process, contents of the destination site (the site you are pushing to) will be overwritten as needed. During Deployment, you will be displayed a continuous status of the process and be given the opportunity to test the changes and undo the database changes before making them permanent.- See differences in site server settings, active plugins, theme, versions and media prior to deploying.
- Options to transfer the database (all tables, some, or none), plugins, theme and/or media.
- Automatic migration of URLs, paths, and other settings just like manual migrations.
- Watch the deployment progress just like a normal backup, displaying a continuous status including a detailed advanced status log of the entire process, all in one place.
- Ability to undo the database changes with one click if something goes wrong prior to confirming the deployment once you’re satisfied.
- Automatic chunking of data transferred between servers to support large files or slow servers.
- Swaps databases only after the entire database and all files have been transferred to attempt to minimize site downtime to mere seconds (or less!).
- Perfect for developing your site in a different location from the live site. Use staging best practices.
How to Set Up a WordPress Staging Site with BackupBuddy Deployment
The super-speedy version of this tutorial goes something like this:
- Make a backup of your Live Site.
- Create a Staging (Test) Site by restoring your backup on a new domain (dev.yourdomain.com for example).
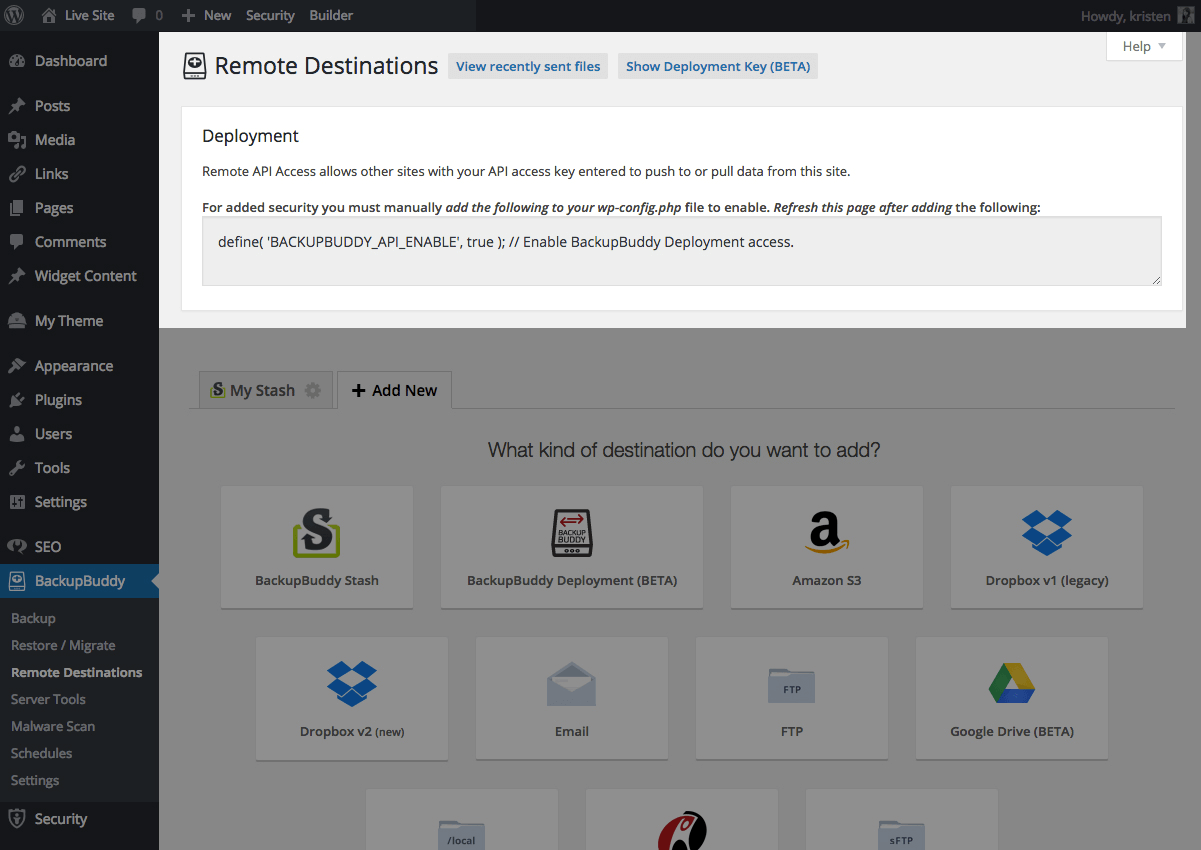
- Add define( ‘BACKUPBUDDY_API_ENABLE’, true ); to the wp-config.php file of your Live Site.
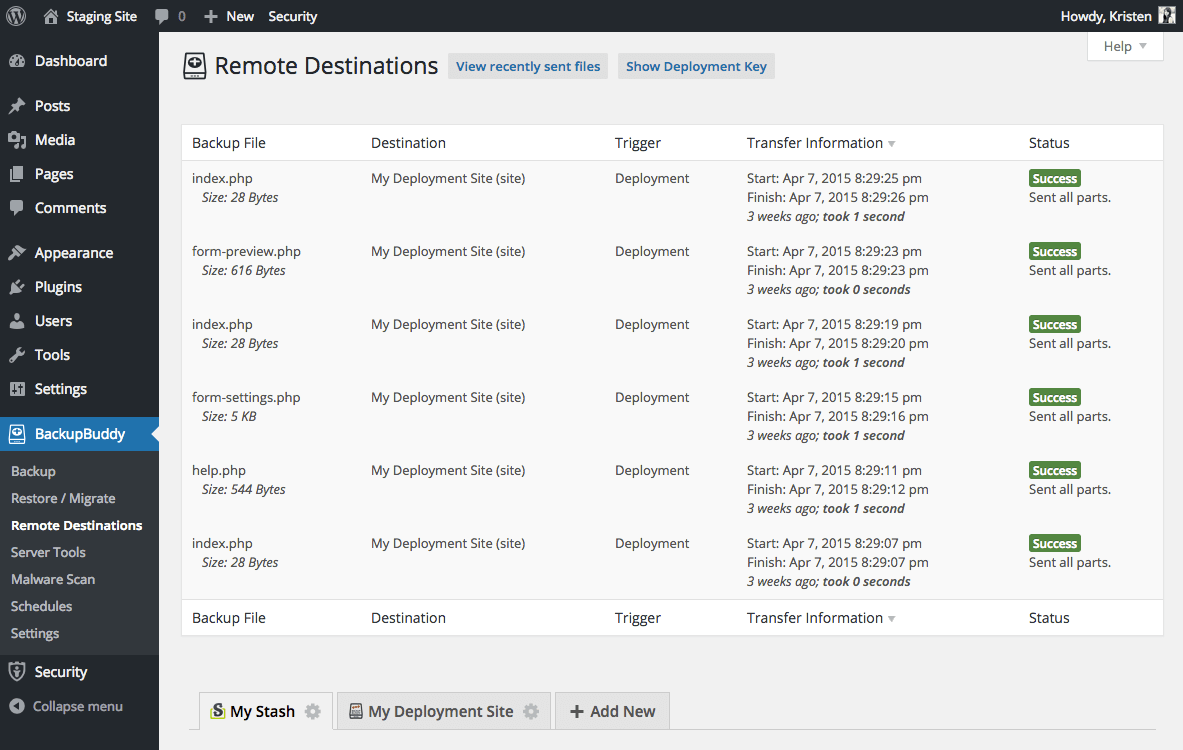
- On the Live Site, go to BackupBuddy > Remote Destinations and select Show Deployment Key at the top of the page
- Copy the given key.
- On your Staging Site, go to BackupBuddy > Remote Destinations and click the Add New option and then select BackupBuddy Deployment.
- Paste the API key you copied from the Live Site into your Staging Site.
The longer, more in-depth version of this tutorial:
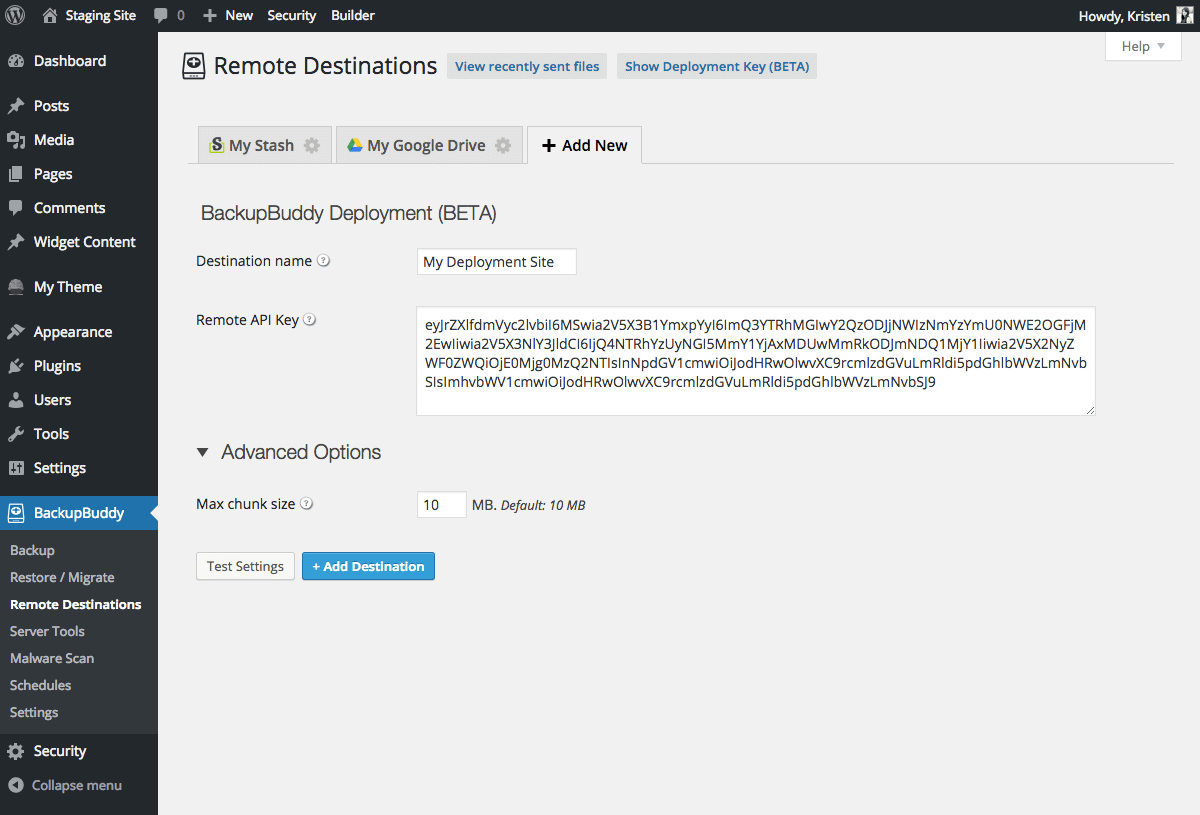
1. On your Live Site, visit BackupBuddy > Remote Destinations and then select the “Show Deployment Key” button at the top of the page.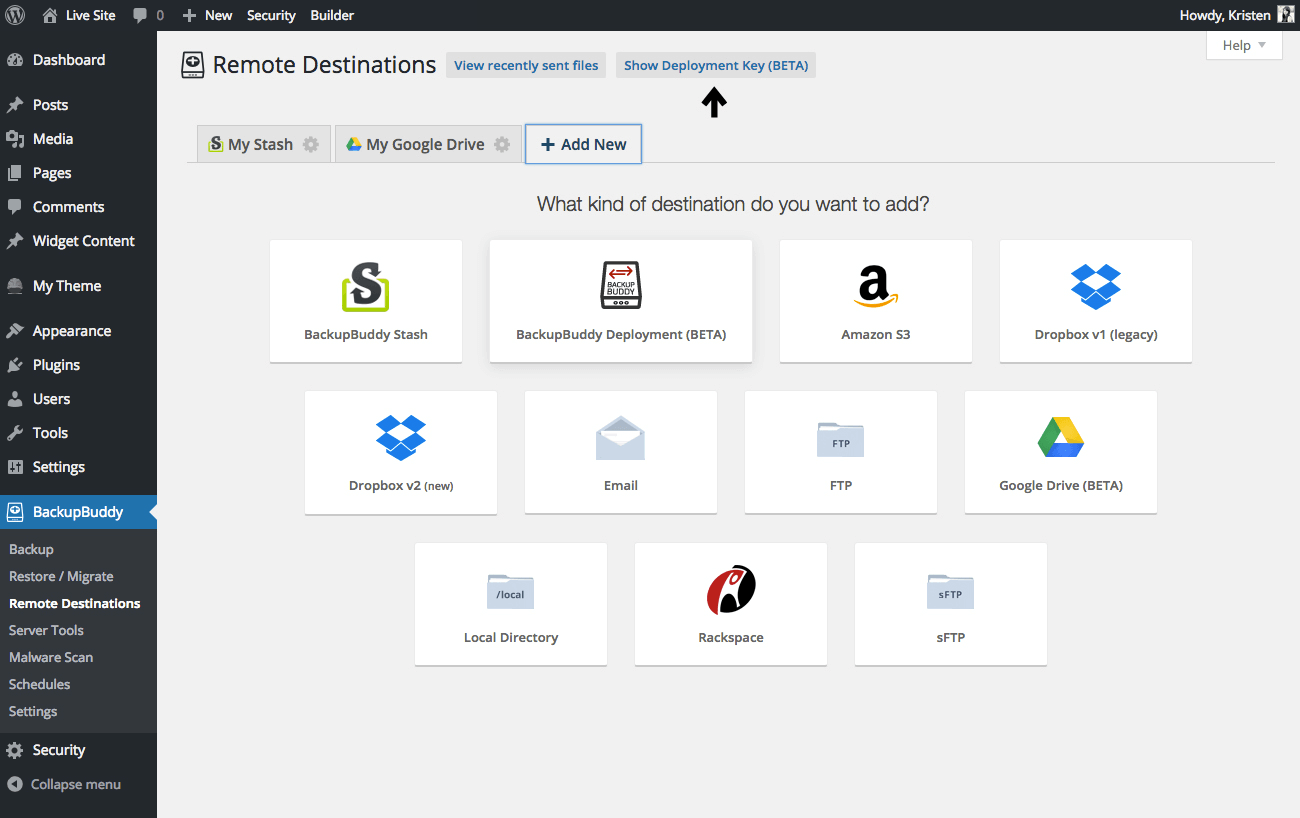 If it is your first time to set up Deployment on this site, you will be prompted to add the following line to the wp-config.php file of your Live Site.
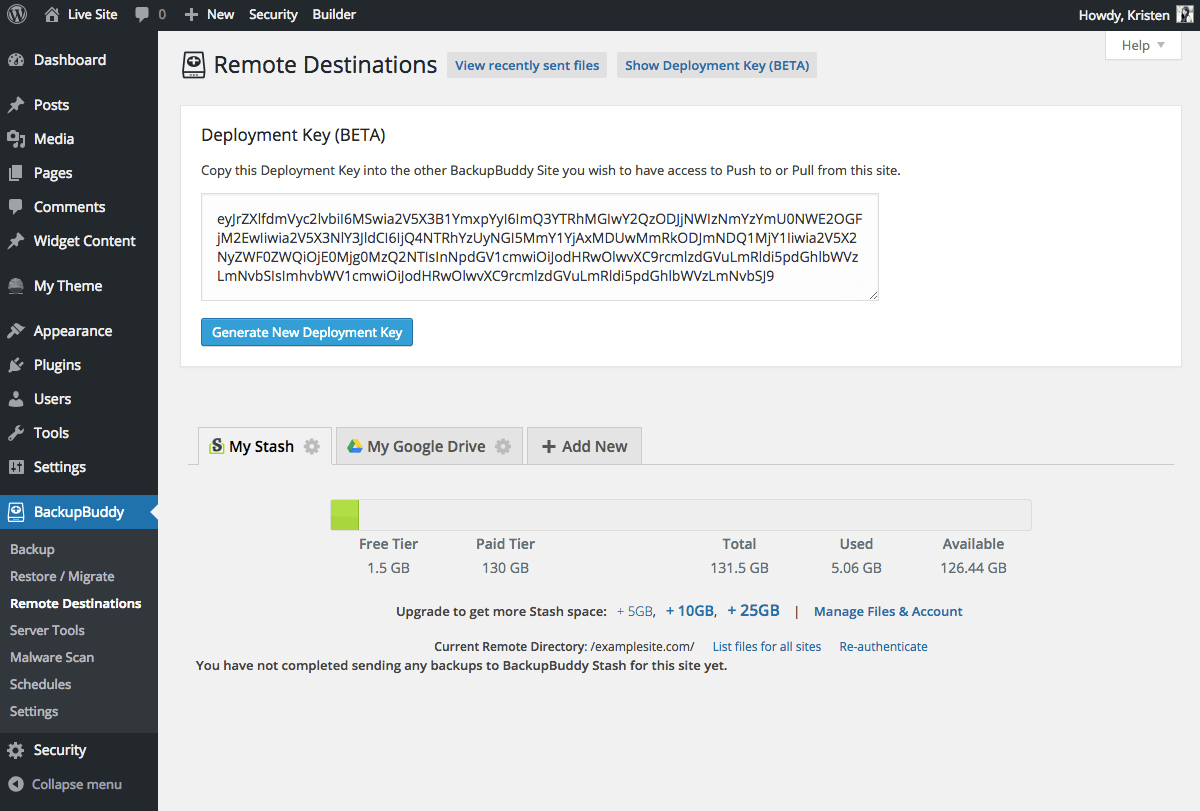
 After adding this line to your wp-config.php file of your Live Site, refresh the page and select “Show Deployment Key” again to view the key). You will see a Deployment API Key that looks something like the following:
 3. On your Staging Site, go to the BackupBuddy > Remote Destinations page and click the tab “+ Add New.” Select the “BackupBuddy Deployment” destination.
 4. Enter the API key you copied from your Live Site. You may test and add the destination now. Setup is now complete!
Pushing & Pulling Changes From Staging Site to Live Site
1. Go to the site you wish to Push from or Pull to. 2. Go to the BackupBuddy > Remote Destinations page and select the “My Deployment Site” tab you added during Setup.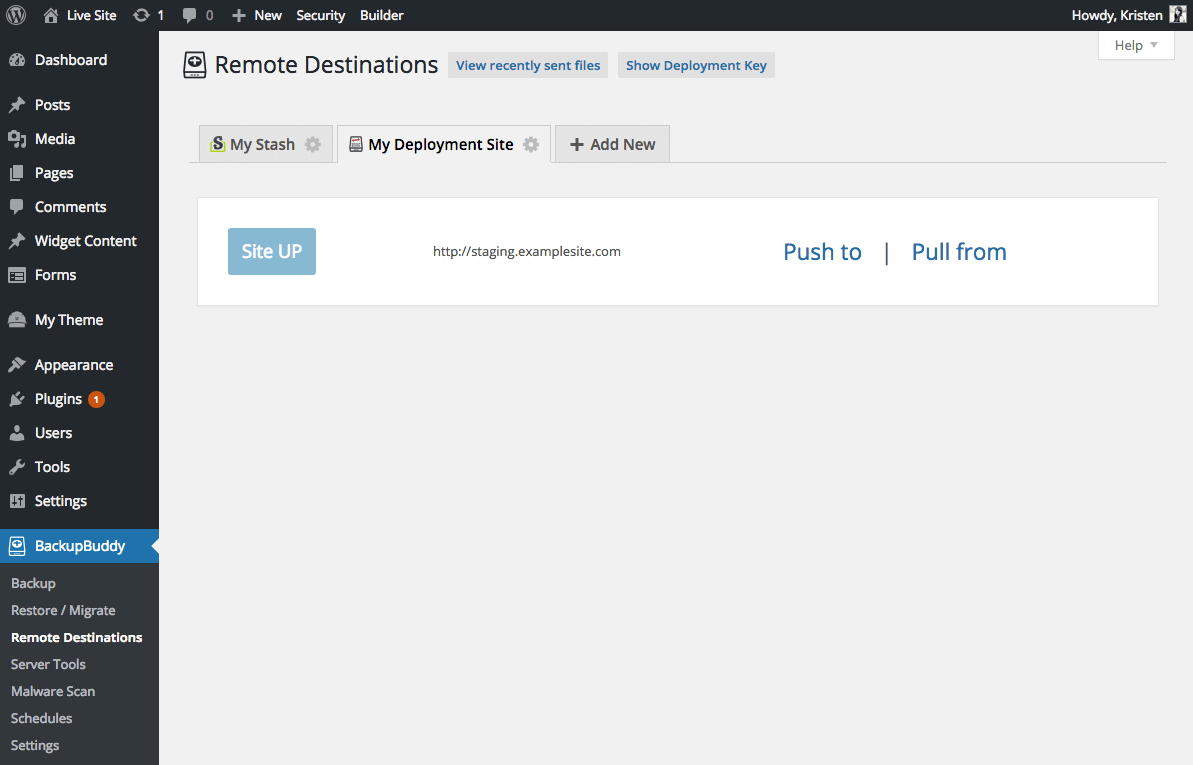 3. Select “Push to” or “Pull from” depending on what you want to do.
4. You will be shown information about both sites and their server configuration including WordPress & plugin versions, media information, database tables, runtime details and more.
3. Select “Push to” or “Pull from” depending on what you want to do.
4. You will be shown information about both sites and their server configuration including WordPress & plugin versions, media information, database tables, runtime details and more.
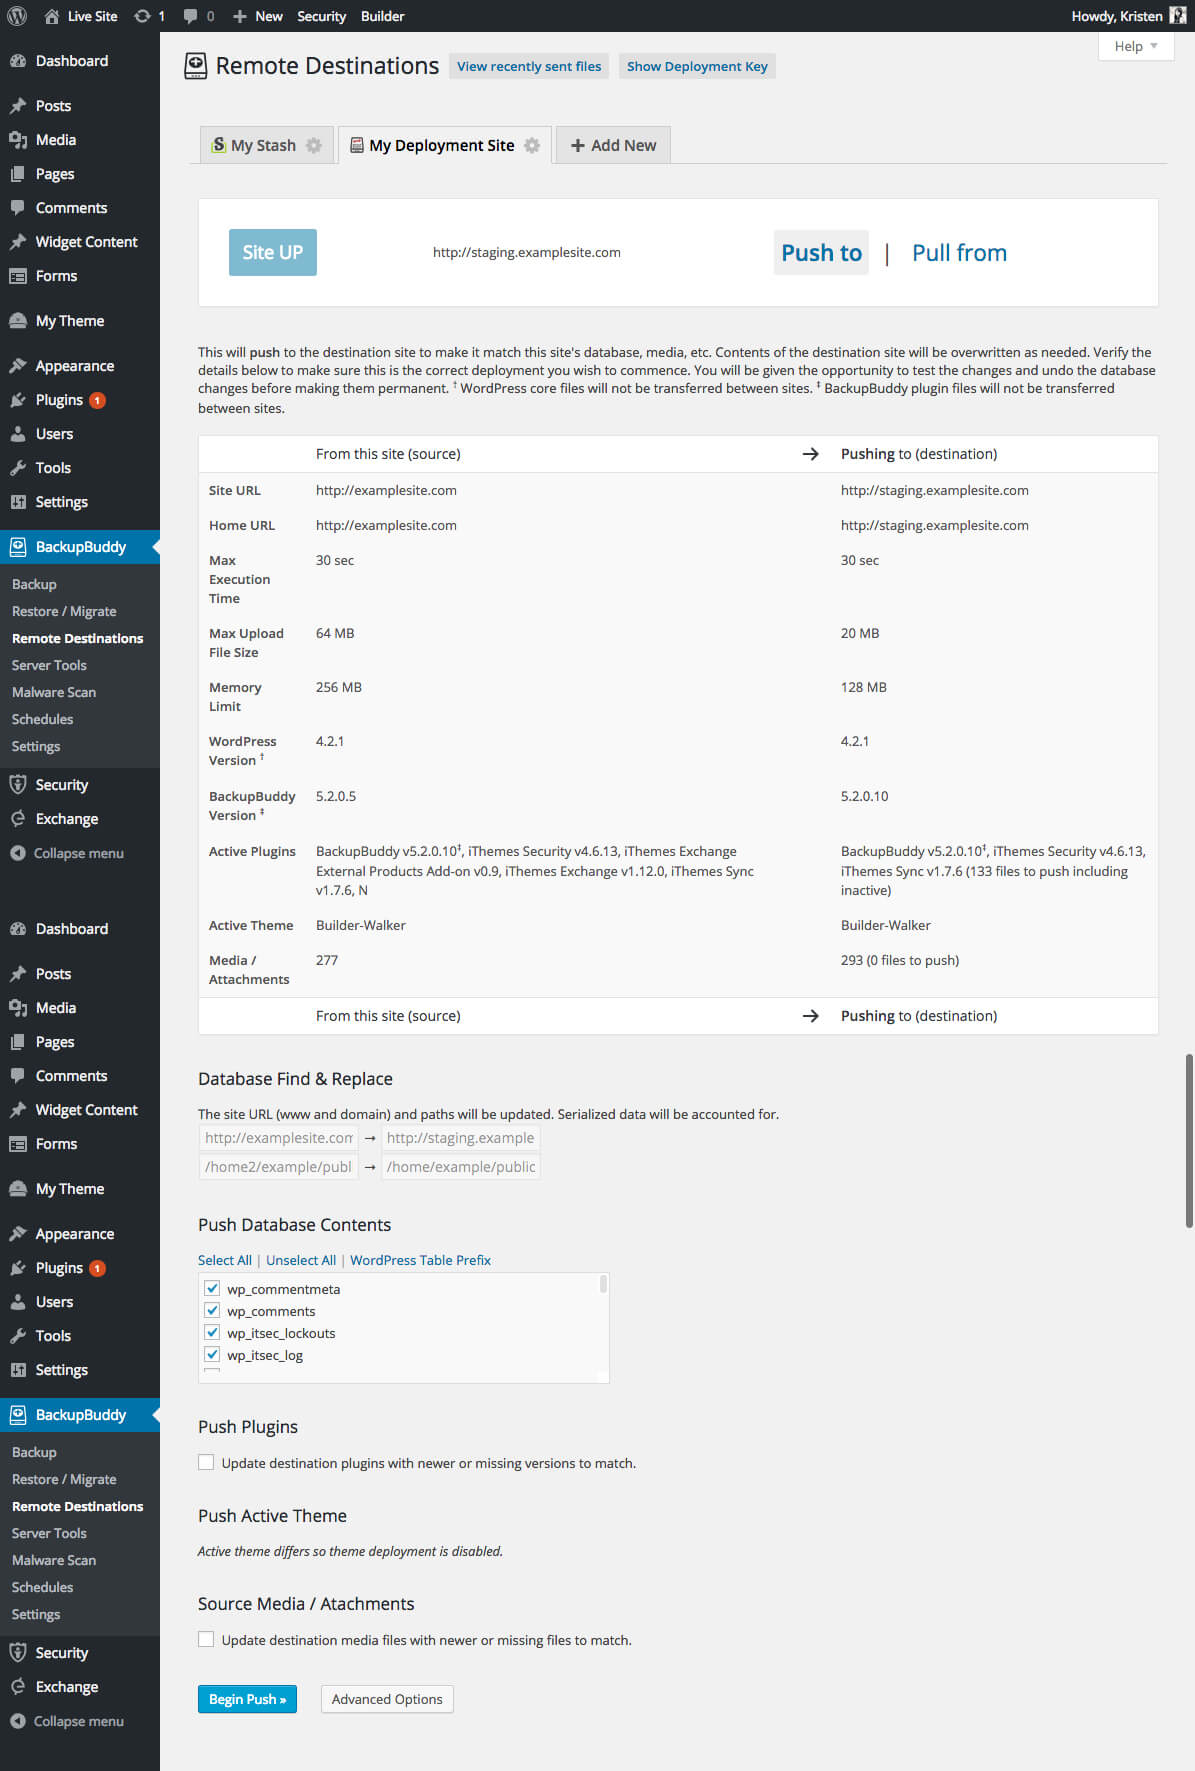 5. Select what data you wish to transfer including Database tables, Media files, Plugins and Theme files.
6. Click “Begin Push/Pull” to start the process. You will be shown a status display giving an overview of the current progress including files transferred including a detailed Status Log.
5. Select what data you wish to transfer including Database tables, Media files, Plugins and Theme files.
6. Click “Begin Push/Pull” to start the process. You will be shown a status display giving an overview of the current progress including files transferred including a detailed Status Log.
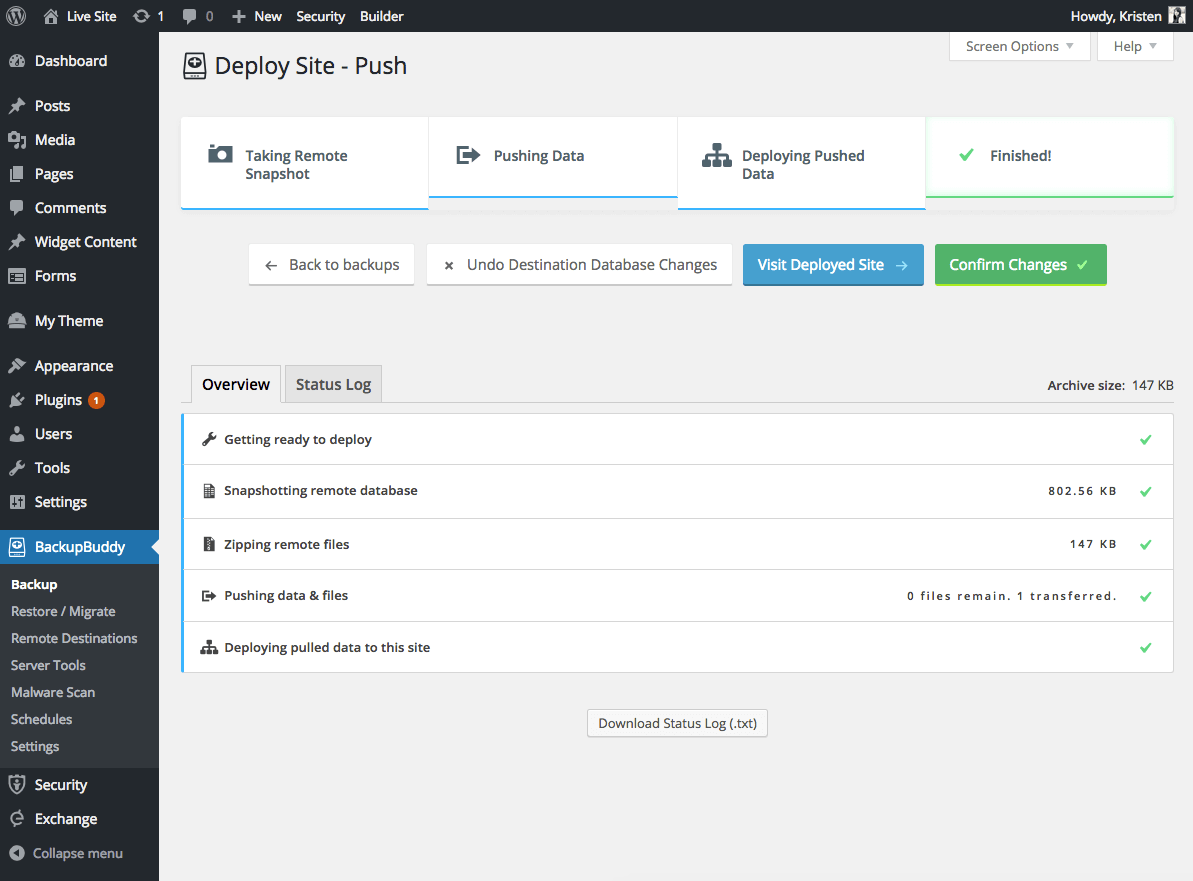 7. Test the destination site to verify everything looks okay and then click “Confirm Changes” to finalize these changes. If you do not confirm the changes within 12 hours they will be considered finalized.
If you are not satisfied with the changes select “Undo Database Changes” to rollback to the database in place prior to the Deployment process.
To view a summary of the files transferred, visit the BackupBuddy > Remote Destinations page again. From here, you’ll be able to view transfer and status information.
7. Test the destination site to verify everything looks okay and then click “Confirm Changes” to finalize these changes. If you do not confirm the changes within 12 hours they will be considered finalized.
If you are not satisfied with the changes select “Undo Database Changes” to rollback to the database in place prior to the Deployment process.
To view a summary of the files transferred, visit the BackupBuddy > Remote Destinations page again. From here, you’ll be able to view transfer and status information.
Staging Best Practices
When Pushing and Pulling between sites, it is important that you only send the contents you wish to overwrite on the destination site. For instance, you probably would want to omit sending the WordPress comments on your Development site to your Production site so comments would not be overwritten. BackupBuddy does not “merge” database contents. Entire tables are either sent or not sent. You may do something similar to a merge by excluding one or more tables from being deployed. Tables not sent will result in the existing database table being left as-is.More Important BackupBuddy Deployment Things to Note
- At least one site must be able to access the other URL. For example, to push, that destination URL must be accessible from the source computer.
- Only active theme files will be updated & both sites must have the same active theme at this time.
- Sites must have enough resources to be able to backup, restore, and make connections for sending files (eg via curl). BackupBuddy should be fully operational for normal functionality before attempting Deployments.
- When transferring files, files that have been deleted on the other server may not be deleted remotely.
- When transferring files, empty directories will not be transferred.
- Windows support is currently experimental and not currently supported. Windows Deployment support is in progress.
- The remote server is suggested to have an admin user with the same username as the local server. If it does not, a logout may occur on pulling server post-restore. We attempt to work around this but some setups may still result in a logout.
Get BackupBuddy with Deployment Now
Speed up your WordPress development workflow with Deployment in BackupBuddy, the 3-in-1 WordPress backup plugin. In addition to Deployment, BackupBuddy offers a ton of other dev-focused features, like WordPress migration, the ability to clone WordPress and more.Get Release Notes for SolidWP products delivered right to your inbox.
Sign up
Join us for the next Solid Academy Webinar!
Free weekly webinars that will help you master WordPress and increase your business's bottom line.
What is a WordPress Phishing Attack?
Learn how to identify and prevent phishing attacks on WordPress websites.
Kiki SheldonWebsite Protection: 5 Ways to Keep Your Website Safe
Robust website protection is the shield that stands between your business and relentless cyber attacks. Prioritizing website protection enables businesses to fortify defenses to safeguard their online presence and preserve the trust of their customers in the face of ever-evolving cybersecurity threats.
Kiki Sheldon23 Ideas To Grow Your WordPress Business in 2023
WordPress is the most popular website-building platform worldwide, trusted by numerous brands. WordPress enables you to build a user-friendly and highly reliable site, together with tools and plugins to enhance your marketing and work like a lead magnet. All these features make WordPress the platform chosen by more than 43% of businesses globally.
SolidWP Editorial TeamSign up now — Get SolidWP updates and valuable content straight to your inbox
Sign up
Get started with confidence — risk free, guaranteed
