How to Use CloudFlare with WordPress
CloudFlare can do everything from offer CDN abilities to speed up your WordPress website, add additional “pre-screening” security through a firewall system, protect your site against DDoS to ensure that something will be visible to real visitors and, probably most importantly, offer a high-quality DNS service.

 CloudFlare actually got its start by providing services to other companies that worked to alleviate denial of service attacks (DoS) and has since grown into a multi-pronged service with plenty of option for WordPress site owners.
The free level of CloudFlare includes features like:
CloudFlare actually got its start by providing services to other companies that worked to alleviate denial of service attacks (DoS) and has since grown into a multi-pronged service with plenty of option for WordPress site owners.
The free level of CloudFlare includes features like:
- A Basic CDN service so that the site can be displayed through CloudFlare’s servers that are networked around the globe.
- SSL Flexible Certificates that help protect your visitor’s personal information.
- Analytics – Lots of good metrics to see how your side is doing.
- Firewall – A web application firewall that can block online threats before they ever reach your server.
- Fast DNS solution so that you can quickly change DNS records and not have to wait for hours for things to propagate.
- Minifying the Javascript, CSS, and HTML that appears on your site.
- Caching on CloudFlare can cache a copy of the site to serve it super fast even if your site is having trouble being reached. This includes services like CloudFlare’s “Always On” system that includes the homepage and many popular posts and pages.
- Email address encryption to keep all emails on the site away from scrapers.
- Hotlink protection to keep your sites ON your sites.
- Access rules to customize what visitors get viewed as a threat and blocked.
Using CloudFlare with WordPress
To get started with CloudFlare, it is as simple as putting in the domain name of the WordPress site that you want to use. Once you create an account and login, visit https://www.cloudflare.com/a/setup.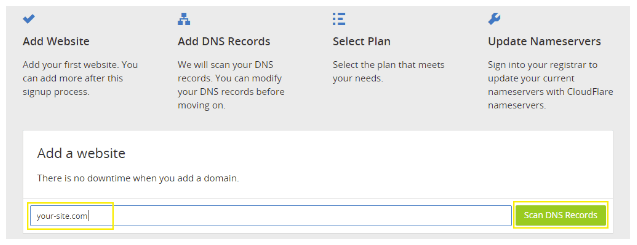 CloudFlare will then go through the process of copying everything you currently have with your DNS records for the domain. It will give you a chance to verify that it is all correct.
Then you will be given two nameservers to use when switching your domain records at the registrar of the domain.
Once that is done you can begin setting up your services that you will use with CloudFlare.
CloudFlare will then go through the process of copying everything you currently have with your DNS records for the domain. It will give you a chance to verify that it is all correct.
Then you will be given two nameservers to use when switching your domain records at the registrar of the domain.
Once that is done you can begin setting up your services that you will use with CloudFlare.
 To help you get started using CloudFlare with WordPress, below is a quick summary of some of the features found in each on of the settings of CloudFlare. While there are many more features that can be used and set to enhance your WordPress site, this post is focused on what you can do with CloudFlare under the free account level.
Analytics
To help you get started using CloudFlare with WordPress, below is a quick summary of some of the features found in each on of the settings of CloudFlare. While there are many more features that can be used and set to enhance your WordPress site, this post is focused on what you can do with CloudFlare under the free account level.
Analytics
- What is it actually tracking?
- Threats that have happened during the time period.
- Analysis of what CloudFlare “saved” you.
- Access to all A, AAAA, CNAME, MX, TXT, NS, SPF, SRV, LOC domain records.
- Each record can choose to pass bypass CloudFlare or not.
- This means SSL certs and other cryptographic methods of securing your website
- The areas that are good to know for the free level are “security level” and the IP Firewall.
- The FULL Web Application Firewall is only under that paid version.
- Choose to minify your Javascript, CSS, and/or HTML.
- Mobile Redirect is a really cool feature for the free level.
- The ability to purge the cache or release individual pages from the cache.
- The “Always Online” and the Development Mode are key settings to understand.
- These are specific instructions for CloudFlare to know how to handle visitors that arrive under specific URL settings.
- There are two settings to be aware of in this section. The “IP Geolocation” option and the “Maximum Upload Size” drop-down field.
- Email obfuscation, hotlink protection, and the ability to hide content from suspicious visitors.
- A Better Browser
- Google Analytics
- Google Webmaster Tools
- Pingdom
- ScrapeShield
How do you use CloudFlare with WordPress?
Join us for the next Solid Academy Webinar!
Free weekly webinars that will help you master WordPress and increase your business's bottom line.
What is a WordPress Phishing Attack?
Learn how to identify and prevent phishing attacks on WordPress websites.
Kiki SheldonWebsite Protection: 5 Ways to Keep Your Website Safe
Robust website protection is the shield that stands between your business and relentless cyber attacks. Prioritizing website protection enables businesses to fortify defenses to safeguard their online presence and preserve the trust of their customers in the face of ever-evolving cybersecurity threats.
Kiki Sheldon23 Ideas To Grow Your WordPress Business in 2023
WordPress is the most popular website-building platform worldwide, trusted by numerous brands. WordPress enables you to build a user-friendly and highly reliable site, together with tools and plugins to enhance your marketing and work like a lead magnet. All these features make WordPress the platform chosen by more than 43% of businesses globally.
SolidWP Editorial TeamSign up now — Get SolidWP updates and valuable content straight to your inbox
Sign up
Get started with confidence — risk free, guaranteed
