WordPress Gutenberg: The Ultimate Guide to the New WordPress Block Editor
The WordPress Gutenberg Editor transforms the way you edit WordPress pages and posts. If you’re like most people, you probably have a ton of questions about the new WordPress block editor and may even be a little nervous about the changes it brings to WordPress. In this guide to WordPress 5.0 and the new Gutenberg Editor, we hope to answer all of your questions and hopefully settle your nerves about the update.

What is WordPress Gutenberg?
Gutenberg is the project name for the new WordPress editor slated for release in WordPress 5.0. [pullquote]The Gutenberg WordPress Editor will replace the classic WordPress editor, so it will be a very significant change in the way you edit posts and pages in WordPress. [/pullquote] The WordPress Gutenberg Editor is designed to be more like a dynamic page builder for WordPress, allowing you to have more control over the layout of the content of your posts and pages. With the new Gutenberg editor, you can add multiple types of media while editing a WordPress post or page, and then rearrange the layout directly within the editor using Gutenberg Blocks.Download the Free Ebook: The Ultimate Guide to WordPress 5.0 and The Gutenberg Editor
In this guide, we cover everything you need to know about Gutenberg. Contents:
- Introduction to WordPress 5.0
- Before You Update to WordPress 5.0
- What is Gutenberg?
- Why Overhaul the WordPress Editor?
- What Happens to the Classic Editor?
- Introducing Blocks
- What Blocks Are Included?
- Getting to Know the Gutenberg Editor Menu
- Document Settings
- Gutenberg Block Menu Options
- More Gutenberg Options
- Gutenberg Keyboard Shortcuts
- More WordPress Resources
Download the PDF
When Will Gutenberg Be Released?
Gutenberg has been available for some time as a separate plugin, and you can download the Gutenberg plugin here to try it out. [pullquote]Beginning in WordPress version 5.0, Gutenberg will be included in WordPress by default.[/pullquote] According to the WordPress 5.0 release schedule, WordPress 5.0 will be released on November 27, 2018. However, any significant issues with WordPress 5.0 could delay the release until January 22, 2019.What Happens to the Classic WordPress Editor?
You may be wondering, “What happens to the Classic WordPress Editor? Is it going away?” The short answer is no, not completely. The WordPress team had enough forethought to know that some of you may not be completely ready for the new Gutenberg Editor and decided not to leave you hanging. Once WordPress version 5.0 is released, you can still install the WordPress Classic Editor if you don’t want to use use the Gutenberg Editor. The Classic Editor plugin will only be officially supported until December 31, 2021.Why WordPress Gutenberg?
The WordPress Gutenberg editor is designed to make building a WordPress blog or website even more approachable to non-coders. From the Focus Tech and Design Leads post that previewed Gutenberg:The editor will endeavor to create a new page and post building experience that makes writing rich posts effortless, and has “blocks” to make it easy what today might take shortcodes, custom HTML, or “mystery meat” embed discovery.With the use of Gutenberg’s Blocks, the Gutenberg team aims to allow you to make modern post and pages without needing to install a bunch of extra plugins. Gutenberg Blocks add already existing features into the editor, so more people will actually know they are there.
What Are Gutenberg’s Blocks?
The Gutenberg Editor is built on the concept of Blocks. Gutenberg’s Blocks allow you to add all the things to a page or post. From paragraph text, images, video, buttons, widgets and even pullquotes, if you can think of it, Gutenberg’s Blocks can add it to your content.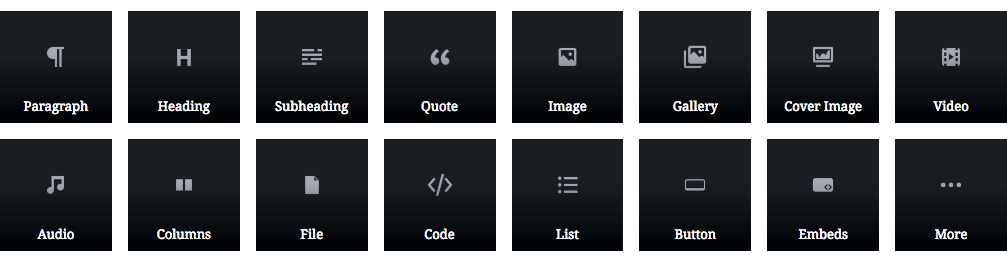 As you can see below, Gutenberg even allows you to drag images from your desktop and drop them directly into a Block to add a gallery to your post.
 To show off Gutenberg’s Blocks, we choose several pictures of blocks (you’re welcome).
 Note: We will go more in-depth on how to use Gutenberg Blocks later. We’ll only cover a broad overview in this post.
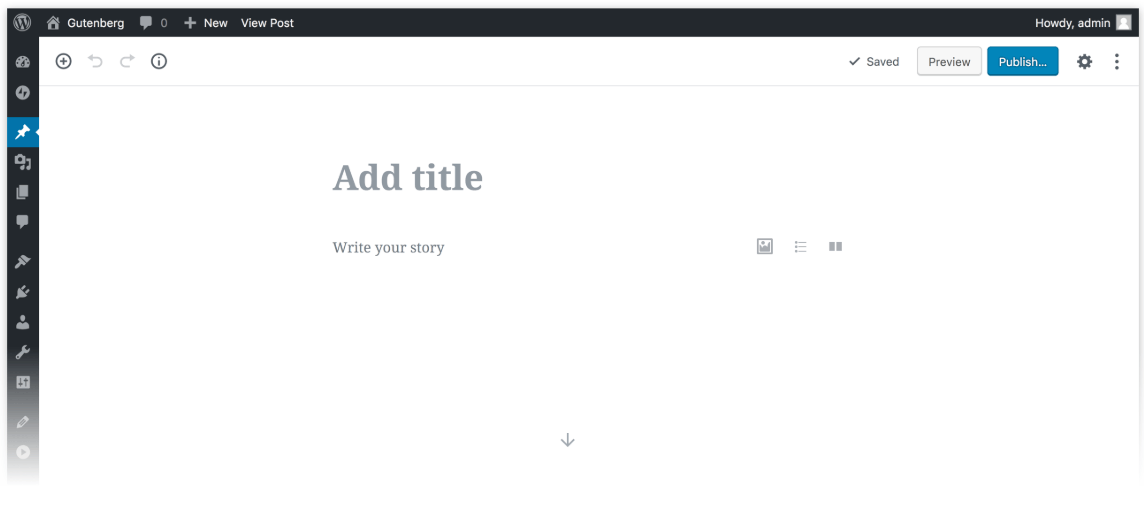
Getting to Know the WordPress Gutenberg Editor Menu
Fist up, let’s dive into the Gutenberg Editor by starting with the options in the top menu.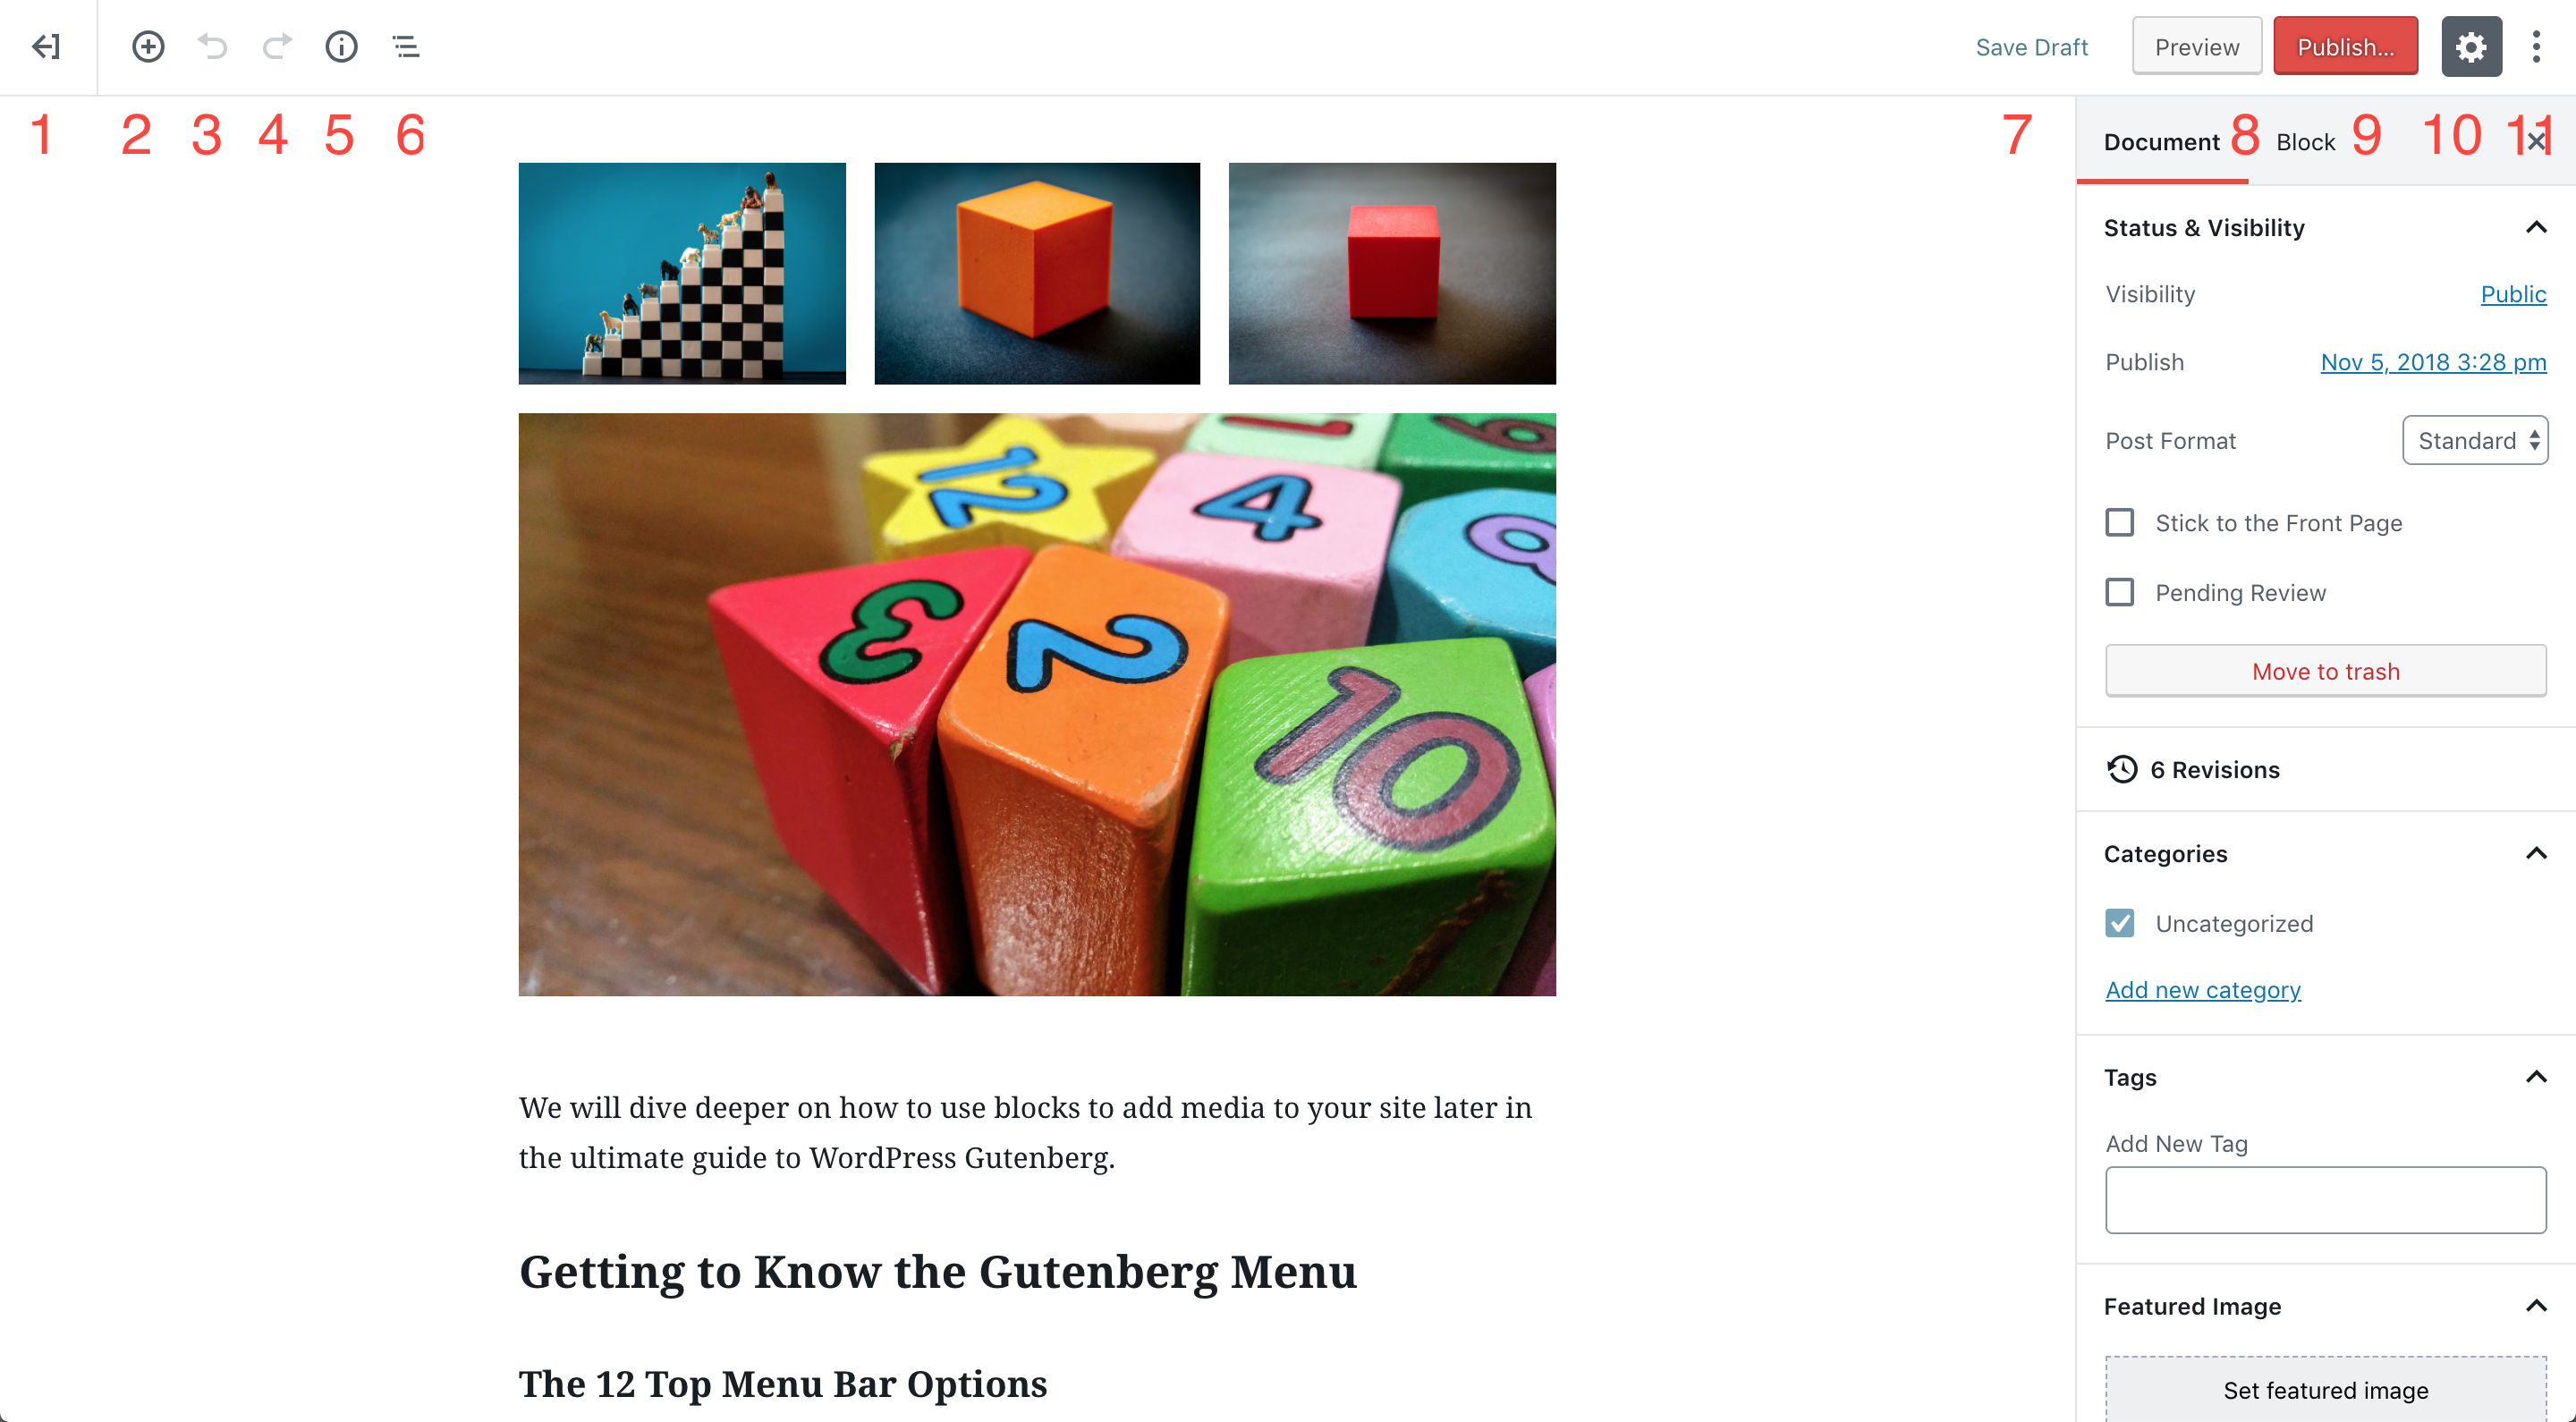
The 11 Top Menu Bar Options
Located at the top of the screen, you’ll see a menu bar with 11 options:- Back
- Add Block
- Undo
- Redo
- Content Structure
- Block Navigation
- Save Draft
- Preview
- Publish
- Settings
- More Options
1. Back
Pressing the Back button will take you back to either the edit all posts or pages page depending on which you are currently editing.2. Add Block
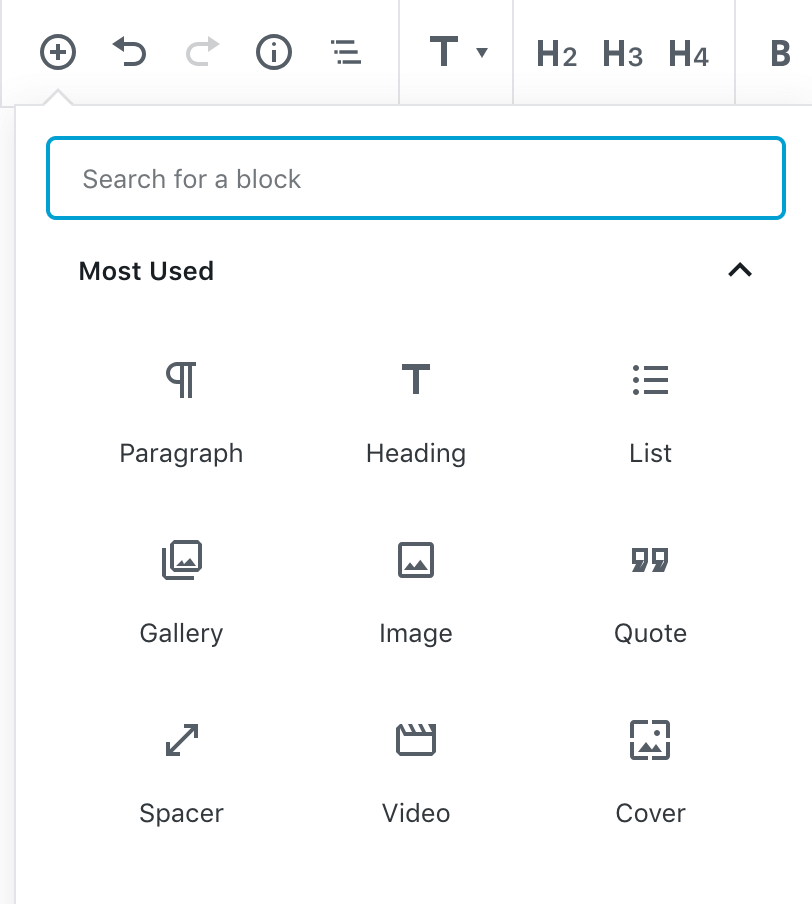 The Add Block option is where you will find the assortment of Gutenberg’s Blocks and embeds you can add to your post and page. You can use the search bar or scroll through the options available on the screen.
The Gutenberg Editor’s “Most Used” Block options include:
The Add Block option is where you will find the assortment of Gutenberg’s Blocks and embeds you can add to your post and page. You can use the search bar or scroll through the options available on the screen.
The Gutenberg Editor’s “Most Used” Block options include:
- Paragraph
- Heading
- List
- Gallery
- Image
- Quote
- Spacer
- Video
- Cover
3. Undo
Undo the last change you made.
4. Redo
Obviously, redo your last undo.5. Content Structure
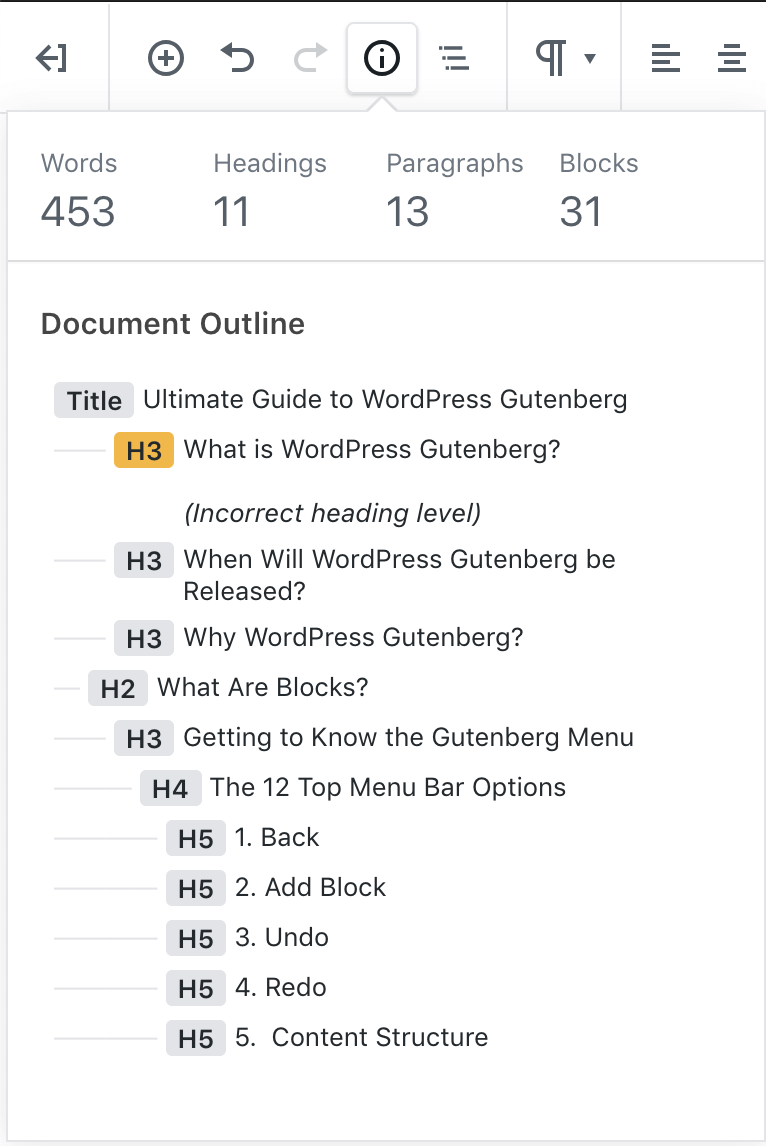 The Content Structure option gives you a quick overview of the content in your current WordPress post or page, including the word count, the number of headings, paragraphs and the number of Blocks.
You can also see a Document outline, which is handy for seeing the way your WordPress post or page is structured with headings.
Using headings (h1, h2, h3, h4, h5, h6) is a great way to divide your content into sections, giving readers a better way to scan the information.
Headings are also important for SEO. Search engines also use headings to better index your content, so use them wisely.
By clicking on the heading, you can quickly jump to the corresponding section on the page.
The Content Structure option gives you a quick overview of the content in your current WordPress post or page, including the word count, the number of headings, paragraphs and the number of Blocks.
You can also see a Document outline, which is handy for seeing the way your WordPress post or page is structured with headings.
Using headings (h1, h2, h3, h4, h5, h6) is a great way to divide your content into sections, giving readers a better way to scan the information.
Headings are also important for SEO. Search engines also use headings to better index your content, so use them wisely.
By clicking on the heading, you can quickly jump to the corresponding section on the page.
6. Block Navigation
Block Navigation allows you to quickly jump between the Gutenberg Blocks in your WordPress post or page.
7. Save Draft
This Save Draft Link is how you can save the current version of your draft. Note that WordPress Gutenberg will constantly auto-save your work, so you may not use the Save Draft button very often.8. Preview
The Preview button will show you what your post or page will look like on the front end of your site once it is published.9. Publish
Clicking the Publish button will make your WordPress post or page available to the public.10. Settings
The Settings wheel toggles the right settings menu on and off.
11. More Tools & Options
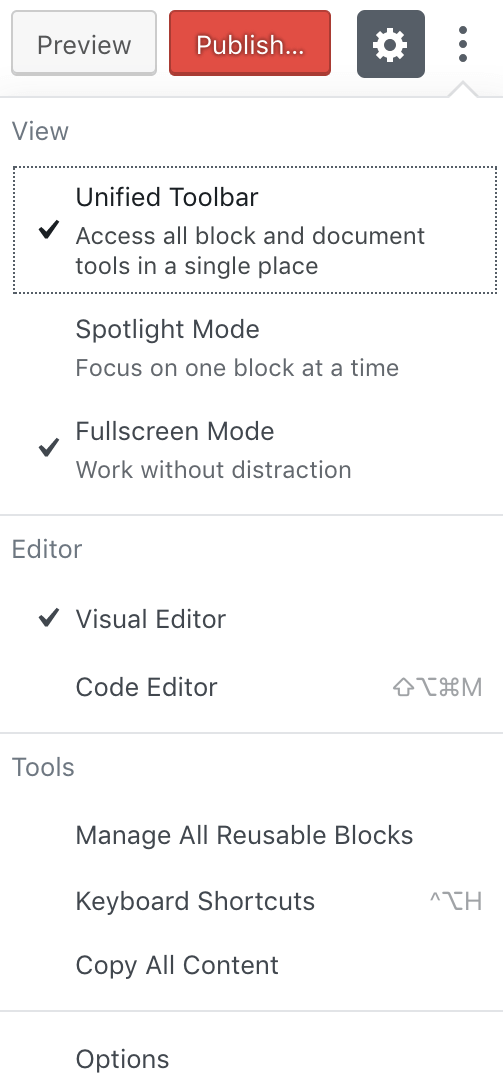 Use the icon with the three vertical dots to display the More Tools & Options menu.
From this menu, you’ll see some additional choices you have for the Gutenberg editor, including the View, Editor options and more Tools.
Views include the Unified Toolbar, Spotlight Mode, Fullscreen mode.
Use the icon with the three vertical dots to display the More Tools & Options menu.
From this menu, you’ll see some additional choices you have for the Gutenberg editor, including the View, Editor options and more Tools.
Views include the Unified Toolbar, Spotlight Mode, Fullscreen mode.
- The Unified Toolbar allows you to access all block and document tools in a single place.
- Spotlight mode allows you to focus on one block at a time.
- Fullscreen Mode allows you to work without distraction by removing unnecessary menu items.
Getting to Know the Document Menu Options
Next, we walk through the Document menu options. You’ll see 10 different options for formatting your “document,” or the content in your WordPress post or page.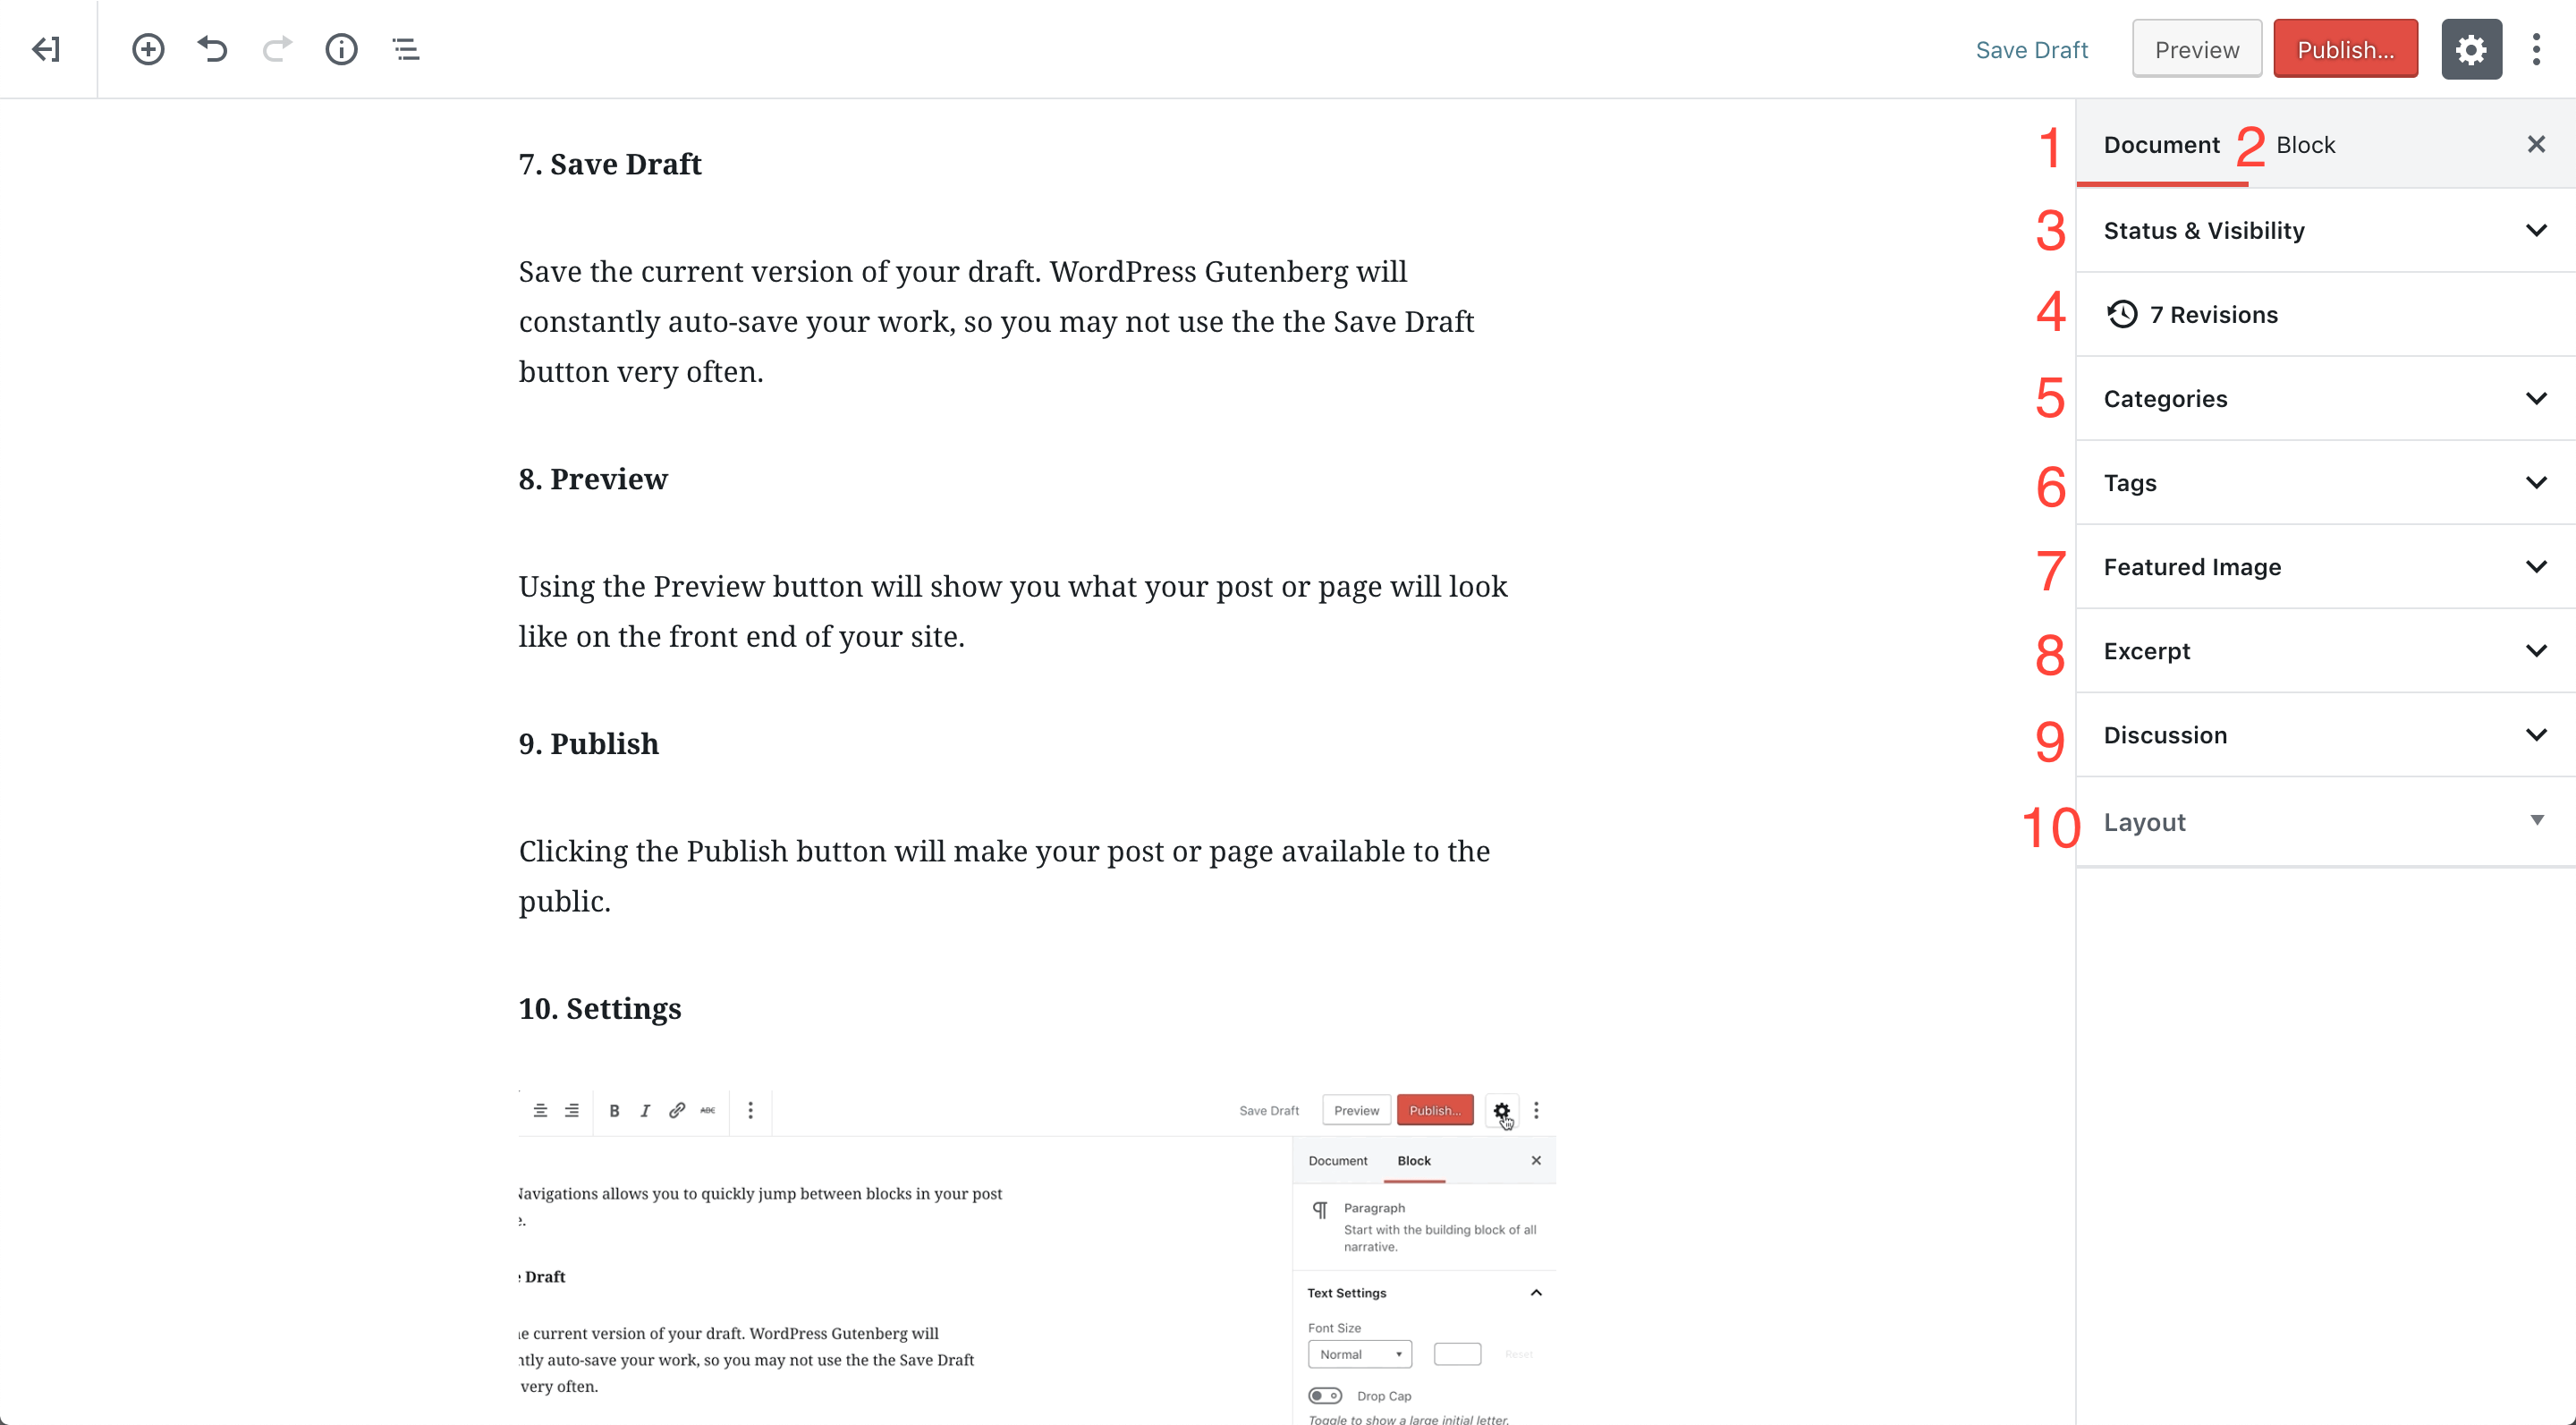
1. Document
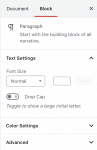
This tab toggles the right menu to display the Document settings.2. Block
Toggle the right tab to display the Block settings.3. Status & Visibility
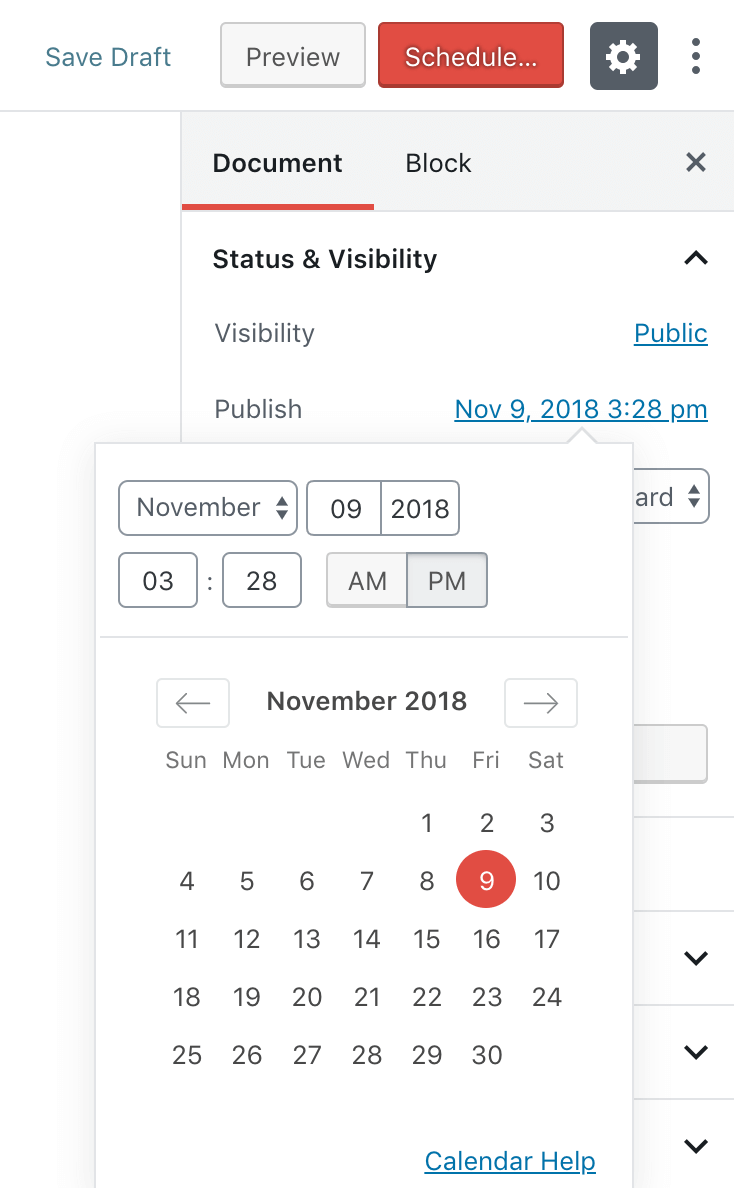 The Status and Visibility section gives an overview of the current status of your post or page.
- Visibility – The Post Visibility option allows you to choose who can see a WordPress post or page once it is published. You can select between Public, Password protected or Private.
- Publish – You can use the Publish option to schedule your post to publish automatically. To schedule a post, select the date and exact time you want your new post or page to go live.
- Post Format – The Post Format link allows you to select the format of your post, including Aside, Link, Image, Quote, Standard or Video.
- Stick to Front Page – Check this box to have a link to your post added to the front page of your site.
- Pending Review – Select this option and save the post to change the post status to pending.
4. Revisions
Clicking the Revisions link will take you to the different versions of your post. You will be able to compare two versions side by side to see the changes that were made and who made them. You can revert your post to an older version from the Revisions page.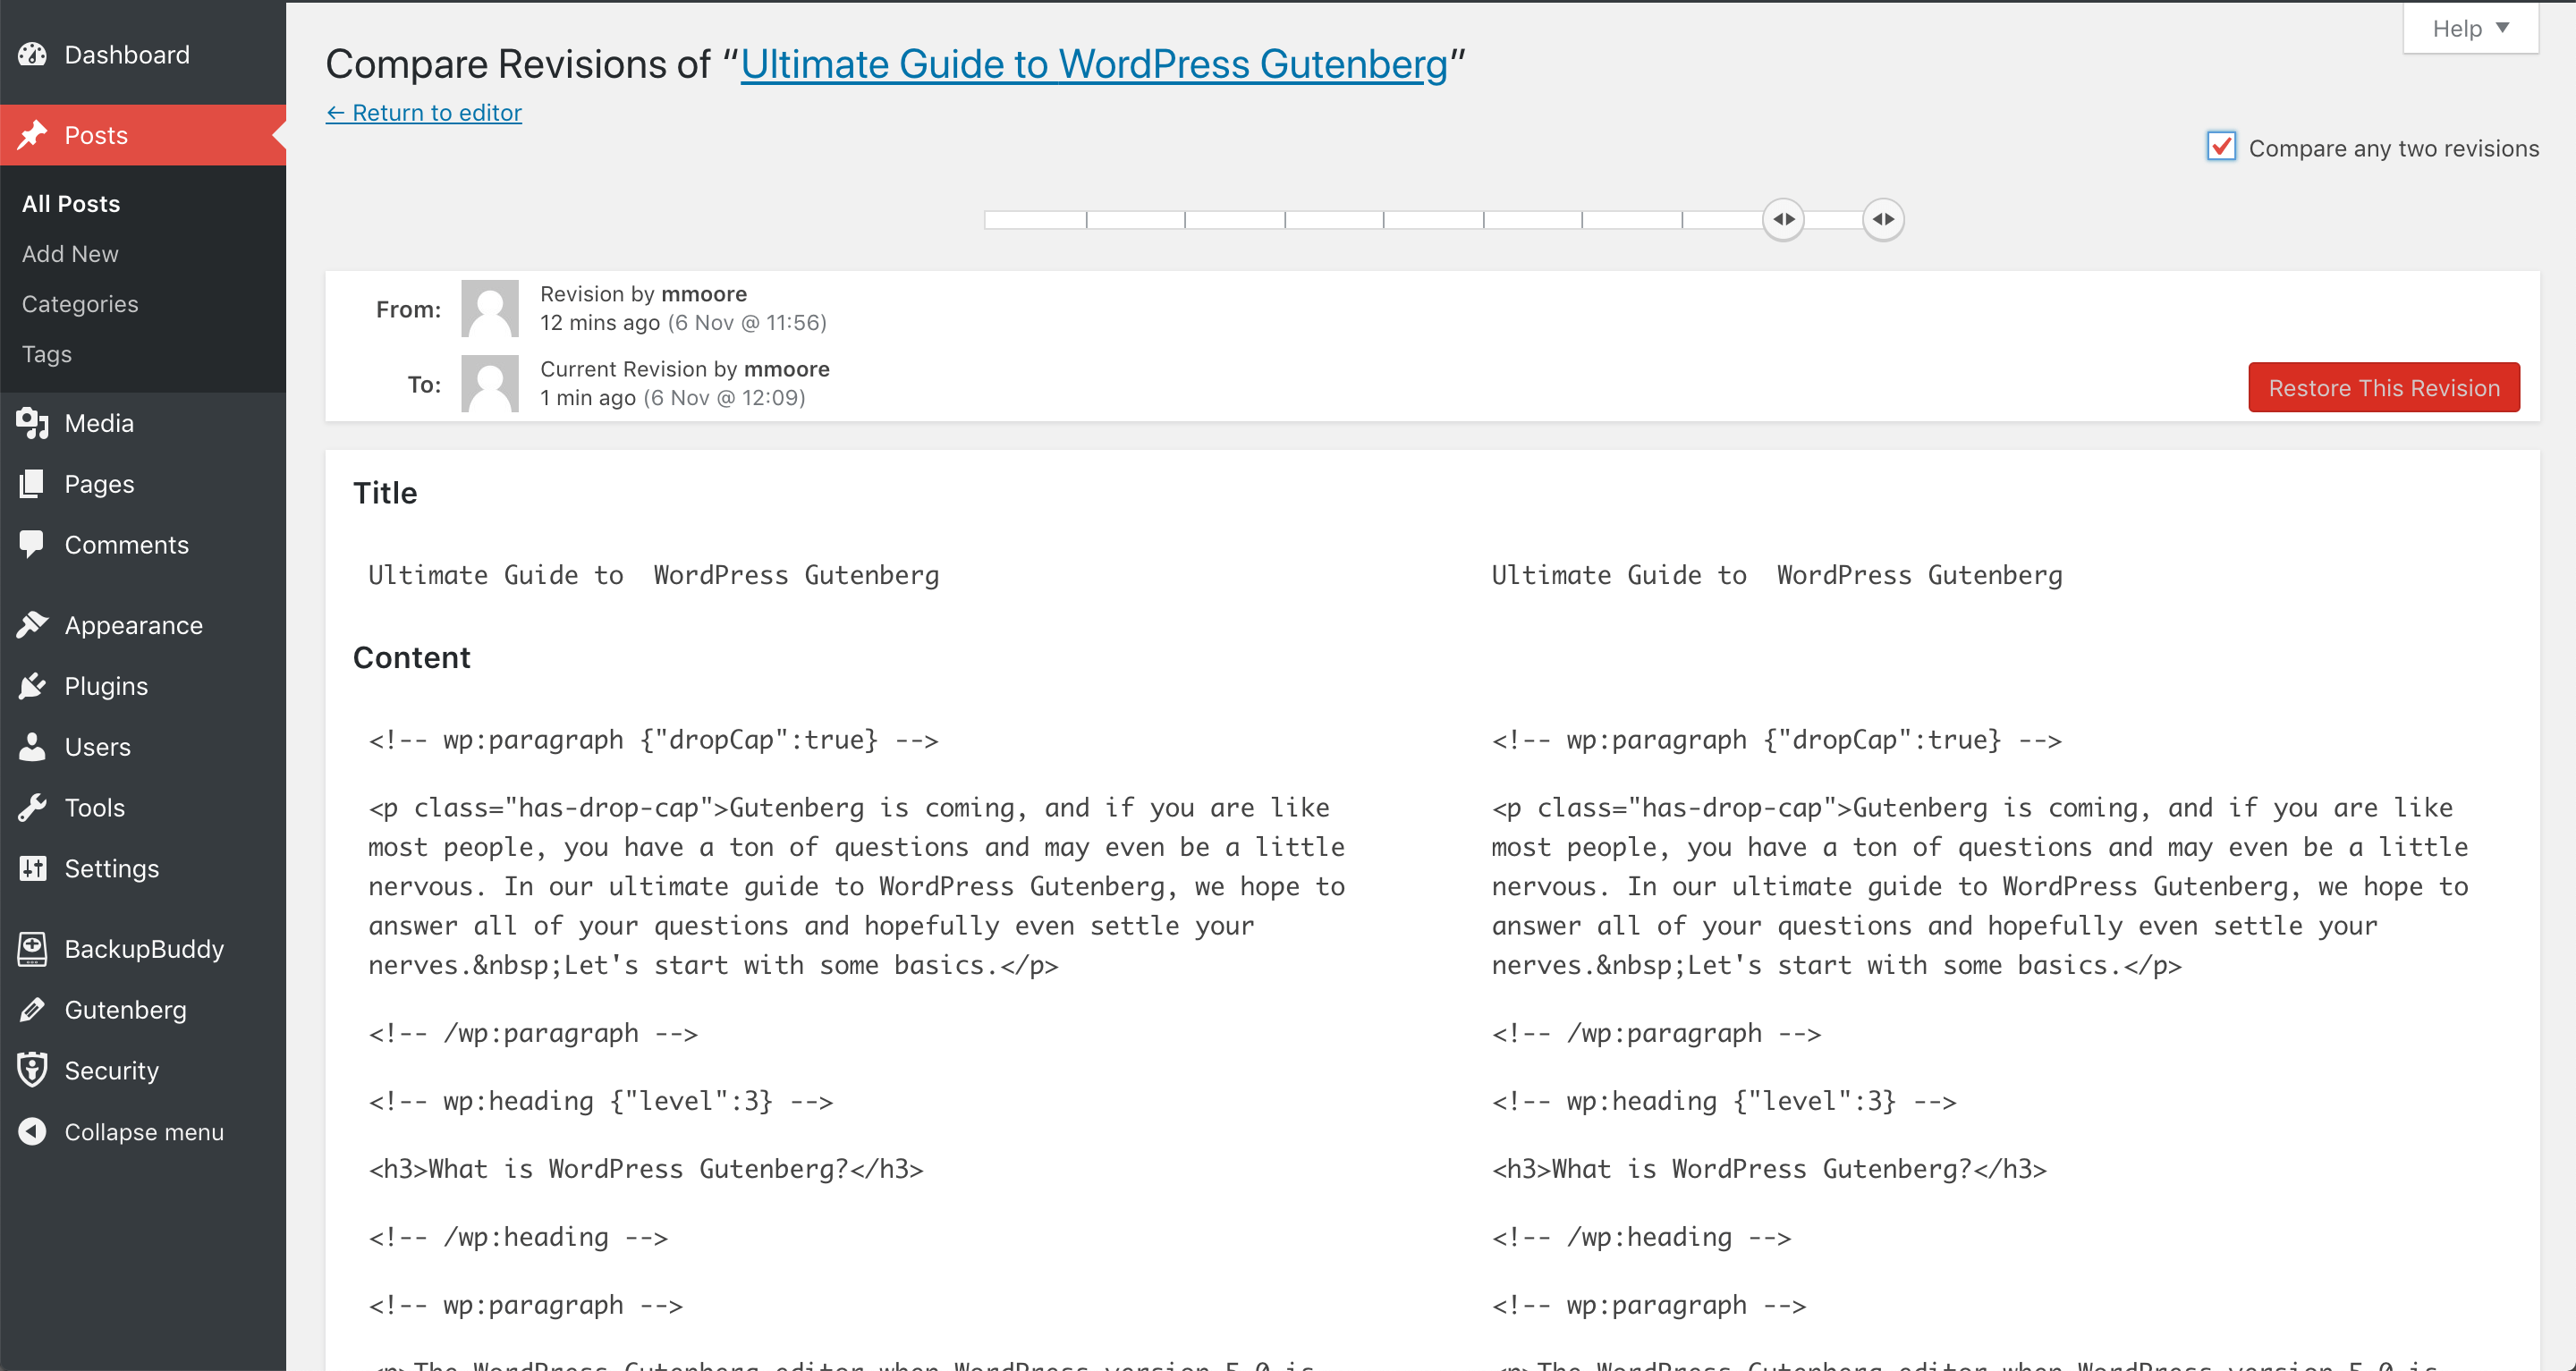
5. Categories
Select a current category or create a new one for your post.6. Tags
Select a current Tag or create a new one for your post.7. Featured Image
Add a Featured Image to your post.8. Excerpt
Create a summary or description for your post. The WordPress Excerpt is an optional summary or description of your post. Excerpts have two uses:- Provides summaries in RSS feeds: Excerpts replace the full content in RSS feeds when the option to display summaries is selected in Dashboard › Settings › Reading.
- In post previews: Depending on the WordPress theme, excerpts can be displayed in places where quick summaries are preferable to full content, such as search results or archives for categories, tags, months and authors.
9. Discussion
Control whether you want to allow users to comment on your WordPress post or page. You can also select if you want to allow Pingbacks & Trackbacks. Trackbacks and pingbacks are methods for alerting blogs that you have linked to them, so they provide a type of “remote” commenting system.- A pingback is a type of comment that’s created when you link to another blog post where pingbacks are enabled. Pingbacks are automated and don’t send any content.
- Trackbacks are a way to notify legacy blog systems that you’ve linked to them. Trackbacks must be created manually, and send an excerpt of the content.
Getting to Know the Gutenberg Block Menu Options
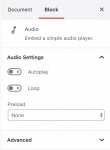
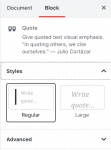
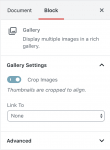
The Block tab on the right side of the screen gives you several options for formatting the Blocks you’ve used. You’ll first need to select the Gutenberg Block you wish to format. The Block Settings allow you to customize each block individually. As you select a Gutenberg Block, the options in this panel will change. Most Gutenberg Block options have to do with formatting and styles. The customizations settings that are available will vary with Block type, but you can see there are tons of options for applying styles and other settings to the Block.
Advanced Gutenberg Block Settings
The Advanced setting allows you to add an additional CSS class to the selected Block. CSS classes can be used by your theme to add additional styles to the Block.Change Block Type
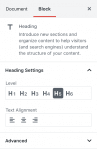
Each Block has an option to change the type. By clicking on a Block you have added and then hovering over the icon on the left, you can change the current Block Type to one of the pre-selected blocks provided to you.Edit Current Block
As you can see below, I was able to use the Change Block Type option to switch my current block from a Paragraph block to a Heading block. Then I was able to use the Edit Current Block options to change the heading size. You will have different quick edit options depending on the type of block that is selected.
More Gutenberg Block Options
 Each Gutenberg Block contains additional options that can be revealed by clicking the icon on the far right side of the menu for the Block.
These additional settings include:
Each Gutenberg Block contains additional options that can be revealed by clicking the icon on the far right side of the menu for the Block.
These additional settings include:
- Hide Block Settings
- Duplicate
- Insert Before
- Insert After
- Edit at HTML
- Add to Reusable Blocks
- Remove Blocks
Hide and Show Block Settings
This option allows you to switch between hiding and showing the right sidebar Block settings. This is helpful if you want to quickly clear up your editing screen.
Insert Before
This is where you can insert a new block above the Block that is currently selected.Insert After
Use this button to insert a new block below the block that is currently selected.Edit as HTML / Edit Visually
This option allows you to switch between editing views, either in HTML or Visually. Editing as HTML could be helpful if you want to see or alter the HTML code output of the Block, such as the div classes or inline styles applied to the block. Switching back to the Edit Visually will return to the default editing screen.Add Reusable Block
With this option, you can save the current Block to use later. This option could be incredibly useful if you use the same text, images or even buttons frequently.
Remove Block
Use this to delete the current block from your page or post.Give Gutenberg a Spin On Your WordPress Website
Now that you know your way around the WordPress Gutenberg editor, it is your turn to have some fun. You can play with the new editor prior to the release of WordPress 5.0 by downloading the Gutenberg plugin and installing it on your WordPress website.Join us for the next Solid Academy Webinar!
Free weekly webinars that will help you master WordPress and increase your business's bottom line.
What is a WordPress Phishing Attack?
Learn how to identify and prevent phishing attacks on WordPress websites.
Kiki SheldonWebsite Protection: 5 Ways to Keep Your Website Safe
Robust website protection is the shield that stands between your business and relentless cyber attacks. Prioritizing website protection enables businesses to fortify defenses to safeguard their online presence and preserve the trust of their customers in the face of ever-evolving cybersecurity threats.
Kiki Sheldon23 Ideas To Grow Your WordPress Business in 2023
WordPress is the most popular website-building platform worldwide, trusted by numerous brands. WordPress enables you to build a user-friendly and highly reliable site, together with tools and plugins to enhance your marketing and work like a lead magnet. All these features make WordPress the platform chosen by more than 43% of businesses globally.
SolidWP Editorial TeamSign up now — Get SolidWP updates and valuable content straight to your inbox
Sign up
Get started with confidence — risk free, guaranteed


