BackupBuddy University: 7 Types of Backup Email Notifications
BackupBuddy's email notifications are a useful feature to enable so you always know the status of your website backups. You can get email updates about your scheduled backups, remote destination file transfers and Stash Live Snapshots, plus important notifications if your backups encounter issues.

BackupBuddy’s email notifications are a useful feature to enable so you always know the status of your website backups. You can get email updates about your scheduled backups, remote destination file transfers and Stash Live Snapshots, plus important notifications if your backups encounter issues.
In this guide, we’ll cover the different types of email notifications you can receive from BackupBuddy, plus how to customize the emails that BackupBuddy sends.
How to Enable Email Notifications in BackupBuddy
If email is still the best way to reach you, turning on email notifications about your website backups is a great way to add some peace of mind to your inbox.
BackupBuddy’s general backup email notifications are located on the BackupBuddy > Settings page. From your WordPress admin dashboard, navigate to the Settings page within the BackupBuddy plugin menu.

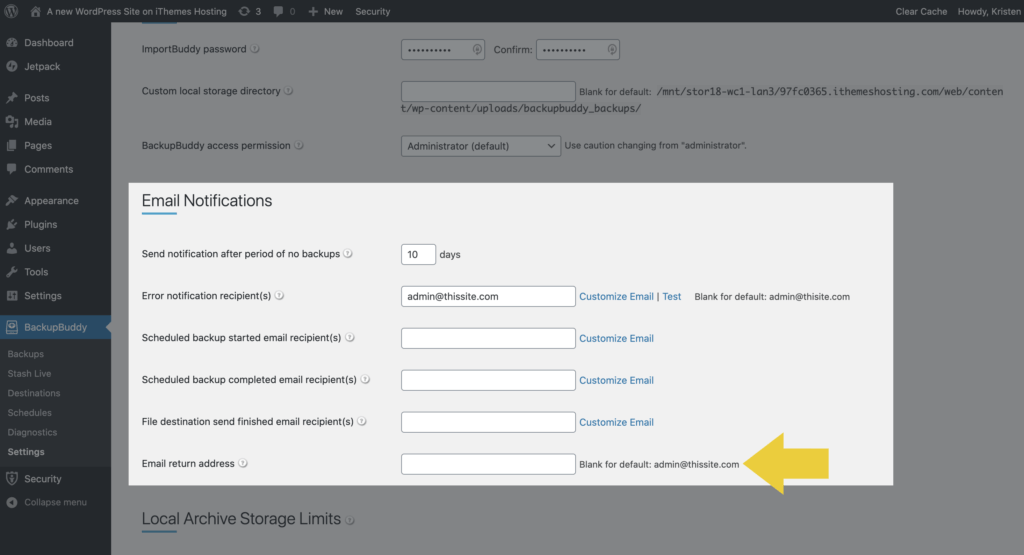
Click the General Settings tab and locate the Email Notifications section. This is where you can configure email notifications for the initiation of backups, backup completions, backup errors and if no backups are completed in a set number of days. This setting also allows you to customize notification emails and the email return address.
The 7 Types of Backup Email Notifications
BackupBuddy can send several types of email notifications. Let’s cover each in more detail.
1. Scheduled Backup Started
BackupBuddy’s backup schedules are a powerful way to let BackupBuddy handle your backups for you. Once backup schedules are set up, you won’t have to do anything else—BackupBuddy will just run your backups automatically on the schedule you need. Want to get the most out of backup schedules? Here are 10 tips for WordPress backup schedules.
This email notification will alert you via email when a scheduled backup has started. In the Scheduled backup started email recipient(s) field, you can add an email address to send this email notification.
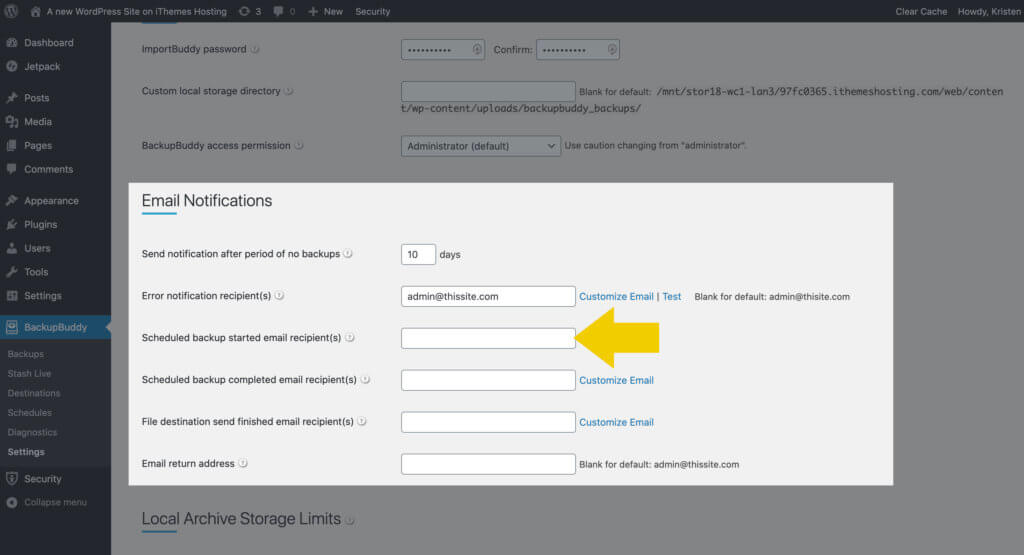
Need to add multiple email addresses? Use commas to separate multiple email addresses.
Click the Customize Email link to reveal additional fields for customizing the subject and body text of the email with available text variables.
Available email variables include:
{site_url}– The site URL{backupbuddy_version}– The currently-installed version of BackupBuddy{current_datetime}– The current date and time{message}– The default message generated for this email notification.
2. Scheduled Backup Completed
Once your scheduled backup has completed, you can get an email to let you know. In the Scheduled backup completed email recipient(s) field, enter the email address you wish to use for this email notification. You can use commas to add multiple email addresses.
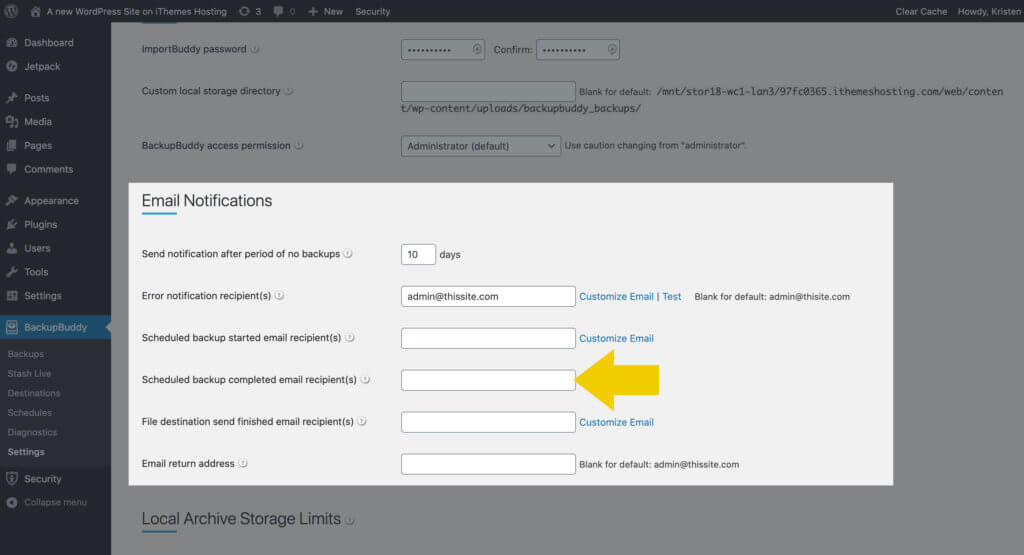
To the right of this field, click the Customize Email link to reveal fields to customize the subject and body of the email.
{site_url}– The site URL{backupbuddy_version}– The currently-installed version of BackupBuddy{current_datetime}– The current date and time{message}– The default message generated for this email notification.{download_link}– A download link for the backup file{backup_size}– The size of the backup file{backup_type}– The backup type{backup_file}– The backup file{backup_serial}– The serial number for the backup
3. Backup Error
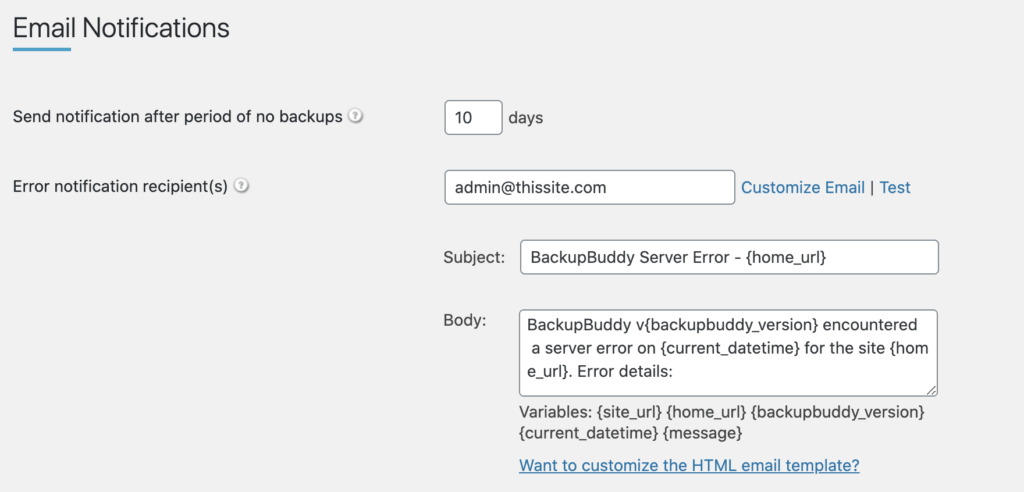
If a backup encounters any errors while running a backup, that’s important information to know. In the Error notification recipient(s) field, add an email address (or addresses) that will receive an email notification should the backup encounter any issues. You can also Test this email to make sure BackupBuddy can successfully send the email from your server.
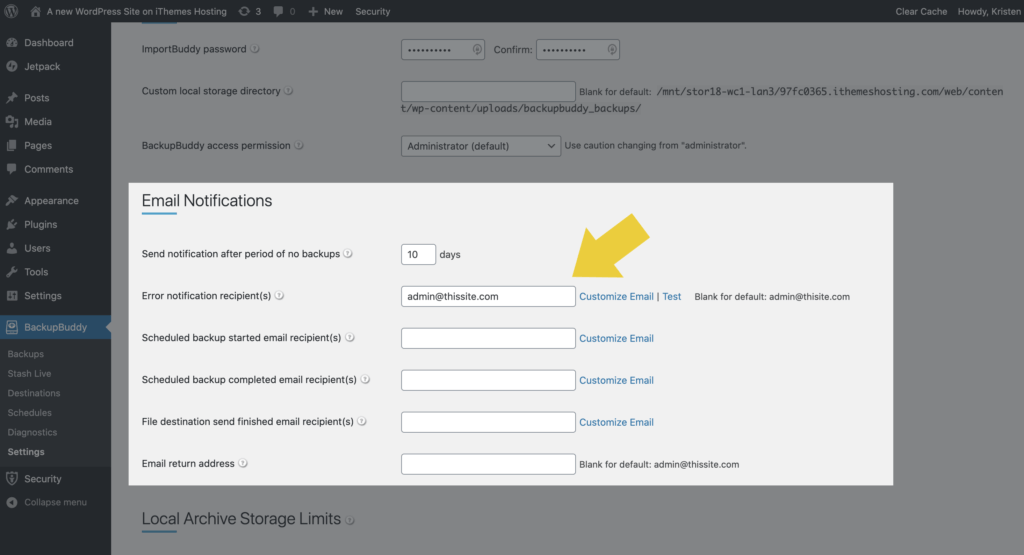
BackupBuddy will include more details about the error in the emails. Should you receive a backup error email, be sure to ping the BackupBuddy support team by opening a ticket at the iThemes Help Desk. Support can help troubleshoot why the backup had issues and help you adjust any advanced settings that could help resolve the issue.
Email variables for the error notification email include
{site_url}– The site URL{backupbuddy_version}– The currently-installed version of BackupBuddy{current_datetime}– The current date and time{message}– The default message generated for this email notification.
4. No Backups in [X] Days
Need to know if a backup hasn’t completed in a few days? If your website changes frequently and it’s important that a backup completes, this email notification can alert you if a certain amount of days have passed without a backup. Keep in mind that setting up backup schedules will automatically run backups so you don’t have to perform backups manually.
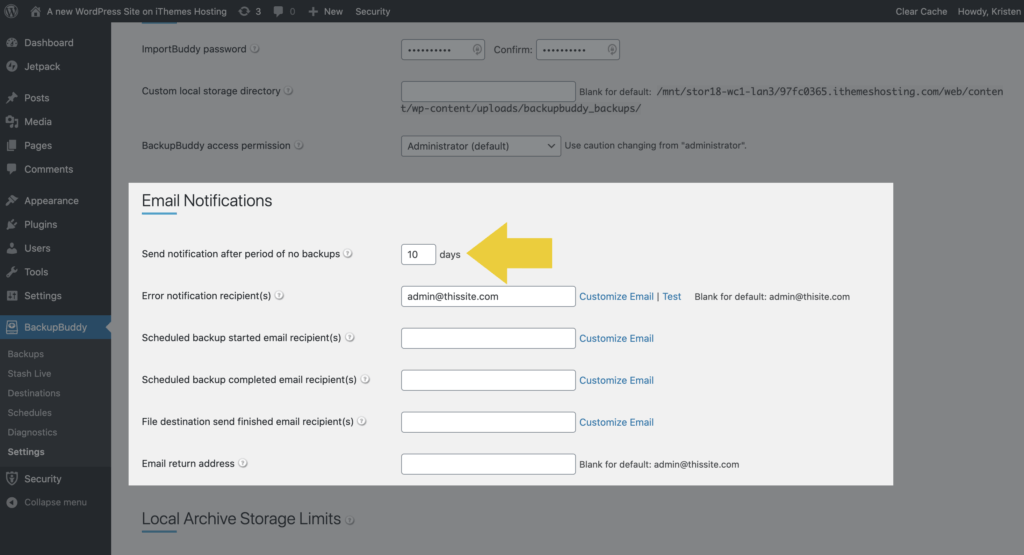
In the Send notification after period of no backups field, you can configure the maximum number of days that are allowed to pass with no new backups created before BackupBuddy will send you an alert email notification. Just note that alert notification emails will only be sent once every 24 hours at most.
5. File Destination Send Finished
Your WordPress backup strategy isn’t complete without a secure, off-site place to store your backup files. In the BackupBuddy plugin, these are called Remote Destinations, and you have several options for where to send your backups for safekeeping. Read more: The Complete Guide to Remote Destinations for WordPress Backups.
You can be alerted when BackupBuddy completes the action of sending a backup file to one of your remote destination with the File Destination Send Finished email notification.
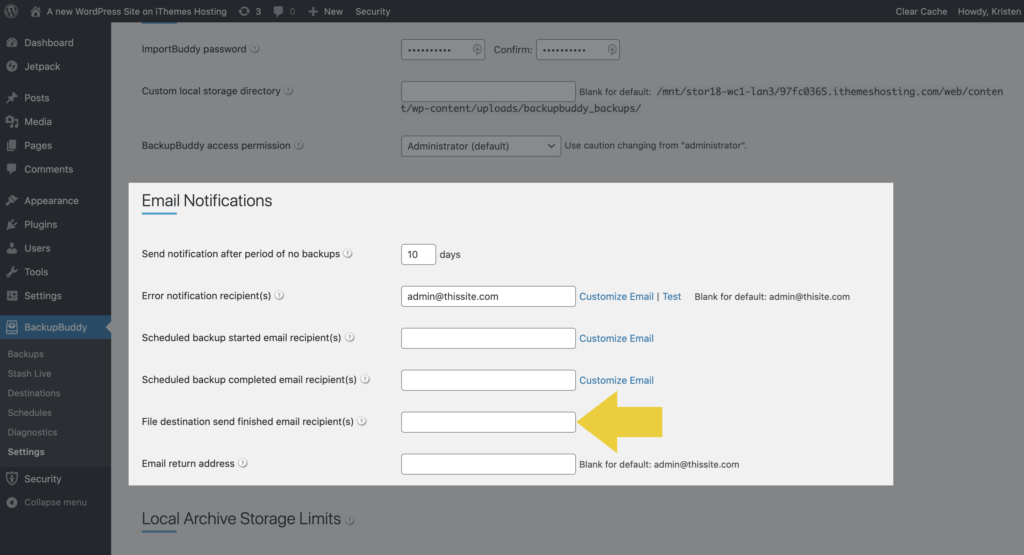
In the File destination send finished email recipient(s) field, you can add an email address for this notification. Use commas to separate multiple email addresses.
Email variables for this email include:
{site_url}– The site URL{backupbuddy_version}– The currently-installed version of BackupBuddy{current_datetime}– The current date and time{message}– The default message generated for this email notification.
6. Stash Live Snapshot Success
Stash Live is BackupBuddy’s automatic, cloud-based WordPress backup feature. Stash Live is included for free for all BackupBuddy customers, with 1GB+ of free BackupBuddy Stash storage space, so it makes sense to take advantage of this feature within BackupBuddy. You can learn more in: BackupBuddy University: Stash Live.
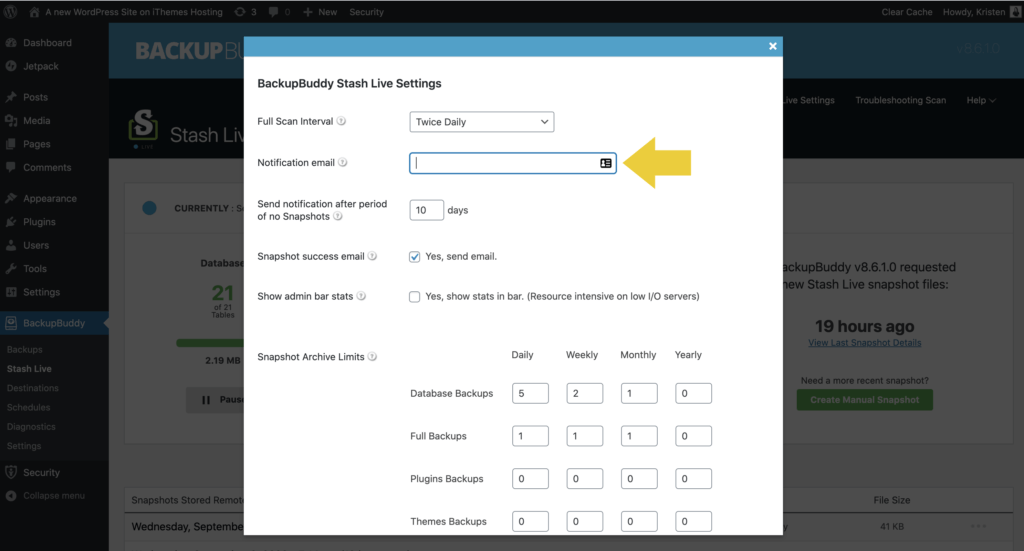
Once you have Stash Live set up (which is as simple as entering your iThemes customer username and password), you can start receiving email notifications about your Snapshots, the types of backups that Stash Live performs.
To configure your Stash Live email notifications, visit the BackupBuddy > Stash Live page within the BackupBuddy plugin menu in your WordPress admin dashboard. Click the Settings link in the upper right corner. Just keep in mind that this email is set up for you when you first turn on Stash Live.
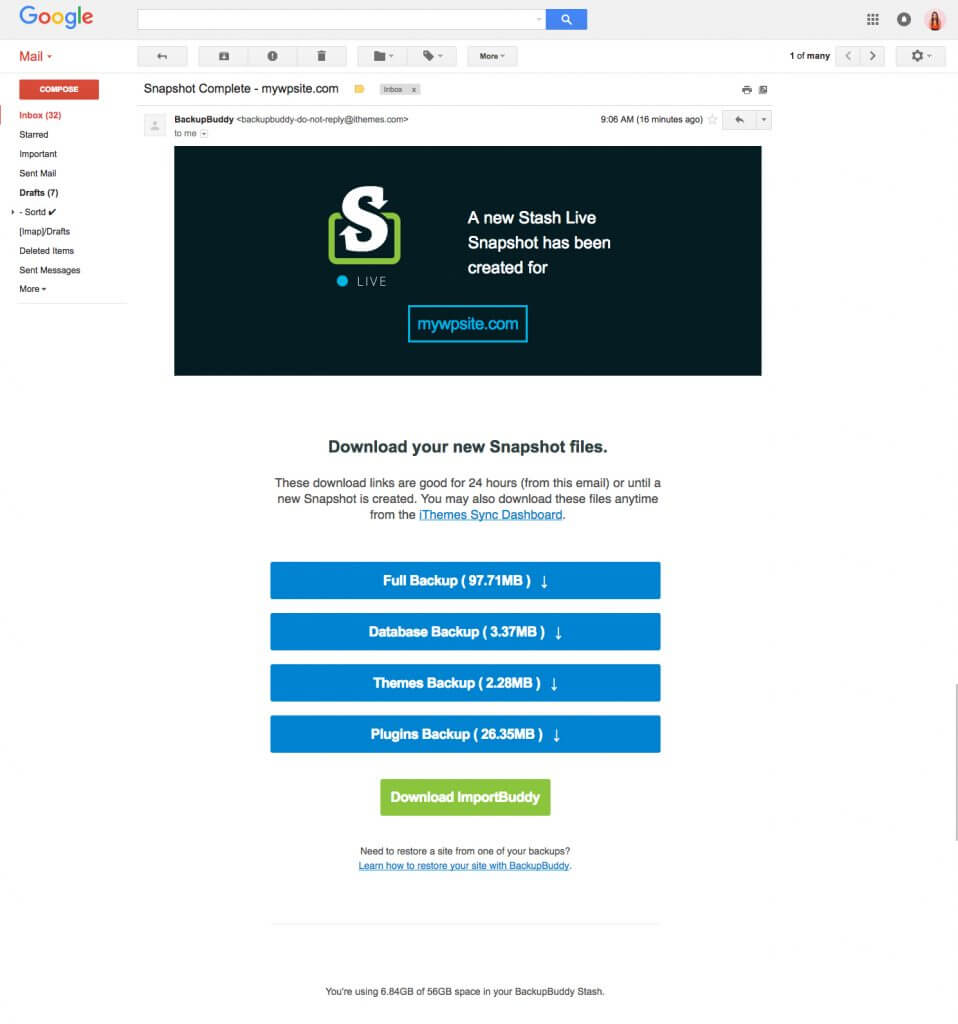
The email you receive from Stash Live has direct download links for your Snapshot backup files, which is pretty cool.
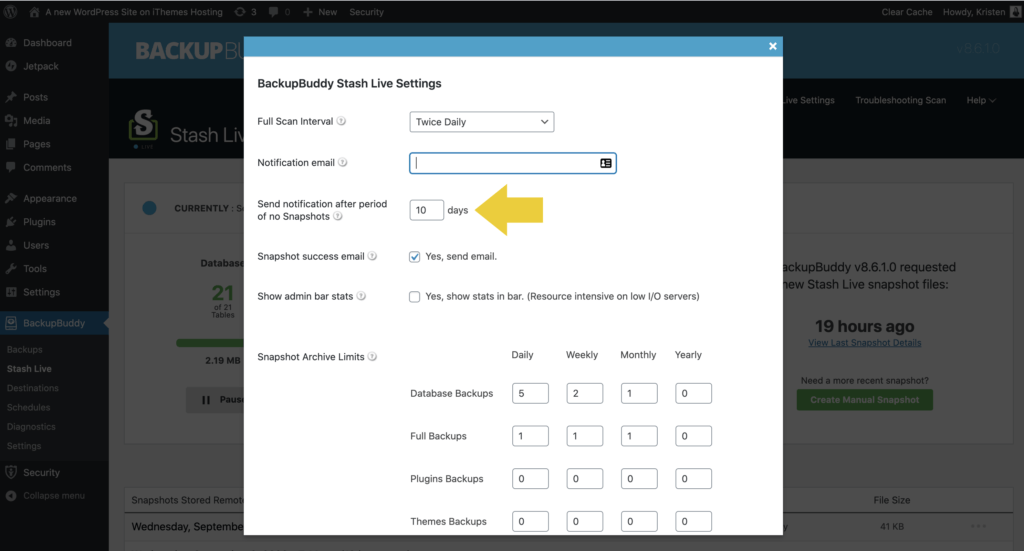
7. No Stash Live Snapshot in Days
If Snapshots haven’t occurred in a certain amount of days, BackupBuddy can let you know. Again from your Stash Live settings, add the number of days in the Send notification after period of no Snapshots field.
Customizing Backup Email Notifications
There are a few ways to further customize the emails that BackupBuddy sends. Here are a few customization options.
Email Return Address
You can customize the email address listed as the “from” email address for any emails sent by BackupBuddy. Leave blank (default) to use the WordPress admin email.
Subject & Body of Email
Email Notifications available from the BackupBuddy’s General Settings have the option to customize the subject and body with your own text. Just click the Customize Email link next to any of the fields to reveal the email customizer.
Email Variables
An email variable or placeholder is a dynamic field that can be added to email templates. These “smart fields” generate content that is specific to your site information or to BackupBuddy.
For each email notification with customization options, several email variables are available. You’ll see the list of available email variables for each email beneath the customization fields. Here are some of the email variables that can be used in your email notifications.
{site_url}– The site URL{backupbuddy_version}– The currently-installed version of BackupBuddy{current_datetime}– The current date and time{message}– The default message generated for this email notification.{download_link}– A download link for the backup file{backup_size}– The size of the backup file{backup_type}– The backup type{backup_file}– The backup file{backup_serial}– The serial number for the backup
Custom HTML Email Template (How to Whitelabel Emails for Clients!)
If you build or maintain websites for clients and want to whitelabel the email notifications BackupBuddy sends, you can do so if you’re familiar with HTML email templates. Just note this takes some more advanced coding skills and familiarity with email template code, structure and development.
To customize BackupBuddy’s HTML email template, you’ll need to access a file manager on your website’s server.
Navigate to the /wp-content/plugins/backupbuddy/plugin directory, then to the /views/backupbuddy-email-template.php file. This is the default email template BackupBuddy uses to send notifications.
Copy the default template backupbuddy-email-template.php into the theme directory at /wp-content/themes/backupbuddy-email-template.php.
You may then edit this new file to your liking with your logo, colors, etc.

Get BackupBuddy, the 3-in-1 WordPress Backup Plugin
BackupBuddy, our WordPress backup plugin, can backup, restore and migrate your WordPress website to a new host or domain. Then store your backups safely off-site with BackupBuddy Stash, our secure, remote backup storage destination (you get 1GB free with your BackupBuddy subscription!)
Get BackupBuddy now
Join us for the next Solid Academy Webinar!
Free weekly webinars that will help you master WordPress and increase your business's bottom line.
What is a WordPress Phishing Attack?
Learn how to identify and prevent phishing attacks on WordPress websites.
Kiki SheldonWebsite Protection: 5 Ways to Keep Your Website Safe
Robust website protection is the shield that stands between your business and relentless cyber attacks. Prioritizing website protection enables businesses to fortify defenses to safeguard their online presence and preserve the trust of their customers in the face of ever-evolving cybersecurity threats.
Kiki Sheldon23 Ideas To Grow Your WordPress Business in 2023
WordPress is the most popular website-building platform worldwide, trusted by numerous brands. WordPress enables you to build a user-friendly and highly reliable site, together with tools and plugins to enhance your marketing and work like a lead magnet. All these features make WordPress the platform chosen by more than 43% of businesses globally.
SolidWP Editorial TeamSign up now — Get SolidWP updates and valuable content straight to your inbox
Sign up
Get started with confidence — risk free, guaranteed

