How to Restore a Website with BackupBuddy and Manually Extracted Files
When you restore a WordPress website using BackupBuddy, ImportBuddy (the BackupBuddy restore script) will automatically unzip the backup zip file for you. There are two methods of unzipping that can be used: PclZip and Command Line Zip through the PHP exec function. But what happens if neither of these methods are available to be used within your server environment?

 Fortunately, ImportBuddy allows you to manually unzip the backup file and then you can go ahead with the restore.
The steps to restore a website with manually unzipped files are:
Fortunately, ImportBuddy allows you to manually unzip the backup file and then you can go ahead with the restore.
The steps to restore a website with manually unzipped files are:
- 1. Download your BackupBuddy backup and importbuddy.php files
- 2. Extract your files from the backup .zip file you downloaded
- 3. Upload all your files to the site directory
- 4. Start import and use Advanced Settings to skip the extraction
- 5. Follow the rest of the ImportBuddy steps as normal
Download Your Backup Zip File and ImportBuddy.php
We always recommend that you store your BackupBuddy backup files and a copy of ImportBuddy in a secure, remote off-site location such as BackupBuddy Stash in case you’re not able to access your server. If you’ve done that already, you can download the backup zip file you want to use to restore your site from that remote destination. If you still need to do this and can still access your server, you’ll be able to find your backups in/wp-content/uploads/backupbuddy_backups on your server.
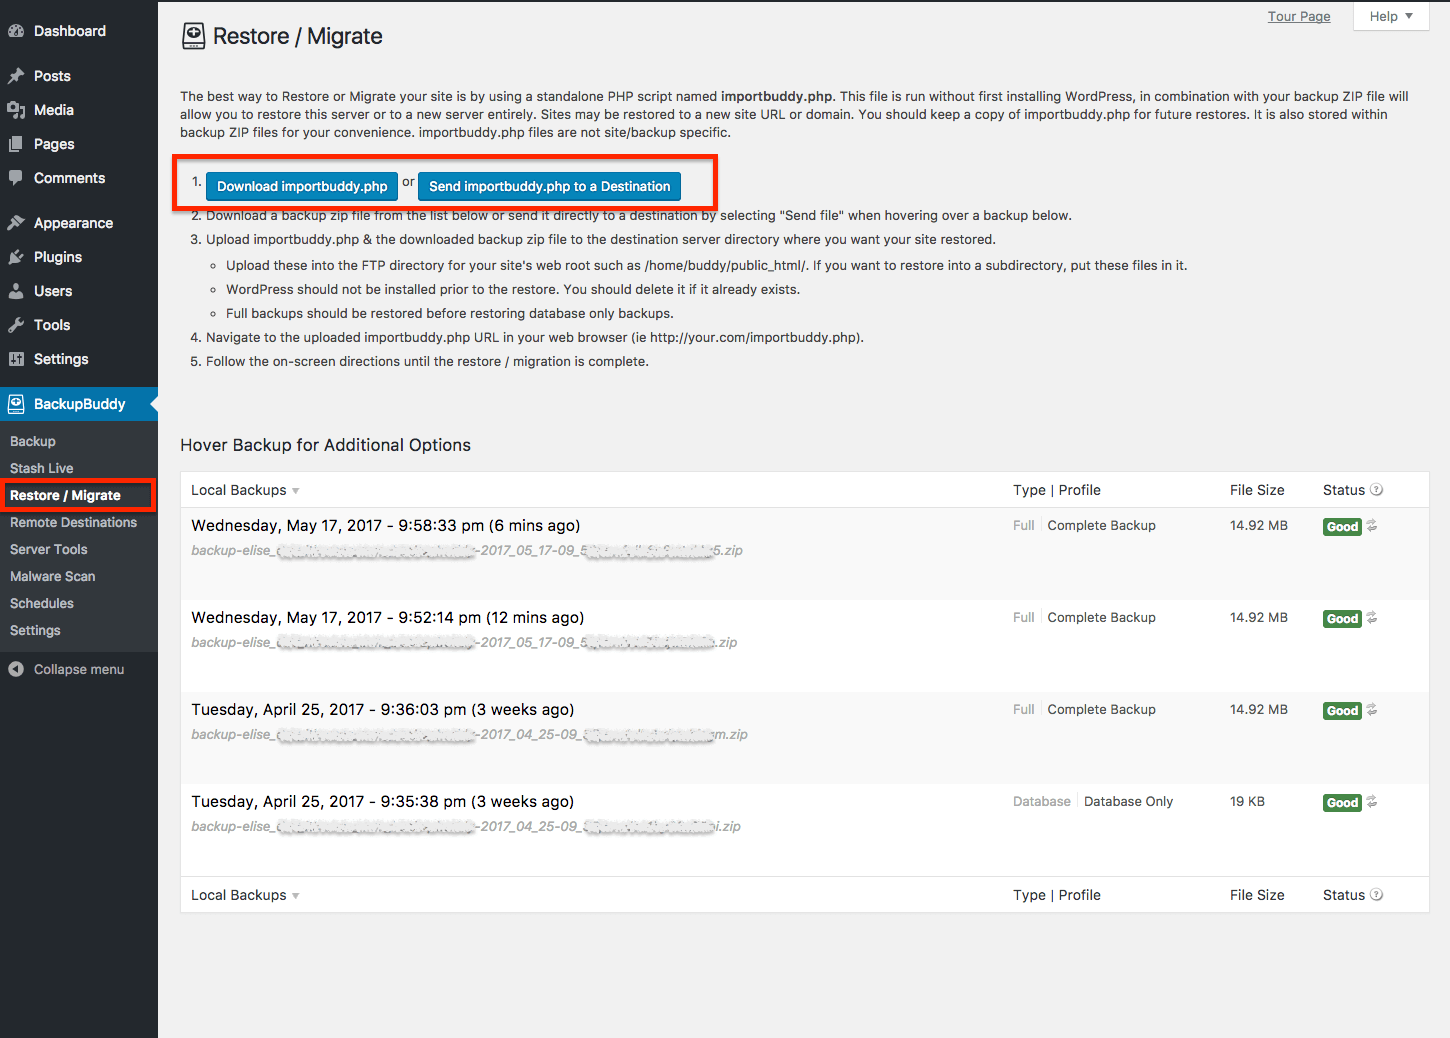
If you can access your website, you can download the necessary backup files from the BackupBuddy > Restore/Migrate menu in your WordPress admin dashboard. This is also where you can download the importbuddy.php file.
Extracting Files from Your Backup Zip
Let’s go over how to extract the files from the backup zip and then we can go over the changes we need to make in ImportBuddy.Windows
To extract data from a zip file within Windows simply right-click the zip file you wish to extract files from. Then select Extract All… which will then open a dialog box asking you to select the location on your PC where you want the files to be extracted. Where you extract the files to is up to you; just remember the location where you have extracted the files from your backup.Mac/OSX
To extract data on OSX start you can simply double-click on the backup .zip file. This should start extracting the files into a folder with the same name as the backup and in the same location as the backup zip file. If double-clicking on the zip file does not start extracting the files automatically you can always right-click and then select Open With -> Archive Utility.cPanel File Manager
In some versions of the file manager in your cPanel, you can extract files from a zip file within the user interface. To do this, open the cPanel file manager on your host. Navigate to the zip file you wish to extract files from. Once there right-click the zip file and then select Extract. A dialog box will appear asking you to select a location for the extracted files; where you choose to store the files is up to you. If you plan on restoring immediately, extract the files to the location where you want your site to save yourself a step of having to move the files manually.Starting the Import Process of Your Restore with Your Extracted Files
Once your files have been extracted and are located on your local computer we need to upload them to where you want to restore your site. Using your preferred FTP program, upload all the files to the directory where you’d like to restore the site. Remember, you need 3 things to restore a BackupBuddy backup:- All the files that you extracted from the backup
- The backup .zip file
- ImportBuddy.php
Use Advanced Options to Skip the Extraction
Now that you have everything uploading to the location you wish to restore to, it’s time to begin the import. To start the import process please navigate to the importbuddy.php script through the URL bar in your preferred browser. ex: mynewsite.com/importbuddy.php After you have entered in the password for your ImportBuddy script you will be on Step 1. Click the Advanced Options button. Now tick the checkbox for the Skip unzipping or opening archive (for manual extraction) setting.

Complete the Website Restore Process
After you have enabled the setting, continue the import as normal and follow the steps until the end.Get BackupBuddy Today
BackupBuddy is the 3-in-1 WordPress backup plugin to backup, restore and migrate your WordPress website.Buy BackupBuddy Now
Join us for the next Solid Academy Webinar!
Free weekly webinars that will help you master WordPress and increase your business's bottom line.
What is a WordPress Phishing Attack?
Learn how to identify and prevent phishing attacks on WordPress websites.
Kiki SheldonWebsite Protection: 5 Ways to Keep Your Website Safe
Robust website protection is the shield that stands between your business and relentless cyber attacks. Prioritizing website protection enables businesses to fortify defenses to safeguard their online presence and preserve the trust of their customers in the face of ever-evolving cybersecurity threats.
Kiki Sheldon23 Ideas To Grow Your WordPress Business in 2023
WordPress is the most popular website-building platform worldwide, trusted by numerous brands. WordPress enables you to build a user-friendly and highly reliable site, together with tools and plugins to enhance your marketing and work like a lead magnet. All these features make WordPress the platform chosen by more than 43% of businesses globally.
SolidWP Editorial TeamSign up now — Get SolidWP updates and valuable content straight to your inbox
Sign up
Get started with confidence — risk free, guaranteed

