How to Add WordPress Security Logs to Your Website
WordPress security logs provide detailed data and insights about activity on your WordPress website. If you know what to look for in your logs, you can easily identify and stop malicious behavior on your site. In this post, you'll learn how to add security logs to your WordPress website, what events you should record and why tracking these events is so important.

Benefits of WordPress Security Logs
WordPress security logs have several benefits in your overall security strategy. [pullquote]If your site does get hacked, you will want to have the best information to aide in a quick investigation and recovery.[/pullquote]- 1. Identity and stop malicious behavior.
- 2. Spot activity that can alert you of a breach.
- 3. Assess how much damage was done.
- 4. Aide in the repair of a hacked site.
How To Add WordPress Security Logs to Your Website
You can use some of the developer functions and filters that WordPress provides to create a logging system, but the easiest way to start a security log is to install a WordPress security plugin like iThemes Security that will automatically keep track of site and user activity.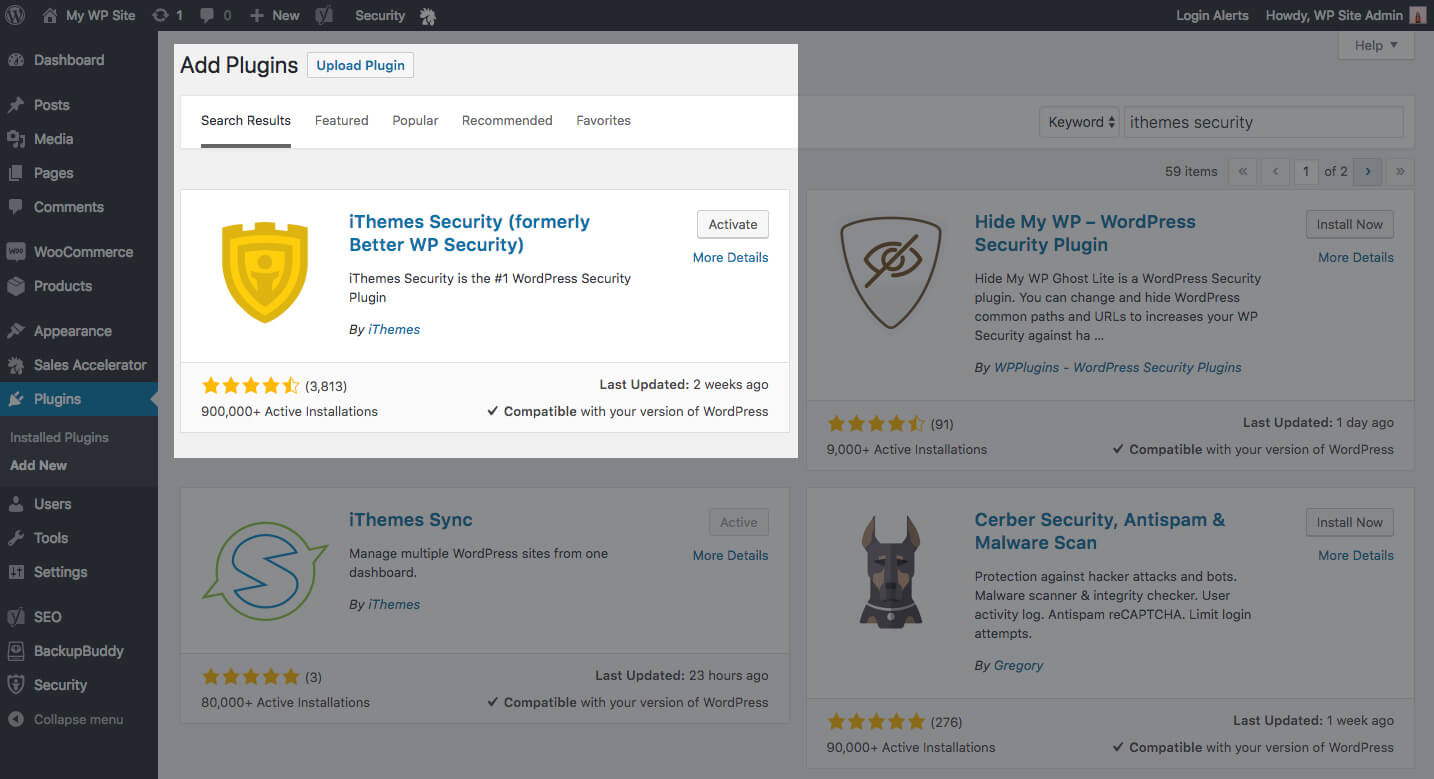 Once you’ve installed and activated the iThemes Security plugin, enable the following features in iThemes Security to get the most out of your security logs:
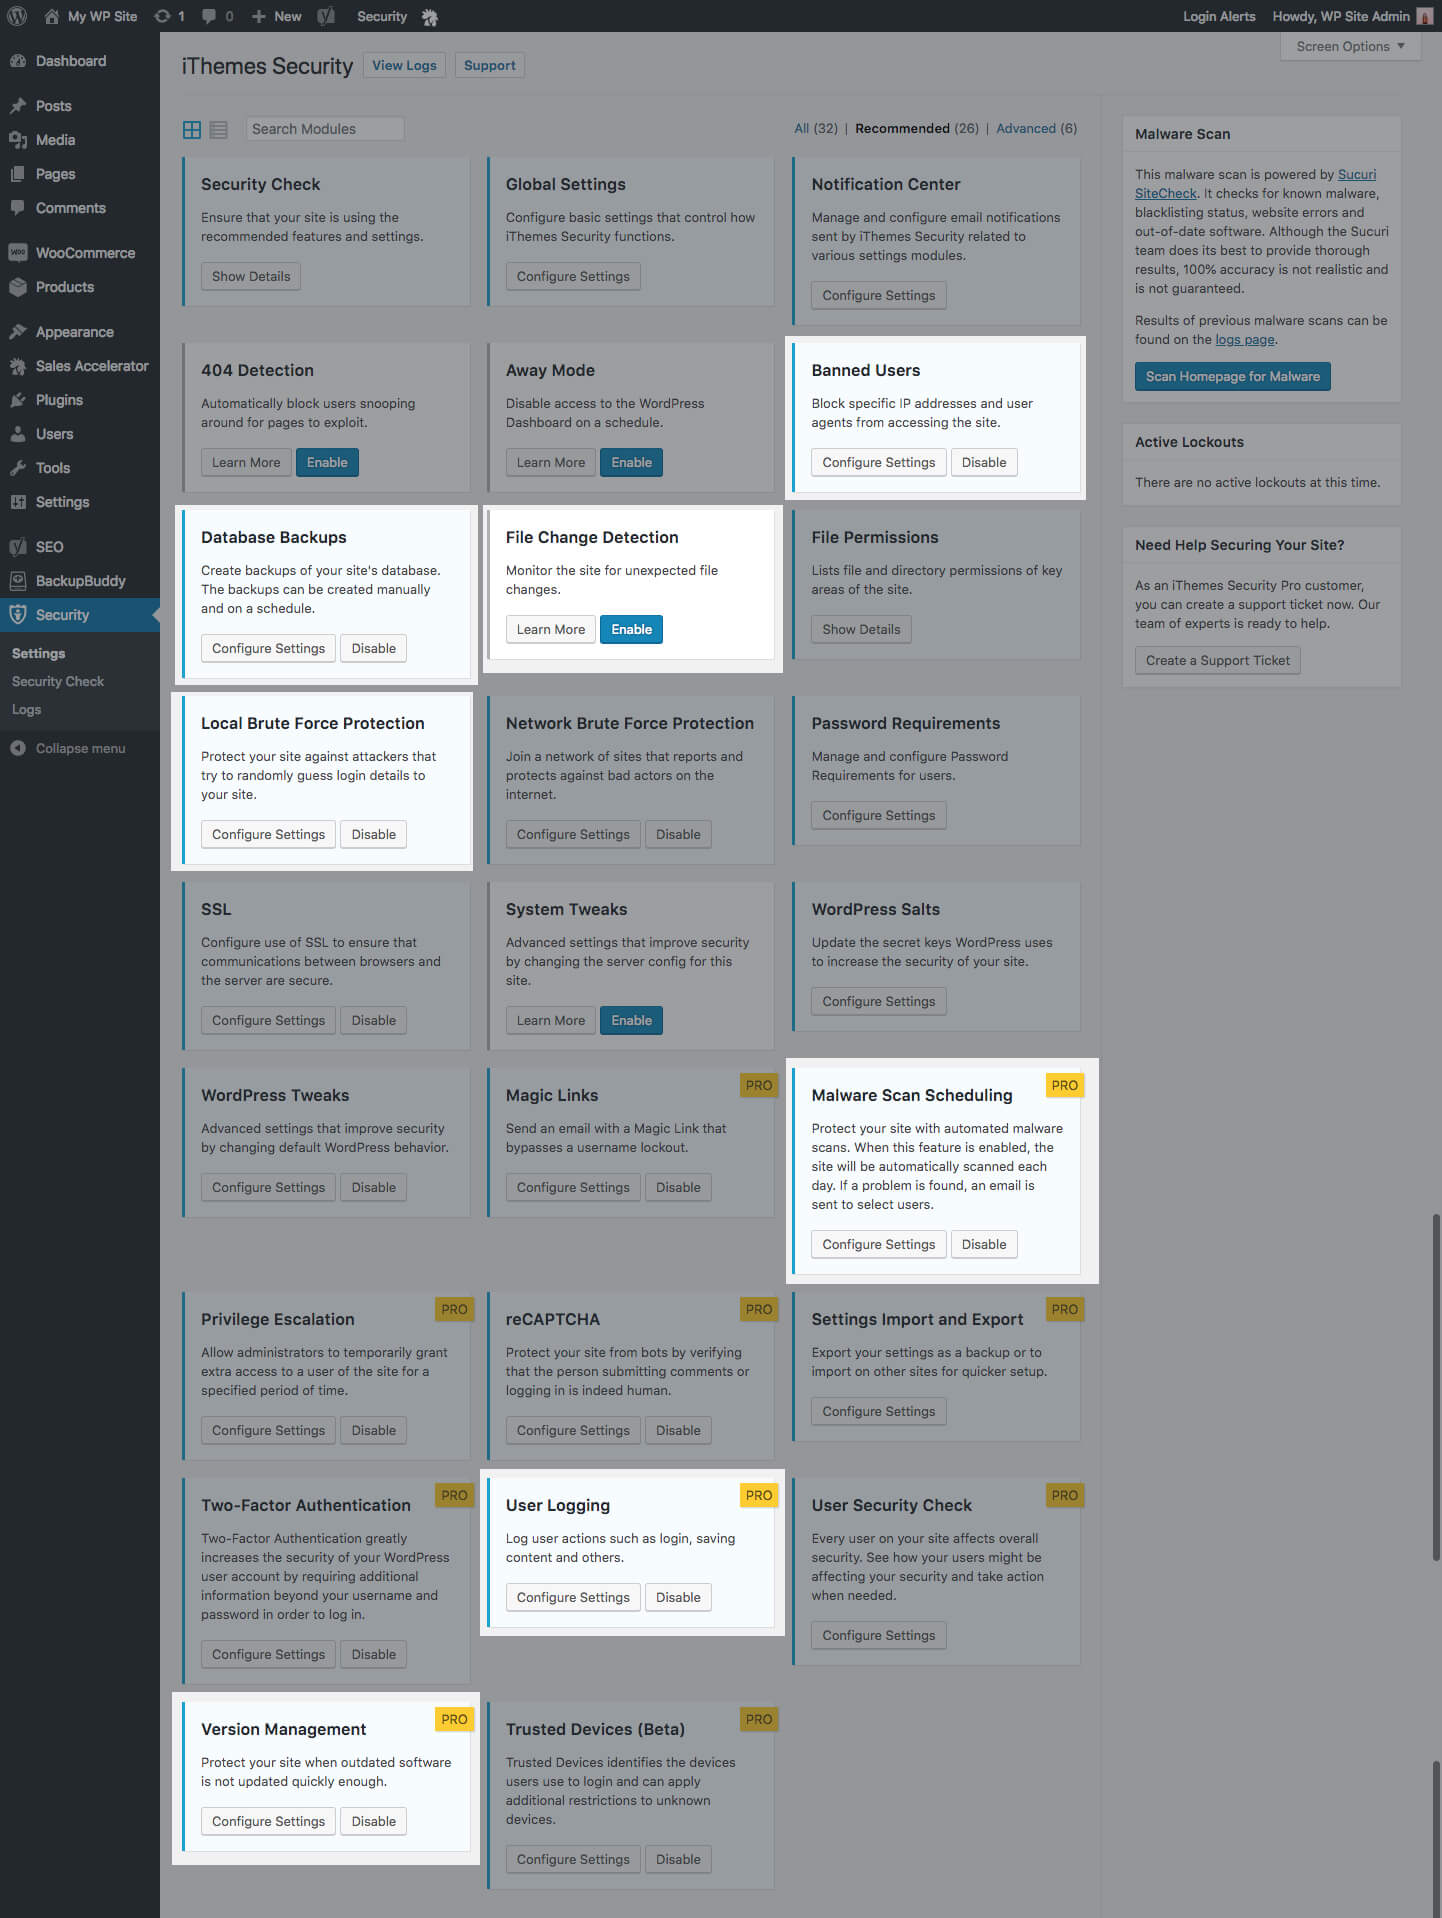
- Local Brute Force Protection
- Banned Users
- Database Backups
- File Change Detection
- Malware Scan Scheduling Pro
- User Logging Pro
- Version Management Pro
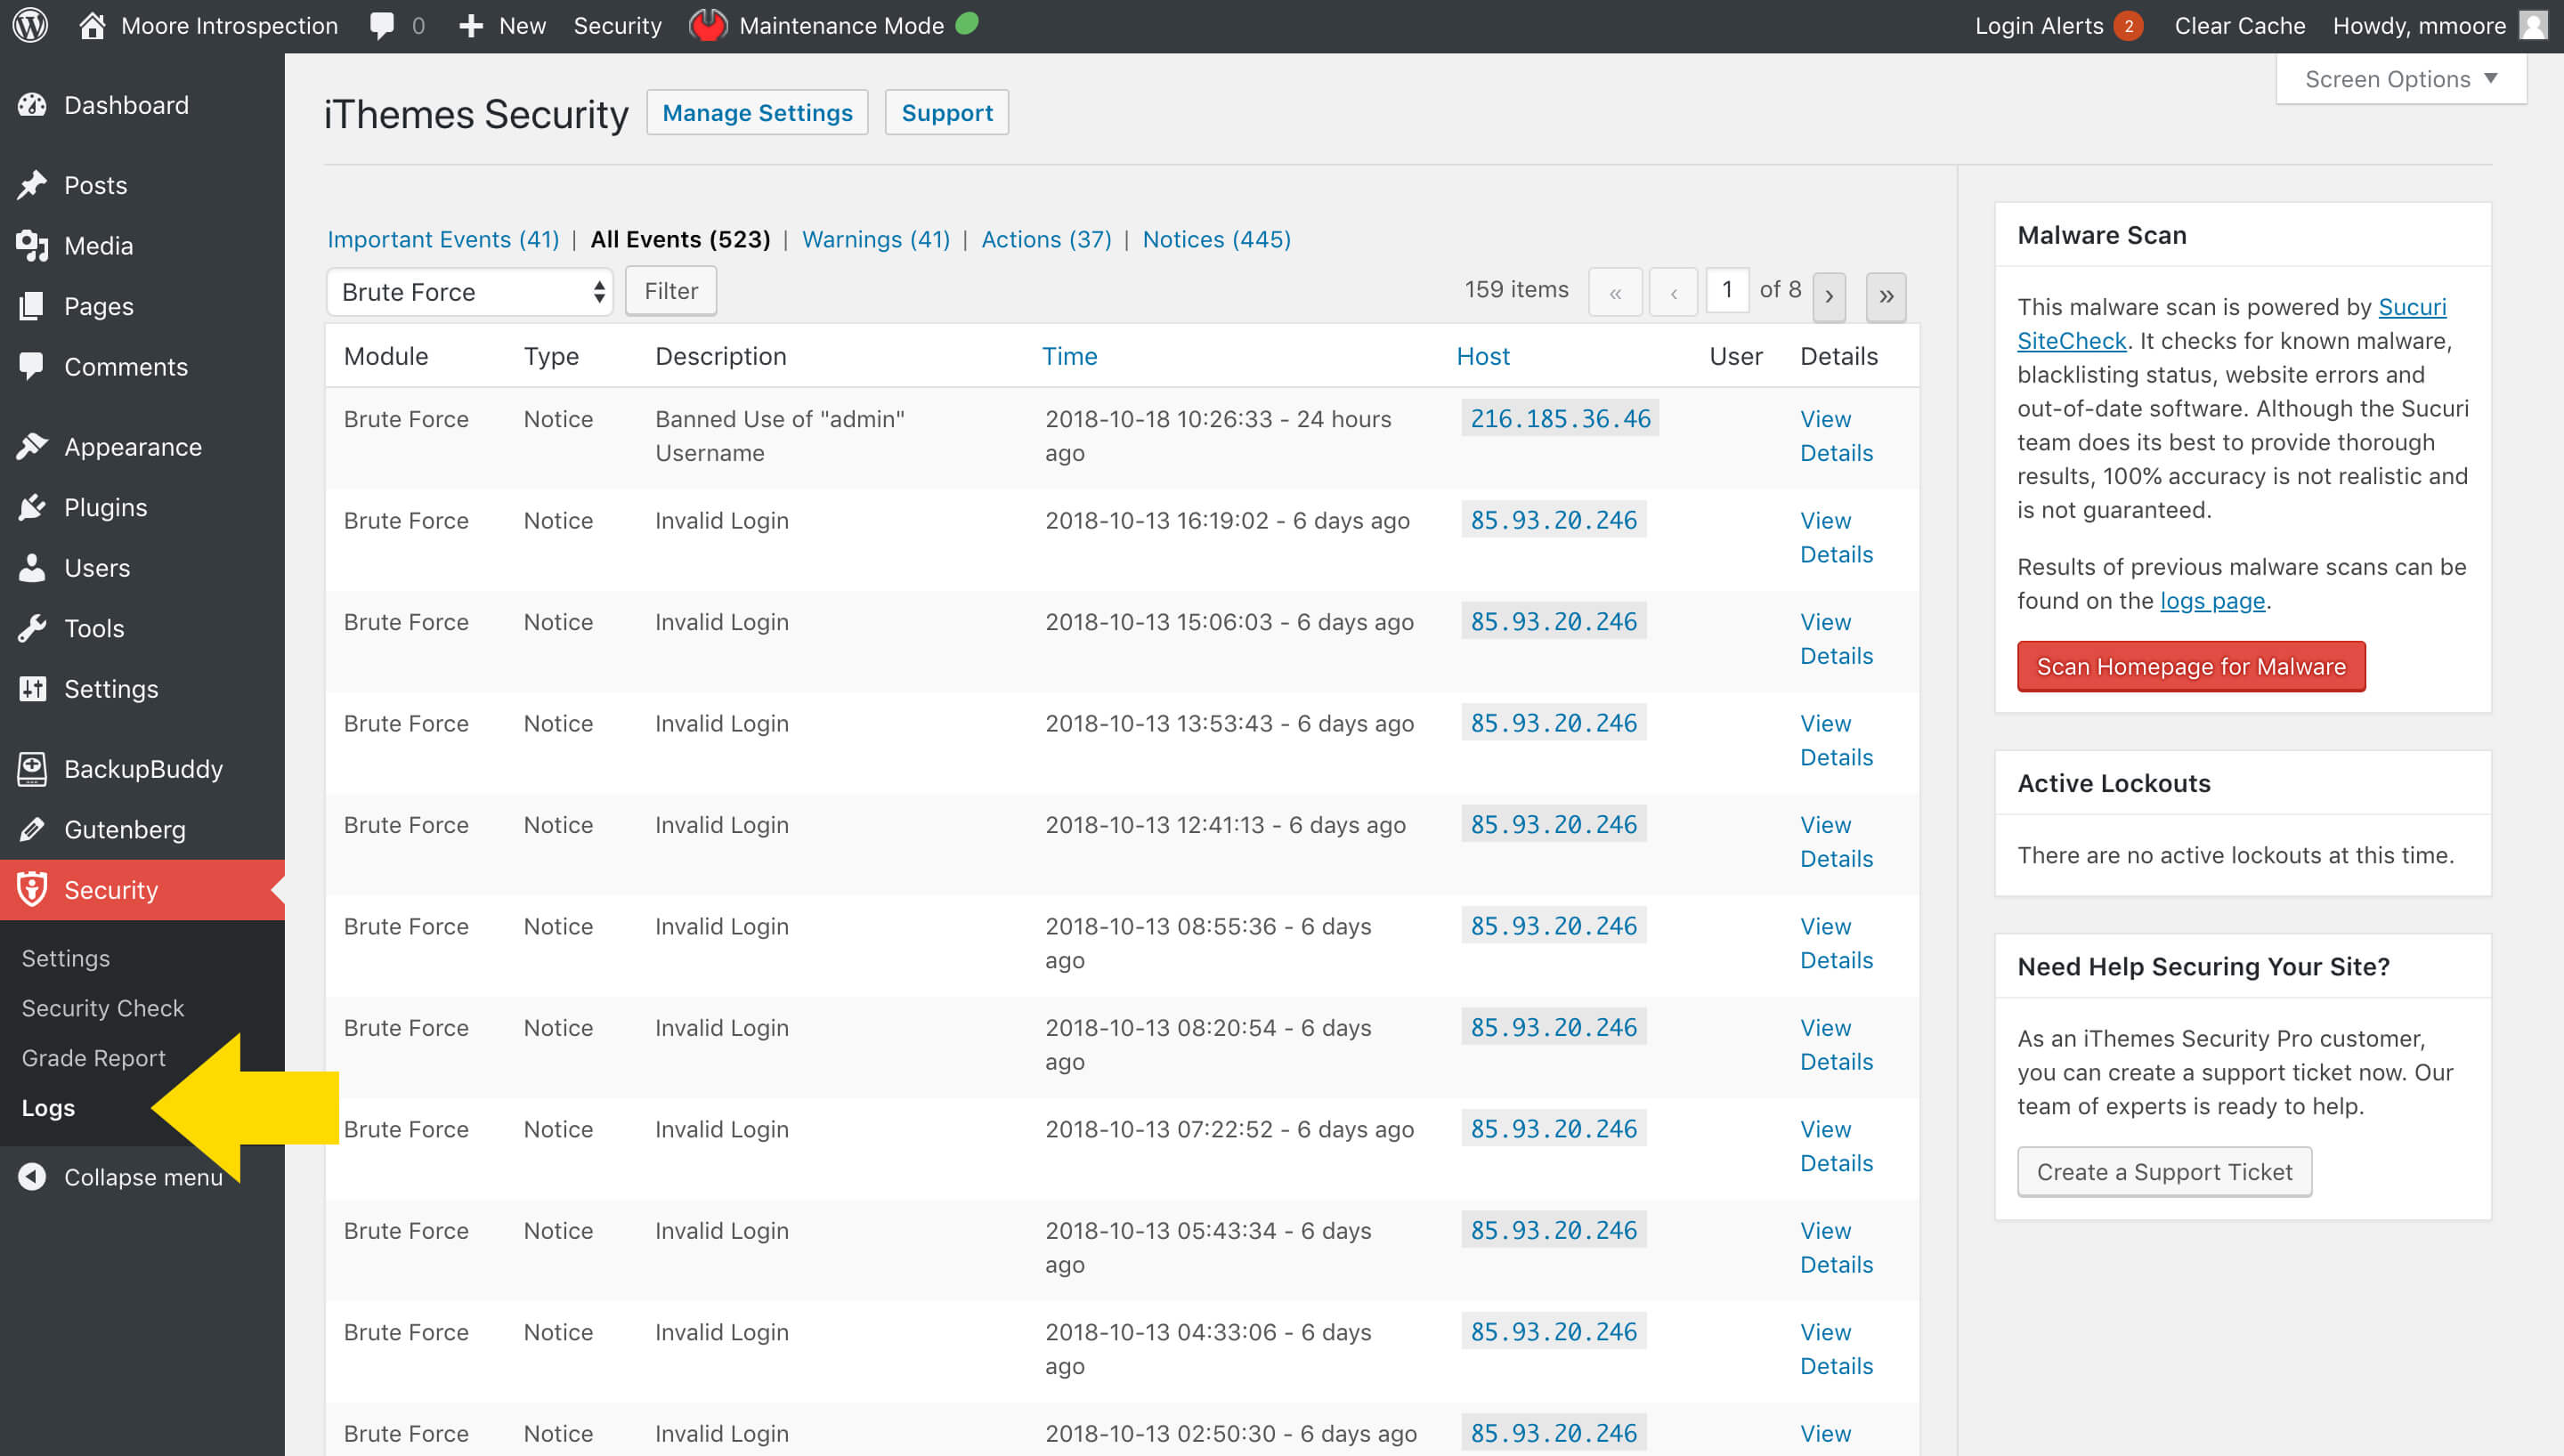
 Once you’ve enabled these settings, you can find your logs from the Security > Logs page in your WordPress dashboard.
4 Important Events to Monitor in WordPress Security Logs
Once you have added security logging to your WordPress site, there are 4 important events to monitor.1. WordPress Brute Force Attacks
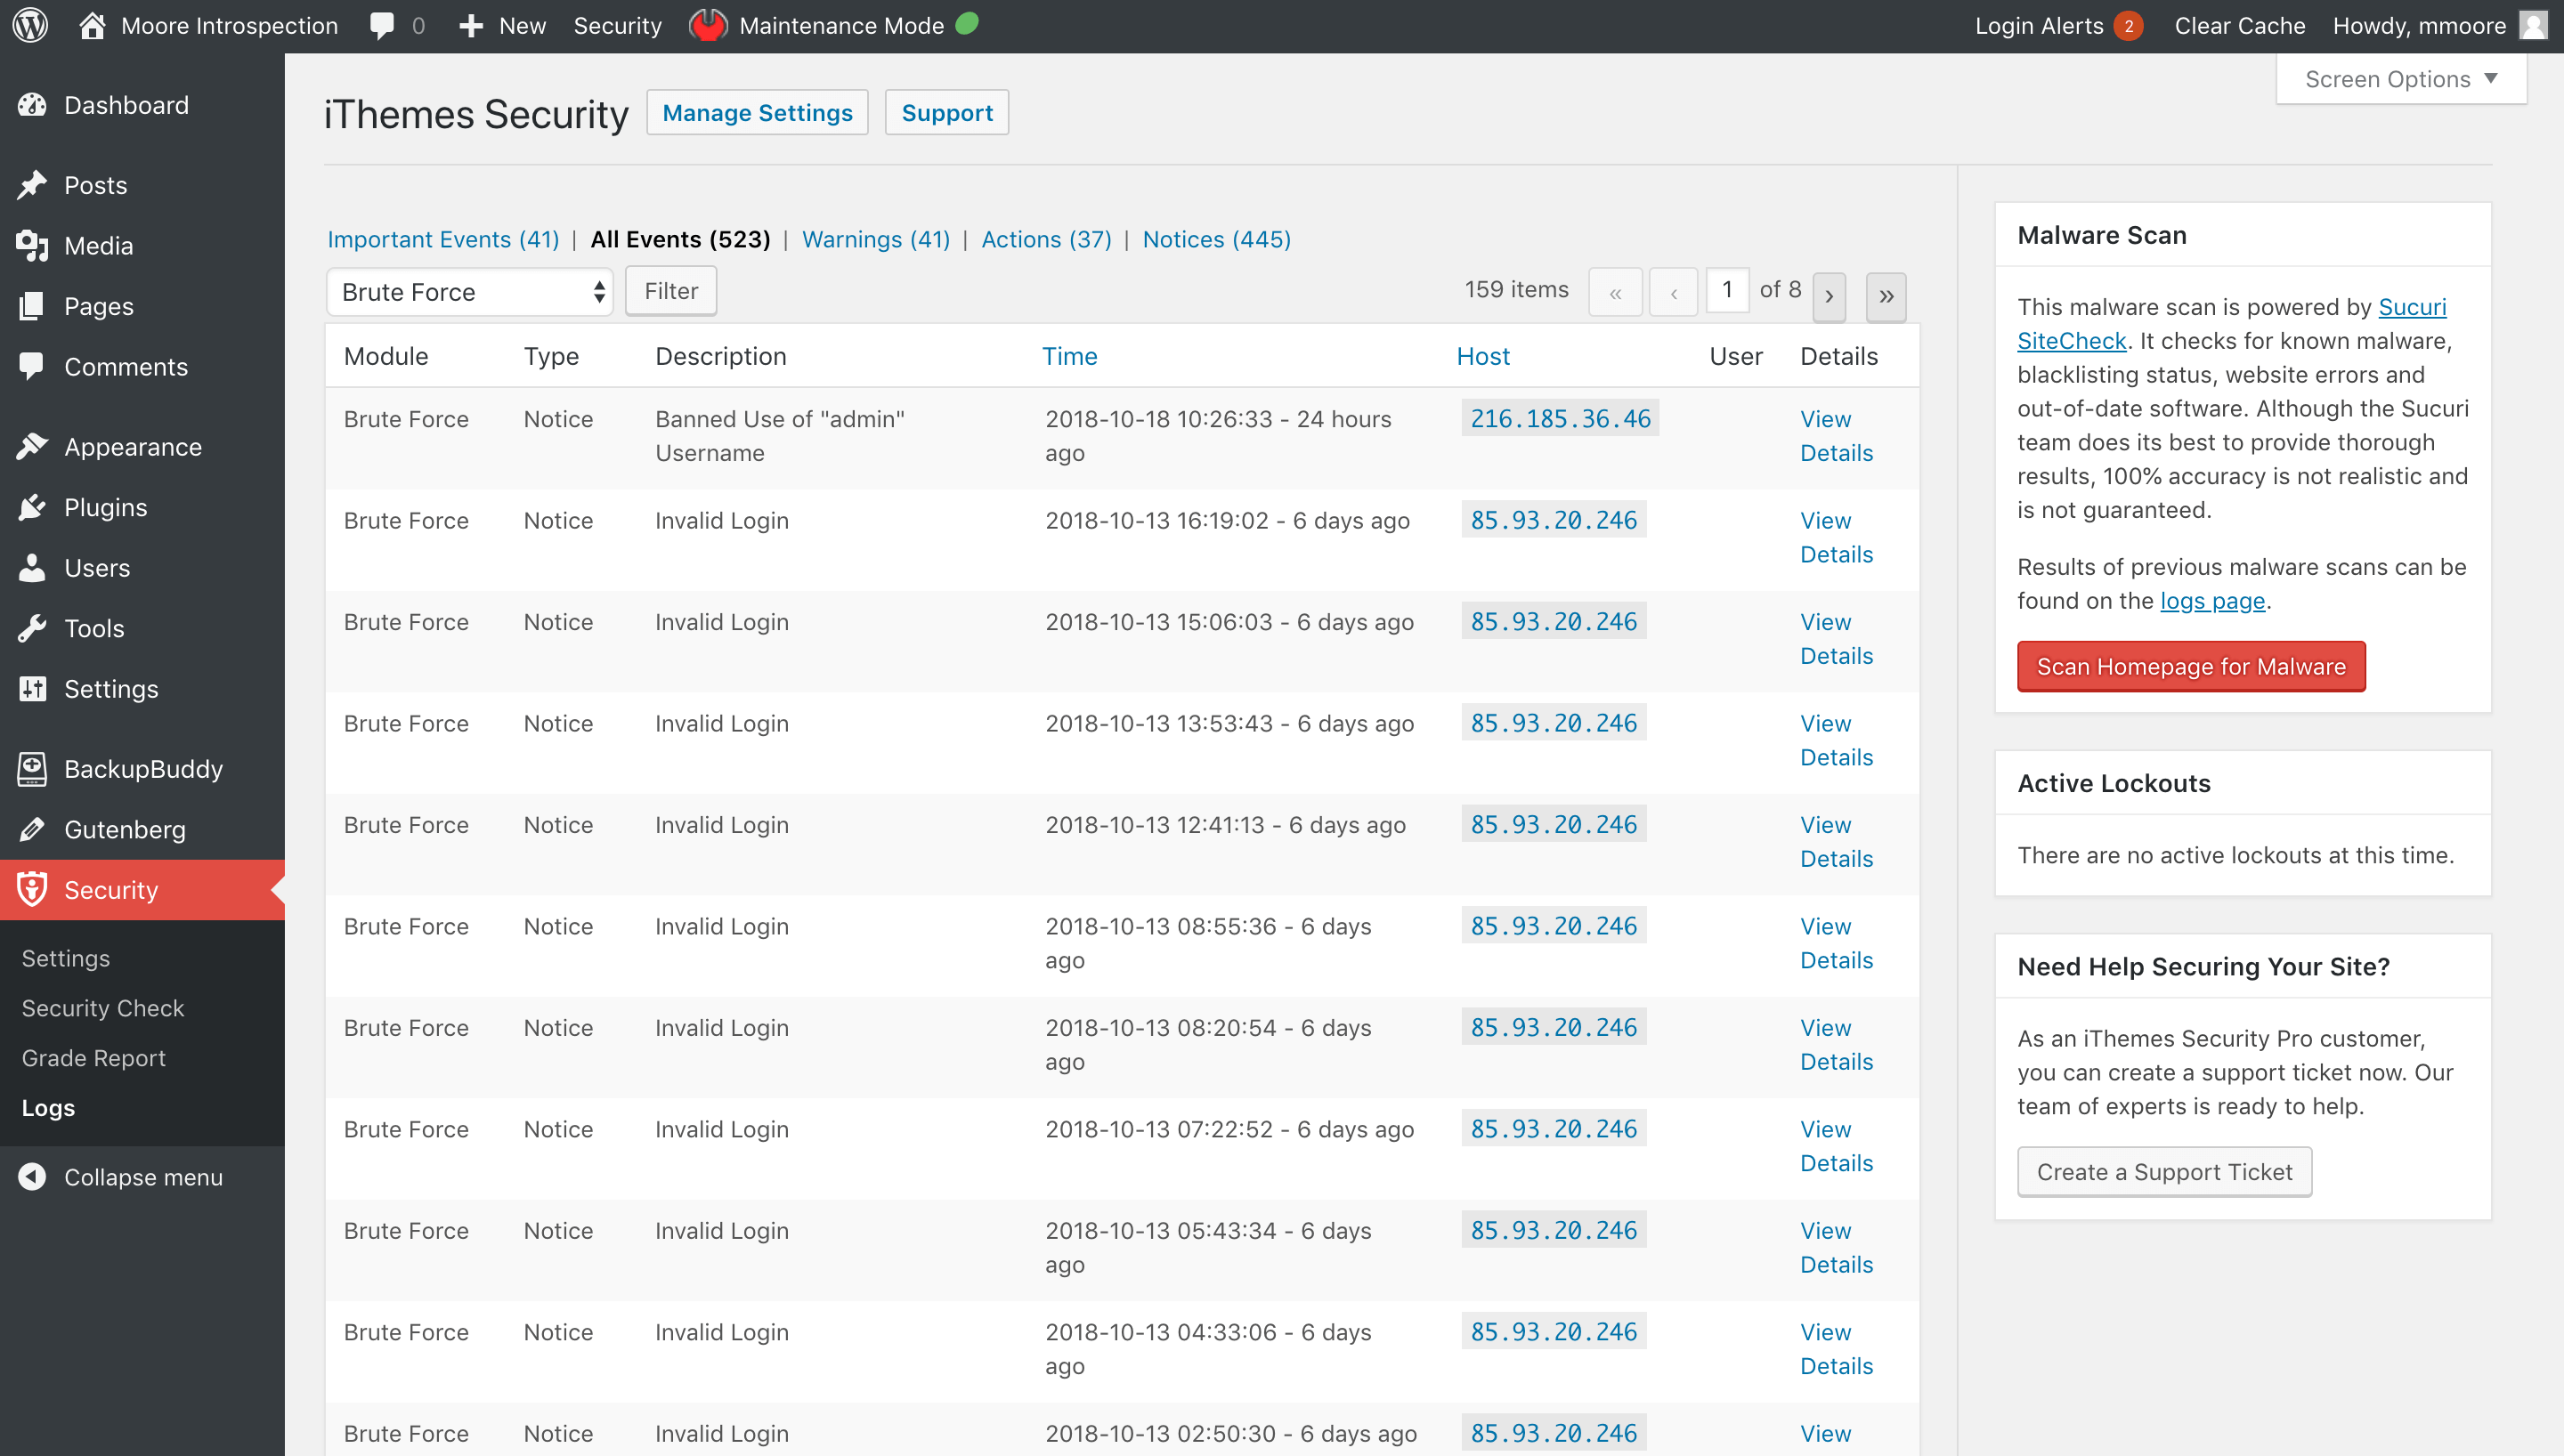 Brute force attacks refer to the trial and error method used to discover usernames and passwords in order to hack into a website. WordPress doesn’t track any user login activity, so there isn’t anything built into WordPress to protect you from a brute force attack. It is up to you to monitor your login security to protect your WordPress site.
Luckily, a brute force attack isn’t very sophisticated, and it is pretty easy to identify in your logs. You will need to record the username and IP that is attempting to login and whether or not the login was successful. [pullquote]If you see that a single username or IP has consecutive multiple failed login attempts, the chances are you are under a brute force attacks.[/pullquote]
Identifying when you are under a brute force attack is a great start, but there is still more work to be done. You can increase the WordPress login security by limiting the number of failed login attempts a single user or IP is allowed to have before they are blocked from making any more attempts.
When you are under a brute force attack, it is essential that you lockout the username and IP that is being used in the attack. Unfortunately, the attacker may have been using a username that exists on the site, which means there is now an actual user that is now not able to login. Enable the iThemes Security Pro’s Magic Links setting, and users will be able to bypass lockouts securely. WordPress security should protect your site while staying out of your way.
Brute force attacks refer to the trial and error method used to discover usernames and passwords in order to hack into a website. WordPress doesn’t track any user login activity, so there isn’t anything built into WordPress to protect you from a brute force attack. It is up to you to monitor your login security to protect your WordPress site.
Luckily, a brute force attack isn’t very sophisticated, and it is pretty easy to identify in your logs. You will need to record the username and IP that is attempting to login and whether or not the login was successful. [pullquote]If you see that a single username or IP has consecutive multiple failed login attempts, the chances are you are under a brute force attacks.[/pullquote]
Identifying when you are under a brute force attack is a great start, but there is still more work to be done. You can increase the WordPress login security by limiting the number of failed login attempts a single user or IP is allowed to have before they are blocked from making any more attempts.
When you are under a brute force attack, it is essential that you lockout the username and IP that is being used in the attack. Unfortunately, the attacker may have been using a username that exists on the site, which means there is now an actual user that is now not able to login. Enable the iThemes Security Pro’s Magic Links setting, and users will be able to bypass lockouts securely. WordPress security should protect your site while staying out of your way.
2. File Changes
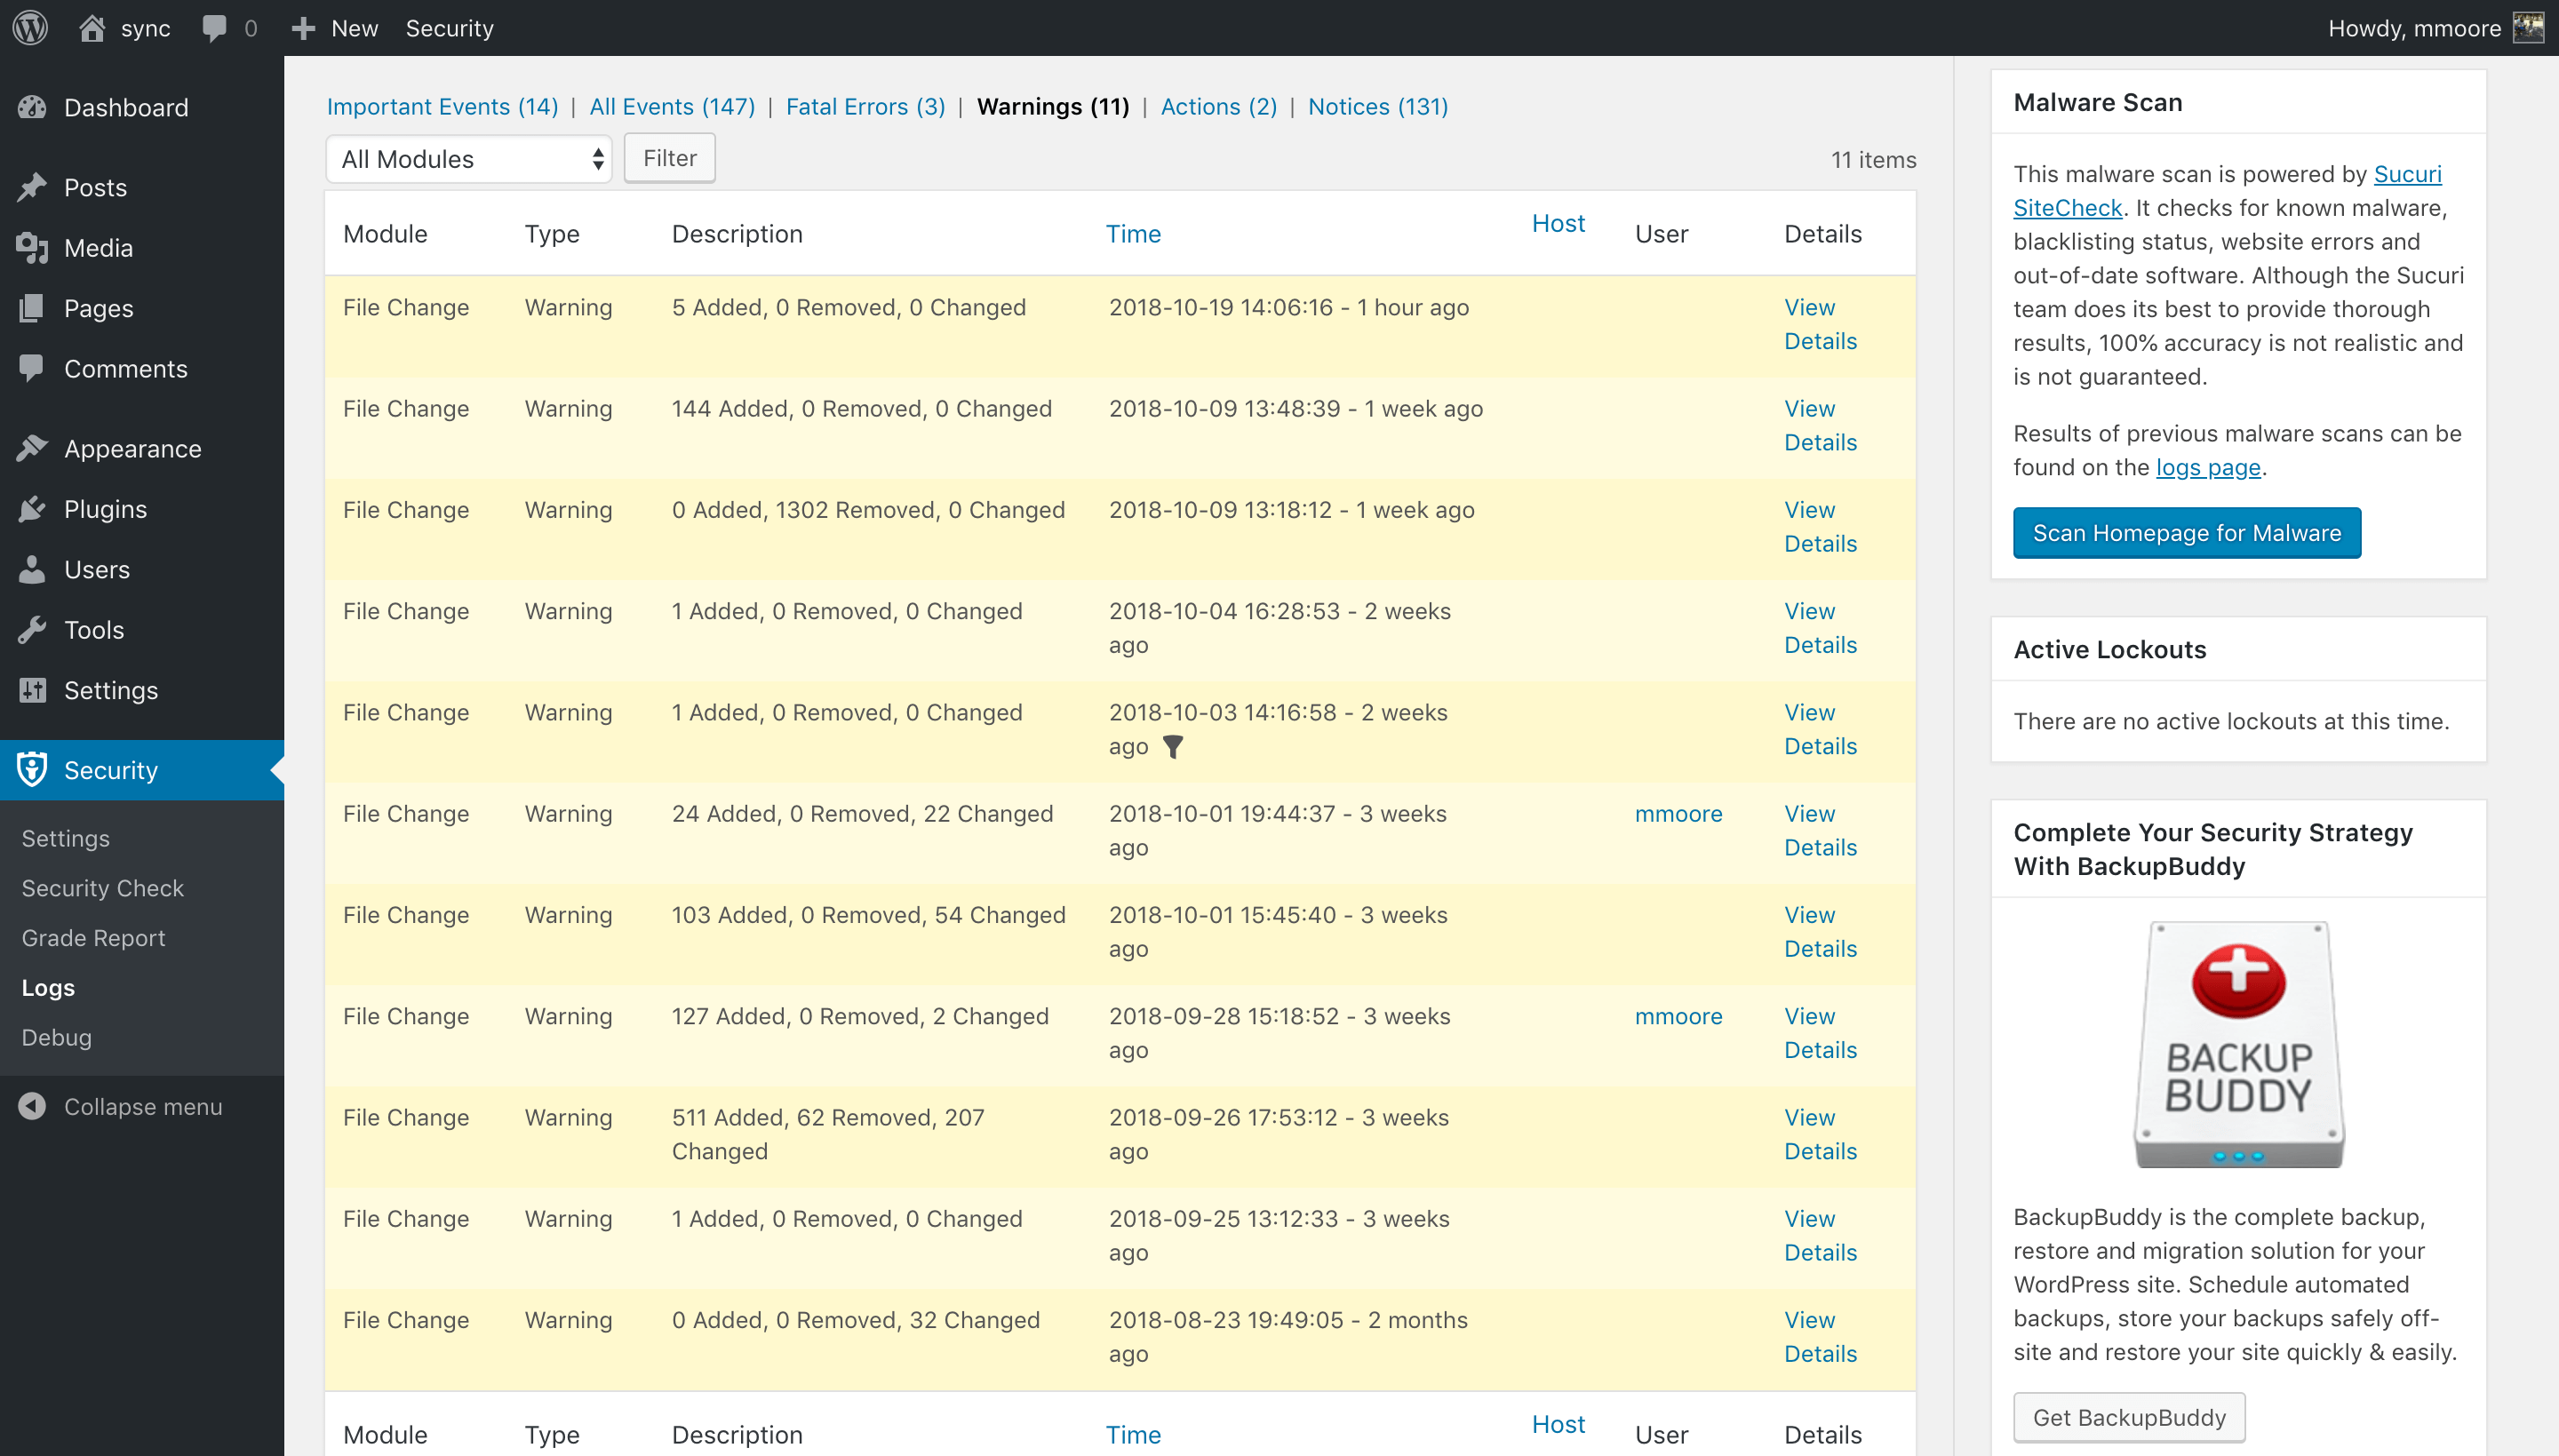 Even if you follow the WordPress security best practices, there is still a chance for your site to become compromised. A compromise means the site has had malicious changes, and that is why is it is so important to stay on top of the file changes on your site by recording them in your WordPress security logs.
File change entries include files added and removed and modifications to existing files. Now that you have the changes recorded in your security logs, you should schedule the time to audit them. If you are an iThemes Security Pro user, remember to enable File Change notifications to be notified when a file changes.
[pullquote]There are several legitimate reasons you would see new file change activity in your logs, but if the changes made were unexpected, you should take the time to assure the changes were not malicious.[/pullquote] For example, if you see a change made to a plugin at the same date and time you updated the plugin, there would be no reason to investigate.
WordPress core or a plugin that is hosted on the WordPress.org repository will include a file hash that can be used for integrity verification. Think of a file hash as a fingerprint, and every file that you download from the WordPress.org repository you will also download the fingerprint. WordPress provides WP-CLI commands to compare the file hashes of core and plugin files easily. For comparing WordPress core files use the wp core verify-checksums command, and for plugins, you can use the wp plugin verify-checksums command. There currently isn’t a WP-CLI command to compare theme file hashes, but it is on the roadmap.
If the file hashes match, then there isn’t any to be concerned about, but if the hashes aren’t a match, you should immediately remove the changed file.
Another way to check a changed file is to compare it to the original in a text editor. You can do a Google search on how to compare files for the text editor you prefer as it can vary. So let’s say you have a premium plugin that has had changes made to it, you will want to download the plugin directly from the premiums plugin website. Now open the changed file from your server and compare it directly to the same file from the freshly downloaded version. If you find any difference, you would want to remove the changed plugin from your server and replace with a fresh copy.
Even if you follow the WordPress security best practices, there is still a chance for your site to become compromised. A compromise means the site has had malicious changes, and that is why is it is so important to stay on top of the file changes on your site by recording them in your WordPress security logs.
File change entries include files added and removed and modifications to existing files. Now that you have the changes recorded in your security logs, you should schedule the time to audit them. If you are an iThemes Security Pro user, remember to enable File Change notifications to be notified when a file changes.
[pullquote]There are several legitimate reasons you would see new file change activity in your logs, but if the changes made were unexpected, you should take the time to assure the changes were not malicious.[/pullquote] For example, if you see a change made to a plugin at the same date and time you updated the plugin, there would be no reason to investigate.
WordPress core or a plugin that is hosted on the WordPress.org repository will include a file hash that can be used for integrity verification. Think of a file hash as a fingerprint, and every file that you download from the WordPress.org repository you will also download the fingerprint. WordPress provides WP-CLI commands to compare the file hashes of core and plugin files easily. For comparing WordPress core files use the wp core verify-checksums command, and for plugins, you can use the wp plugin verify-checksums command. There currently isn’t a WP-CLI command to compare theme file hashes, but it is on the roadmap.
If the file hashes match, then there isn’t any to be concerned about, but if the hashes aren’t a match, you should immediately remove the changed file.
Another way to check a changed file is to compare it to the original in a text editor. You can do a Google search on how to compare files for the text editor you prefer as it can vary. So let’s say you have a premium plugin that has had changes made to it, you will want to download the plugin directly from the premiums plugin website. Now open the changed file from your server and compare it directly to the same file from the freshly downloaded version. If you find any difference, you would want to remove the changed plugin from your server and replace with a fresh copy.
3. Malware Scans
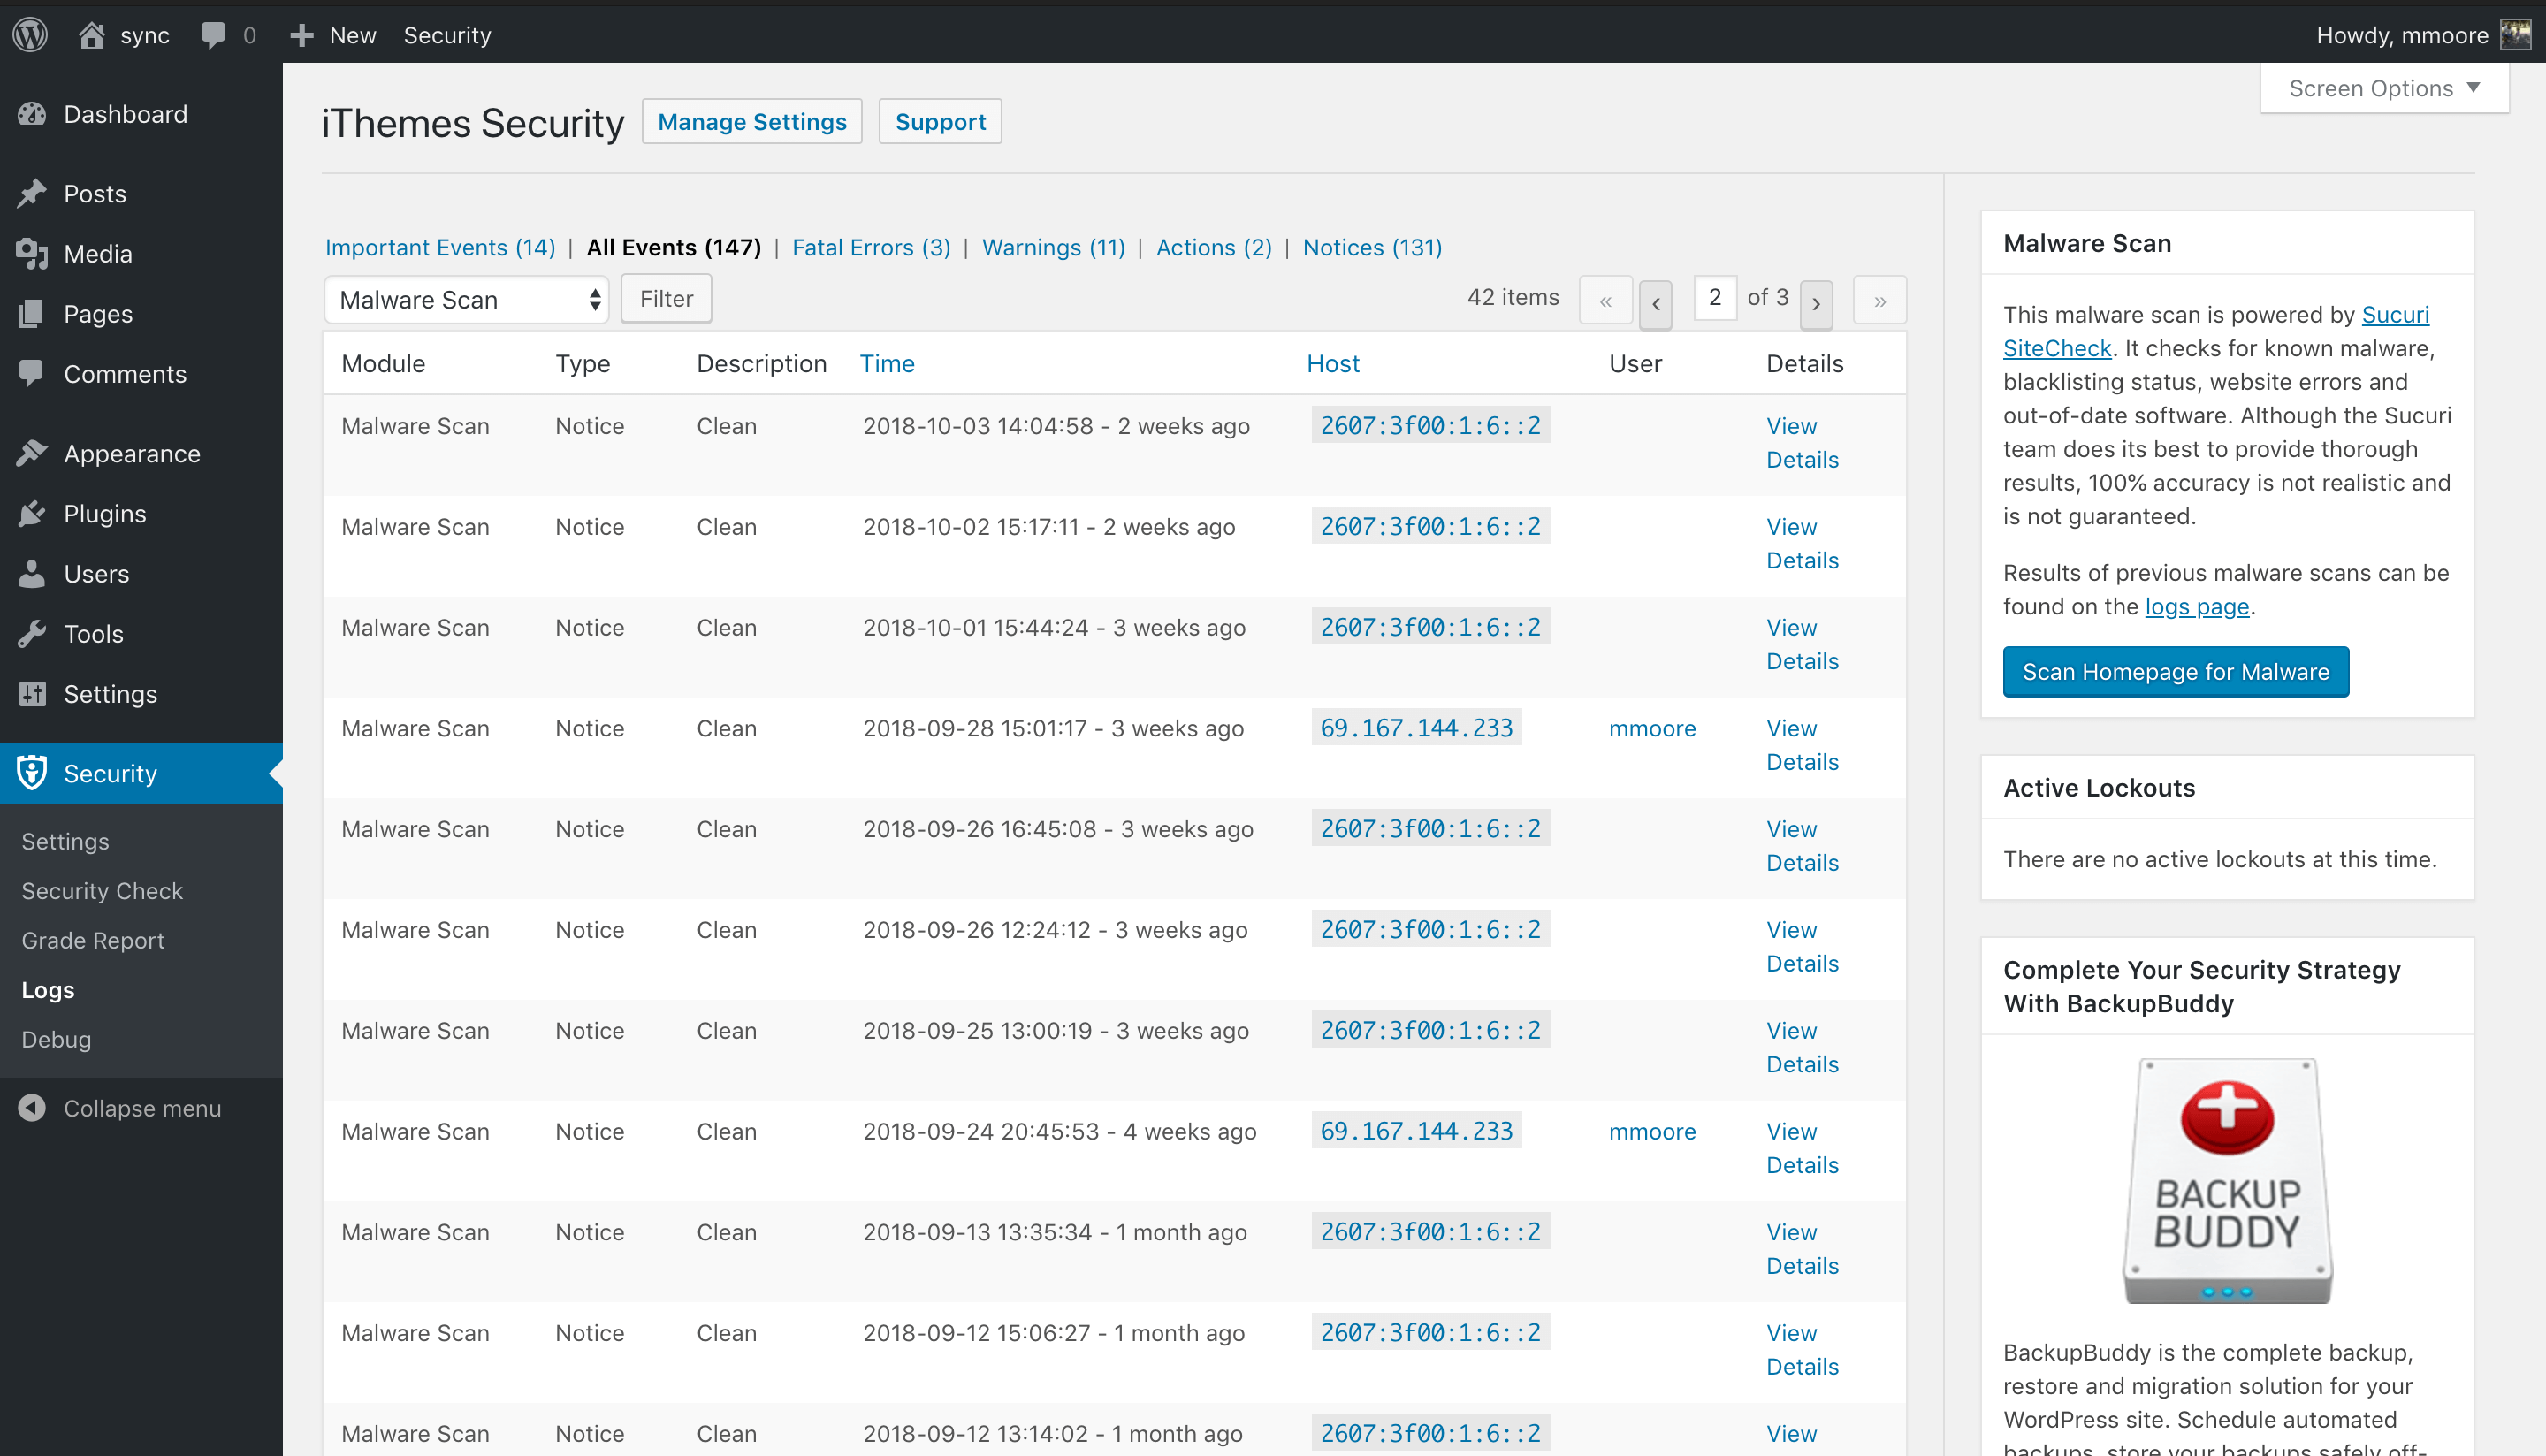 Not only should you run malware scans, you should also be recording the results of every malware scan in your WordPress security logs. Some security logs will only record scan results that fund malware, but that isn’t enough. [pullquote]It is crucial to be alerted as quickly as possible of a breach to your site. The longer it takes for you to know about a hack the more damage it will do.[/pullquote]
While it feels good to see the history of a proactive approach to security paying off, that is just a bonus and not the reason to record malware scans. If you aren’t documenting your scheduled scans, then you will have no way of knowing if there are any scan failures. Not recording failed scans could result in you thinking that your site is being checked daily for malware but, in reality, the scan is failing to complete.
Not only should you run malware scans, you should also be recording the results of every malware scan in your WordPress security logs. Some security logs will only record scan results that fund malware, but that isn’t enough. [pullquote]It is crucial to be alerted as quickly as possible of a breach to your site. The longer it takes for you to know about a hack the more damage it will do.[/pullquote]
While it feels good to see the history of a proactive approach to security paying off, that is just a bonus and not the reason to record malware scans. If you aren’t documenting your scheduled scans, then you will have no way of knowing if there are any scan failures. Not recording failed scans could result in you thinking that your site is being checked daily for malware but, in reality, the scan is failing to complete.
4. User Activity
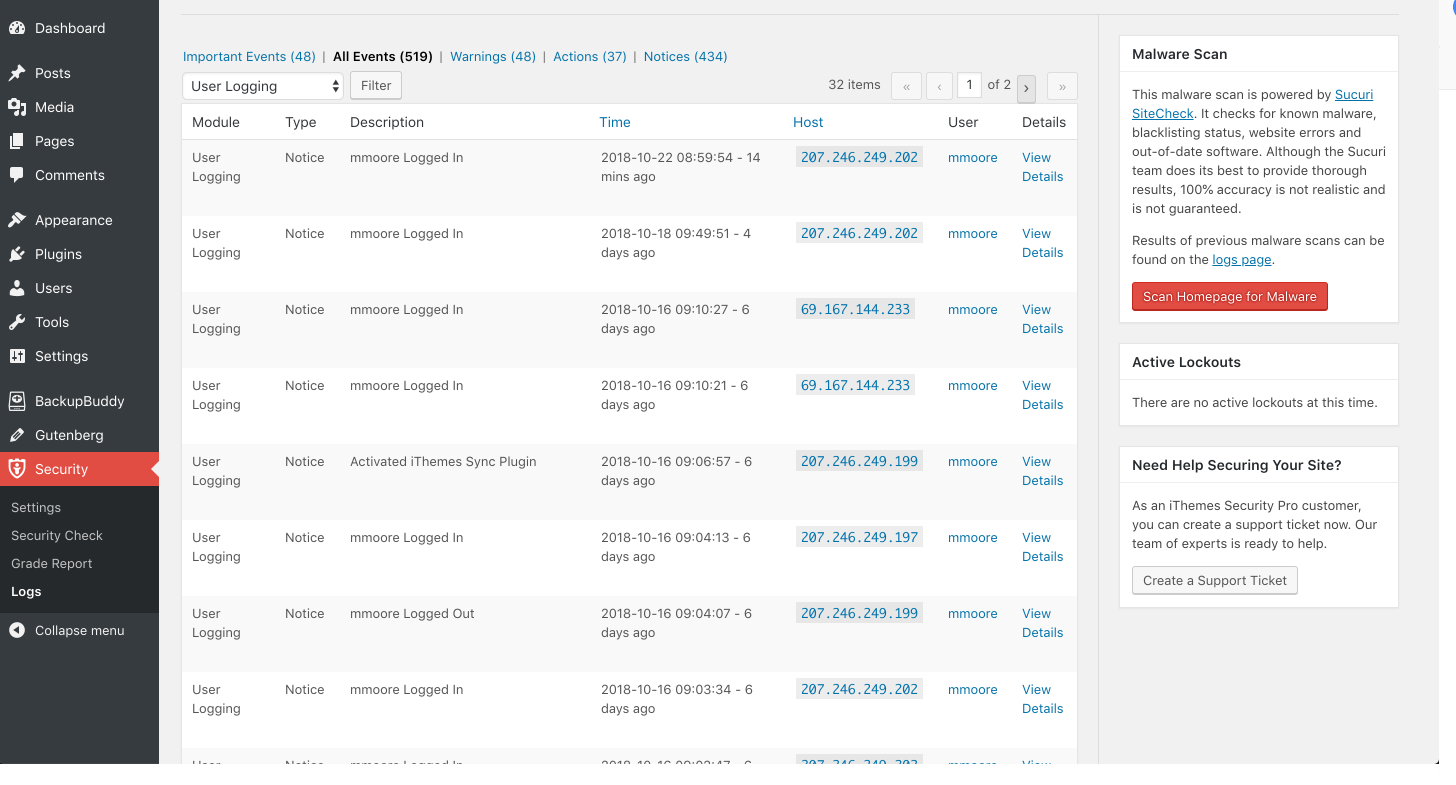 Keeping a record of user activity in your WordPress security logs can be your saving grace after a successful attack.
[pullquote]If you are monitoring the correct user activity, it can guide you through the timeline of a hack and show everything the hacker changed, from adding new users to adding unwanted pharma ads on your site.[/pullquote]
Keeping a record of user activity in your WordPress security logs can be your saving grace after a successful attack.
[pullquote]If you are monitoring the correct user activity, it can guide you through the timeline of a hack and show everything the hacker changed, from adding new users to adding unwanted pharma ads on your site.[/pullquote]
Log In / Log Out
The first type of user activity you should track is when users log in and log out of your site and from where. Monitoring time and location of user’s logins can help you spot a user that is compromised. Did that user login at an unusual time or from a new place? If so, you may want to start your investigation with them. If you have a WordPress backup plugin installed and you can restore the site to a state before it was compromised. Once you restore the site, change the user’s password and enable two factor so your site is breached again.User Creation
The next activity you should keep a record of is user creation. A common practice for a hacker to perform is to create a new admin user in an attempt to be covert. It is easy for you to notice something strange with your account but it is much more difficult to identify malicious activity on another user. So, now we identified the user that is compromised and found out they have created a new user it is time to move our investigation to the new user’s activity.Adding and Removing Plugins
We should now check to see if the new user has added or removed any plugins from the site. It is vital to make a record of who adds and removes plugins. Once your site has been hacked, it will easy for the attacker to add their own custom plugin to inject malicious code into the site. Even if they don’t have access to your server, your WordPress site can access it. Using a plugin they can add redirects to your site to use in their next spamvertizement campaign. After their malicious code is executed, they can then delete the plugin to remove evidence of their crime. Lucky for us we won’t miss any of it because it was all documented in our WordPress security logs.Changes to Posts & Pages
Now it is time to look to see if our new user has added any new or made changes to existing pages or posts on the site. Have they added links to send your traffic to other sites? You will be able to see if any embarrassing pages have been added to the site and get them taken down.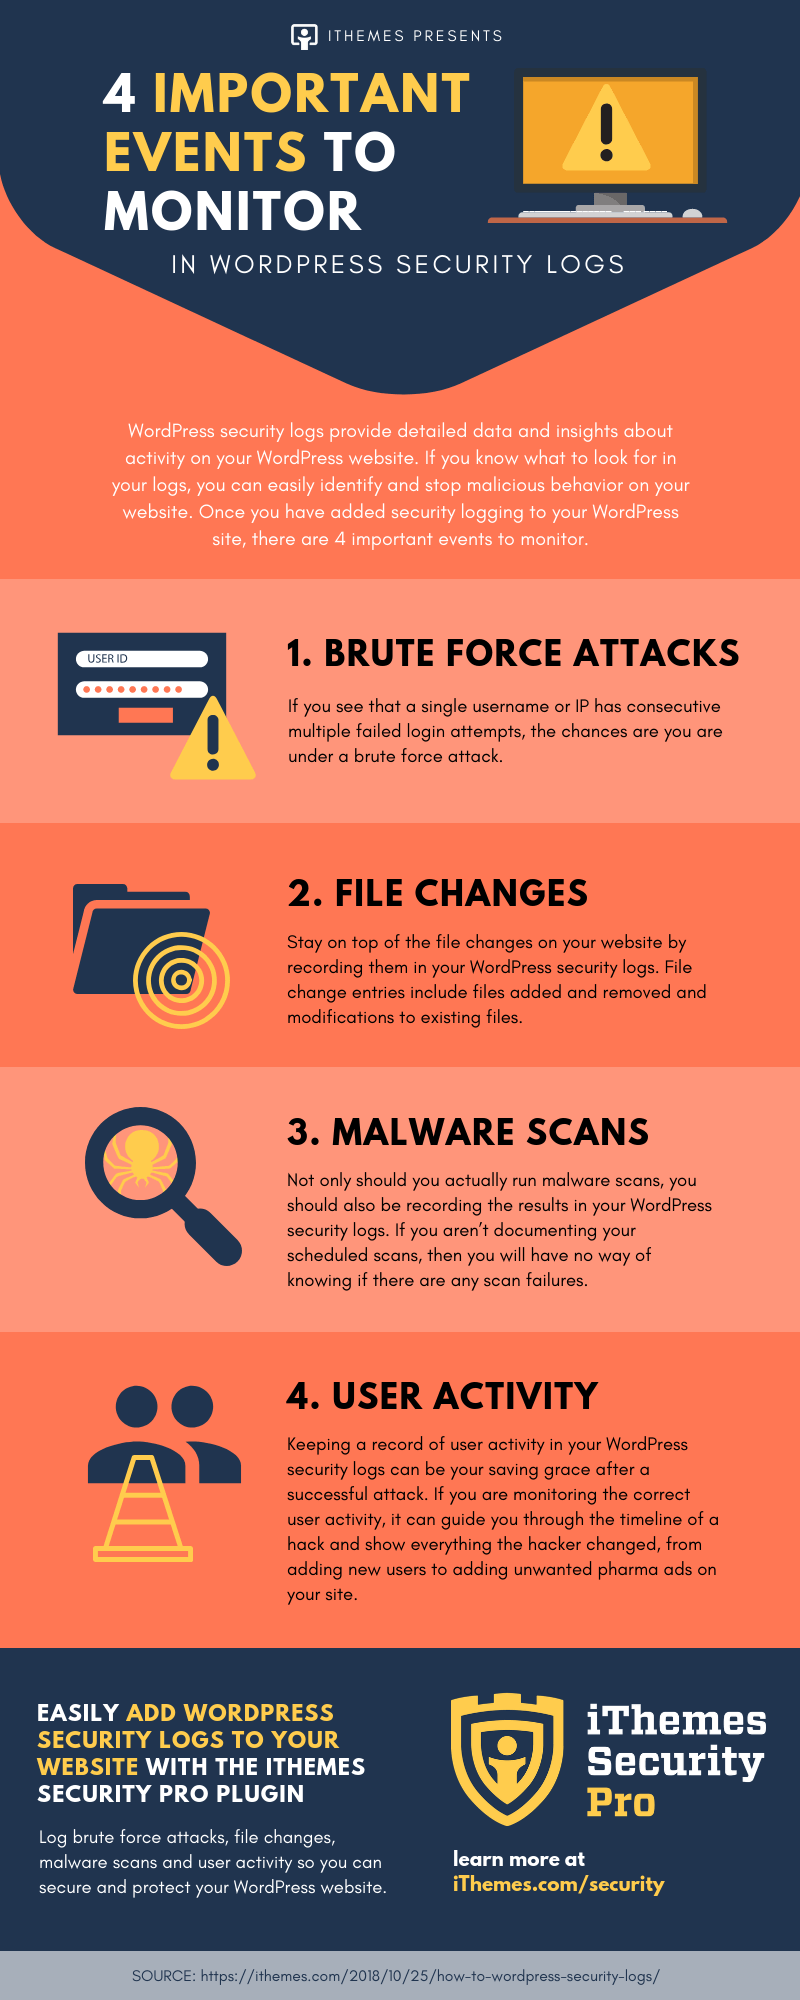
Recap & Watch the Video: A WordPress Security Logs Checklist
As we can see, having the right information can help stop an attack, alert you of a breach, pinpoint the time of the breach, access the damage, and help you with cleanup. Use the checklist below to aid you in monitoring your WordPress security logs:- 1. Brute Force Activity
- 2. File Changes
- 3. Malware Scans
- 4. User Logging
![]()
Get Better WordPress Security Logs with iThemes Security Pro
iThemes Security Pro, our WordPress security plugin, offers 30+ ways to secure and protect your website from common WordPress security vulnerabilities. With WordPress two-factor authentication, brute force protection, strong password enforcement and more, you can add an extra layer of security to your website.
Get iThemes Security Pro
Join us for the next Solid Academy Webinar!
Free weekly webinars that will help you master WordPress and increase your business's bottom line.
What is a WordPress Phishing Attack?
Learn how to identify and prevent phishing attacks on WordPress websites.
Kiki SheldonWebsite Protection: 5 Ways to Keep Your Website Safe
Robust website protection is the shield that stands between your business and relentless cyber attacks. Prioritizing website protection enables businesses to fortify defenses to safeguard their online presence and preserve the trust of their customers in the face of ever-evolving cybersecurity threats.
Kiki Sheldon23 Ideas To Grow Your WordPress Business in 2023
WordPress is the most popular website-building platform worldwide, trusted by numerous brands. WordPress enables you to build a user-friendly and highly reliable site, together with tools and plugins to enhance your marketing and work like a lead magnet. All these features make WordPress the platform chosen by more than 43% of businesses globally.
SolidWP Editorial TeamSign up now — Get SolidWP updates and valuable content straight to your inbox
Sign up
Get started with confidence — risk free, guaranteed
