How to Fix “There Has Been a Critical Error on Your Website” Message in WordPress
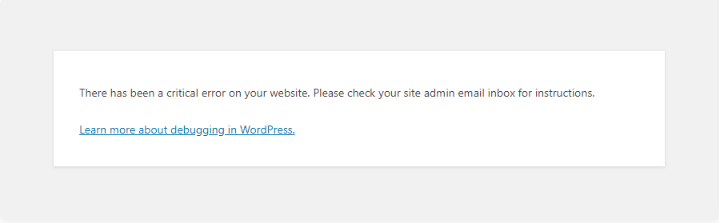
The “There has been a critical error on your website” message, also known as the white screen of death, is one of the most common errors WordPress website owners can encounter. WordPress does not provide any additional information about what has caused this error message to appear, and with no access to your WordPress admin area, troubleshooting it becomes much more complicated.

The “There has been a critical error on your website” message, also known as the white screen of death, is one of the most common errors WordPress website owners can encounter. WordPress does not provide any additional information about what has caused this error message to appear, and with no access to your WordPress admin area, troubleshooting it becomes much more complicated.
In this guide, you will learn what can cause the white screen of death on your website and how to fix the “There Has Been a Critical Error on Your Website” message in WordPress step-by-step.
WordPress Core Files and PHP Code Execution
As a great platform powering 40% of the Internet, WordPress makes it possible to build dynamic websites without any coding skills. This has become possible thanks to the WordPress’ built-in, or core, functionality, which abstracts away all complications that running a modern database-driven web application can create.
The WordPress core files typically do not need to be modified in any way, and will only be reinstalled once you update WordPress to a new version. WordPress defines what core files need to be loaded and in what order for your website pages to appear in the browser, and any issues encountered during PHP code execution will result in various errors, including the “There has been a critical error on your website” message.
In addition to the WordPress’ core functionality, the way a website functions is also defined by the active theme and various plugins that a website owner chooses to extend the possibilities of the platform. Each additional piece of software installed adds to the complexity of the website which inevitably results in the higher risk of PHP running into errors during script execution as the amount of code grows.
What Does “There Has Been a Critical Error on Your Website” Error Mean?
The “There has been a critical error on your website” means that an error has occurred during the PHP code execution process. This essentially tells you that WordPress failed to load its core or additional functionality provided by the activated plugins, which can be attributed to server-side issues, resource limits, and code-related errors.
If there are any syntax errors in your website’s code, one of the required pieces of code or even the whole file is missing, it will inevitably lead to WordPress being unable to load any web content. If you have encountered the WordPress critical error while uploading media or performing another specific task, PHP has most likely reached the resource limits configured for it while executing a script. This has led to the server shutting down the process’ current activity.
Three Main Reasons Behind “There Has Been a Critical Error on Your Website” Error in WordPress and How to Address Them
The key to understanding WordPress critical errors is knowing how WordPress provides functionality using its core files and combines it with the features provided by the WordPress theme in use and all activated plugins. If the code integrity is damaged, you will see a critical error on your WordPress site.
Here are the three main reasons behind the “There has been a critical error on your website” message in WordPress:
- Failed WordPress core, theme, and plugin updates.
- Malware infections.
- Server-side PHP issues and resource limits.
1. Failed WordPress Core, Theme, And Plugin Updates
Failed or incomplete WordPress core, theme or plugin updates can lead to the website files not reinstalled correctly, which in turn will cause issues with PHP code execution. When your WordPress website has suffered a failed update, some of its files can be missing or become corrupt.
Once WordPress attempts to load its core functionality and makes your theme and active plugins to execute their code to extend that functionality, PHP encounters fatal errors, which leads to seeing the “There has been a critical error on your website” message.
How to Address
Depending on what component of your website causes the WordPress critical error to appear, you may need to reinstall the WordPress core files, disable the malfunctioning plugin, or switch to another theme. Unfortunately, as a critical error on your WordPress site prevents you from accessing your WordPress admin area, all operations need to be performed from the command line or via your web hosting control panel’s file manager interface.
Replacing the WordPress core files or correcting syntax errors is a complicated task, and we strongly recommend that you save a backup of your website before making changes to any files to avoid creating even more issues.
Replace WordPress Core Files
If issues have been identified in the WordPress core, you will need to replace the corrupt or redownload the missing files. You will need to download the version of the WordPress installation that your website has previously failed to update the core functionality to, unzip the archive, and manually replace individual files or the whole wp-includes and wp-admin folders, as well as the core files in your WordPress installation directory.
Download a fresh WordPress installation from wordpress.org and unpack the files. For example, to download WordPress 6.0.1, use https://wordpress.org/wordpress-6.0.1.zip. You can download the archive to the server directly by using the wget command and perform all operations on it from the command line, or save the archive to your computer and upload all files to the website via FTP, SFTP, or File Manager.
You can also try to redownload core files via the WordPress command line interface by using the wp core download command. The –skip-content option allows you to skip downloading the default themes and plugins, –force will overwrite all existing WordPress core files.

Switch to Another Theme and Deactivate the Malfunctioning Plugin
If your active theme or one of the active plugins is at fault, you can simply switch to another theme or deactivate the malfunctioning plugin to reinstall it once you stop seeing the critical error message on your WordPress site. This is a temporary solution that will allow you to restore access to the WordPress admin area.
Rename the directory of the malfunctioning plugin to make WordPress skip loading any files from that folder, which would make the critical error on your WordPress site disappear if it was the only thing causing issues. Please note that renaming the plugin’s folder is not a proper way to deactivate it, but it will allow you to restore your website’s functionality and load the WordPress dashboard.
If your current theme is causing issues, you can temporarily switch to the default Twenty Twenty-Two theme. Twenty Twenty-Two is included in each new WordPress installation, so you can download it manually or by using WP CLI.
Rename your active theme’s directory in the themes folder inside wp-content. Go back to your WordPress website’s document root directory and run the wp theme activate command provided by the WordPress command line interface passing twentytwentytwo as an argument.

Restore From a Backup
Taking regular backups is absolutely essential for keeping your WordPress website secure and being able to restore its functionality quickly in case of a failed update. A WordPress backup plugin like Solid Backups can make restoring from a backup a simple process.
Restoring from a backup is a much easier solution than having to manually replace any core, theme, or plugin files. If you have backups saved by your hosting provider, you will most likely be able to leverage automatic backup restorations. If you only use a WordPress backup plugin, the restoration process will need to be performed manually in most cases, especially if you are seeing the “There has been a critical error on your website” message.
2. Malware Infections
Malware infections are another reason for seeing the WordPress critical error on your website. Just like the issues that failed updates create, any malicious code added to the WordPress core, theme, or plugin files can cause syntax errors or other issues that will break the normal PHP code execution.
Hackers are constantly looking for new ways to exploit known vulnerabilities and gain access to your website to perform malicious actions and carry out network attacks. Your website files and its database information can be altered to the point where WordPress will no longer be able to function properly, which would lead to various errors, including the “There has been a critical error on your website” message.
How to Address
The approach is very similar to addressing failed WordPress updates. Once you identify the source of the issue, whether it is a plugin, your current theme, or the core files that need to be replaced, you will need to restore the basic functionality of your WordPress to gain access to the admin area.
Depending on the scale of the issue and your goals, you may be able to manually replace the infected files or remove all malicious code injections, restore your website from a backup, or rebuild it from scratch. The Solid Backups and the Solid Security Pro plugins will allow you to recover from malware attacks like a pro by providing a way to quickly identify and remove all malware or restore your website from a clean backup in a matter of minutes.
But more importantly, using these two robust solutions for website security can help you address all issues at source and never experience any WordPress critical errors by keeping your website protected from all known security threats and ensuring data redundancy. The Solid Security Pro Site Scan feature allows you to run scheduled malware and vulnerability scans that will alert you should a threat be identified.
Get SolidWP tips direct in your inbox
Sign up
Get started with confidence — risk free, guaranteed
3. Server-side PHP Issues And Resource Limits
Server-side issues and the limits imposed on the amount of server resources available to your WordPress website can lead to various errors, including the “There has been a critical error on your website” message. How well your server environment is configured and optimized for the specific needs of your website is key.
Server-side issues related to the PHP code execution errors can include having an outdated PHP version in use, which means that some new functions can be completely unsupported, or having various PHP extensions required by WordPress missing. This also includes having certain PHP functions that WordPress needs disabled.
PHP Limits
Server resource limits can be a serious issue for WordPress website owners, especially on shared hosting plans where you have little to no control over your server environment. The limits imposed on the amount of memory or CPU time that can be allocated to a particular PHP process can be extremely low, which often results in your WordPress website not being able to function properly, especially if you have any resource-intensive plugins or custom code.
The three main PHP settings that affect your WordPress website’s functionality and performance significantly are:
- PHP memory limit. The memory limit defines the maximum amount of memory that a PHP process can use.
- PHP maximum execution time. The maximum execution time for PHP sets a time limit for executing each script, and once reached, the server will stop further script processing.
- PHP maximum upload filesize. The maximum upload file size determines how big of a file can be uploaded to the server via a PHP script.
How to Address
Unless you are on a shared hosting plan which does not typically allow you to make any changes to the server environment, you can increase all PHP limits for all websites or a particular one, a directory or even an individual PHP script. You should also be able to switch to another PHP version.
Update PHP Version
If the current PHP version in use is causing issues, which can happen when it no longer supports some of the new functions required by your WordPress website, or when there are certain extensions missing, you can update it from your web hosting control panel.
Raise Global PHP Limits
If you have a VPS or a dedicated server with a control panel, you can use a graphical user interface to manage all server-side aspects of PHP code execution through a graphical user interface. However, most of the time you can only increase the global limits this way, which means those would be applied to all websites on the server.
This is not always an optimal solution as we would want to keep the limits as low as possible while increasing them for certain websites or scripts. You need to remember that just like any other server resource limits, PHP limits are in place to protect your server from getting overloaded or exploited. Malicious scripts tend to use a large amount of resources, so having PHP limits set as low as your website allows for can be one of the factors protecting your system.
Increase PHP Limits Locally
You can increase your PHP limits for a certain website by creating a .user.ini file and placing the new values there. Each PHP handler has its own order that it follows when loading PHP configuration files, but .user.ini typically has a high priority, so all configurations you include there will take effect.
Create a .user.ini file in the document root of your WordPress installation or one of the directories if you would like to increase the limits only for a particular part of your website. Insert the new PHP limits’ values like shown below and save the file.
Please note that the values below are included just for illustrative purposes, and you need to be mindful of the server resources available to you and set the limits taking all factors into account.

Check the New PHP Configuration Settings
To check whether PHP has recognized the new values you have configured, create a PHP info file that will show you all PHP configuration settings, including the global values and the values set for your website specifically. Create a file named phpinfo.php in your website’s document root and insert the following code into it:

Alternatively, run the following if you are logged in to your website via SSH. It will create a phpinfo.php file and adjust its permissions if needed.

Load the PHP information page by opening yourwebsite.com/phpinfo.php in your browser, where yourwebsite.com is the domain name of your WordPress website. You will see the new limits you have applied to your website under Local Value.

How To Fix The WordPress Critical Error in 3 Steps
Follow the three steps below to address all underlying issues and recover your website by getting the WordPress functionality fully restored.
Step 1. Enable Debugging in WordPress
Checking website error logs to understand what has caused the issues is of primary importance when troubleshooting the “There has been a critical error on your website” message in WordPress, especially when your website has become completely inaccessible. Enabling debugging in WordPress allows you to make WordPress display what errors have been encountered during PHP code execution on the HTML page itself or write all log entries to a separate file on the server.
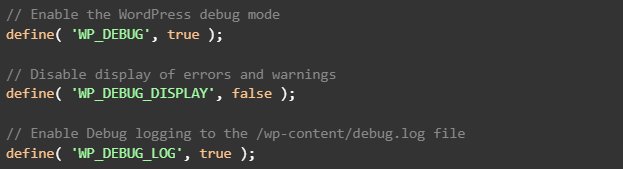
Debugging in WordPress can be enabled by setting the WP_DEBUG constant in the wp-config.php file to true. This will enable the debug mode, and WordPress will start writing all PHP errors and warnings on the web page generated in the browser. This way, you can quickly identify the underlying issue and address it as soon as possible.
Displaying errors on web pages is the default behavior of the debug mode, however, you can make WordPress write everything to a separate log file. Set the WP_DEBUG_DISPLAY constant to false, and enable the WordPress debug log. WordPress now will write all error and warning messages to a file named debug.log inside your WordPress content directory.
Step 2. Identify the Underlying Issue
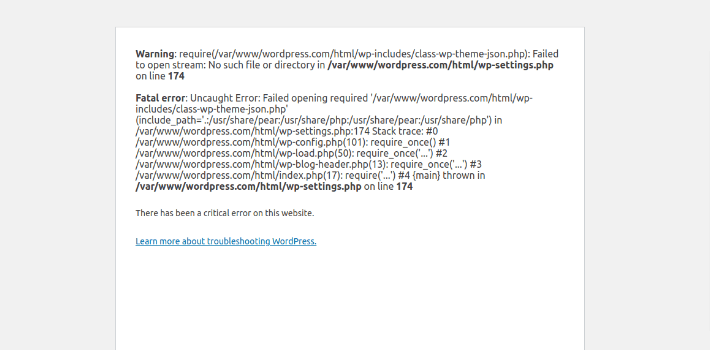
Once you have enabled debugging in WordPress, check the error message displayed on the website or written to the debug log. The error message will help you identify the underlying issue behind the “There has been a critical error on your website” message on your website.
The error encountered by PHP will reference WordPress core files, your active theme, or one of the plugins. Review the log entries carefully to understand what kind of an issue you are dealing with. It can be one of the files or PHP extensions missing, a syntax error, or you may notice that the PHP memory limit was reached.
For example, if the PHP memory limit was reached and your WordPress website was not able to load due to this, you will see the “There has been a critical error message on your website” error, and something similar to the error below will be logged.

Step 3. Fix “There has been a critical error on your website” Message in WordPress
Depending on what the error message displayed on your website or written to the debug log says after you have enabled debugging in WordPress, you will need to take different steps to fix the WordPress critical error and restore your website functionality. Follow the instructions provided in the previous section of the guide to address issues related to failed updates, malware infections, or server-side PHP issues.
Restoring from a backup taken before the failed update happened might be the best and the easiest way to bring your website back online. If there are any recent backups that are sure to contain a working copy of your website, using the files from the backup can be much easier than redownloading WordPress core files or removing malware manually.
Carefully evaluate the situation to work out the best course of action. Remember that if you do not feel comfortable performing the steps outlined in this guide, it is best to seek assistance from your hosting provider’s technical support team. An experienced system administrator will help you quickly identify the reason behind the critical error on your WordPress site and address all issues.
Conclusion
The “There has been a critical error on your website” message in WordPress, also known as the write screen of death, appears on your website when PHP has encountered errors during code execution on the server. To fix the WordPress critical error and bring your website back online, you need to identify the source of the issue and restore the integrity of your website’s code.
The Solid Backups and the Solid Security Pro plugins provide industry-leading solutions for application-level security and data recovery. Having your WordPress website protected from security vulnerabilities while saving regular backups will significantly reduce the risk of experiencing any WordPress critical errors.
Get SolidWP tips direct in your inbox
Sign up
Get started with confidence — risk free, guaranteed
Solid Security is part of Solid Suite — The best foundation for WordPress websites.
Every WordPress site needs security, backups, and management tools. That’s Solid Suite — an integrated bundle of three plugins: Solid Security, Solid Backups, and Solid Central. You also get access to Solid Academy’s learning resources for WordPress professionals. Build your next WordPress website on a solid foundation with Solid Suite!
Join us for the next Solid Academy Webinar!
Free weekly webinars that will help you master WordPress and increase your business's bottom line.
What is a WordPress Phishing Attack?
Learn how to identify and prevent phishing attacks on WordPress websites.
Kiki SheldonWebsite Protection: 5 Ways to Keep Your Website Safe
Robust website protection is the shield that stands between your business and relentless cyber attacks. Prioritizing website protection enables businesses to fortify defenses to safeguard their online presence and preserve the trust of their customers in the face of ever-evolving cybersecurity threats.
Kiki Sheldon23 Ideas To Grow Your WordPress Business in 2023
WordPress is the most popular website-building platform worldwide, trusted by numerous brands. WordPress enables you to build a user-friendly and highly reliable site, together with tools and plugins to enhance your marketing and work like a lead magnet. All these features make WordPress the platform chosen by more than 43% of businesses globally.
SolidWP Editorial TeamSign up now — Get SolidWP updates and valuable content straight to your inbox
Sign up
Get started with confidence — risk free, guaranteed


