iThemes Security Pro 7.0 is Here to Make WordPress Website Security Effortless
The best WordPress security plugin just got even better! iThemes Security Pro 7.0 is officially here and brings significant improvements for everyone, whether you are a WordPress beginner or manage hundreds of websites for clients. WordPress security has never been so effortless. Let's take a look at iThemes Security Pro 7.

The best WordPress security plugin just got even better! iThemes Security Pro 7.0 is officially here and brings significant improvements for everyone, whether you are a WordPress beginner or manage hundreds of websites for clients. WordPress security has never been so effortless.
Let’s take a look at iThemes Security Pro 7.0, the most user-friendly, easy to configure, best-looking security plugin to secure and protect your WordPress website!
A Note On Updating to iThemes Security Pro 7.0
If you manually update to iThemes Security Pro 7.0 from an earlier version of the plugin, you may see an error message in your WordPress admin dashboard. Simply refresh the page to resolve the error. The update may also trigger an email about a technical issue on your site. Simply discard the email.
During a WordPress plugin update, there is a point when two versions of the plugin are running at the same time. Both versions of a plugin running scripts at the same time can trigger an error.
New Setup & Onboarding: Get Your Site from Zero to Secure in Minutes
Many website owners don’t realize the importance of website security until after they’ve been hacked. If you’ve ever been in this situation, the last thing you want to deal with is a time-consuming, complex task of figuring out website security settings and configuring tools. You just want to make sure you never get hacked again.
[pullquote]The new iThemes Security Pro setup and onboarding experience is designed to allow anyone to secure their WordPress website in under 10 minutes, without needing a degree in cybersecurity.[/pullquote] There are also time-saving setup tools if you use iThemes Security Pro for clients.
Knowing that you have enabled all the right security settings for your website will leave you feeling like your site has never been more secure. Plus, once the plugin is set up on your site, iThemes Security Pro will go to work on your behalf, working 24/7 to:
- Stop automated attacks
- Monitor for suspicious activity
- Strengthen user credentials
- Scan for vulnerable plugins and themes
- Block bad bots and reduce spam
Let’s take a look at some of the highlights of the new iTheme Security Pro setup/onboarding experience.
New Security Site Templates to Fit Your Type of Site
iThemes Security Pro now allows you to select your type of site to apply the best security settings.
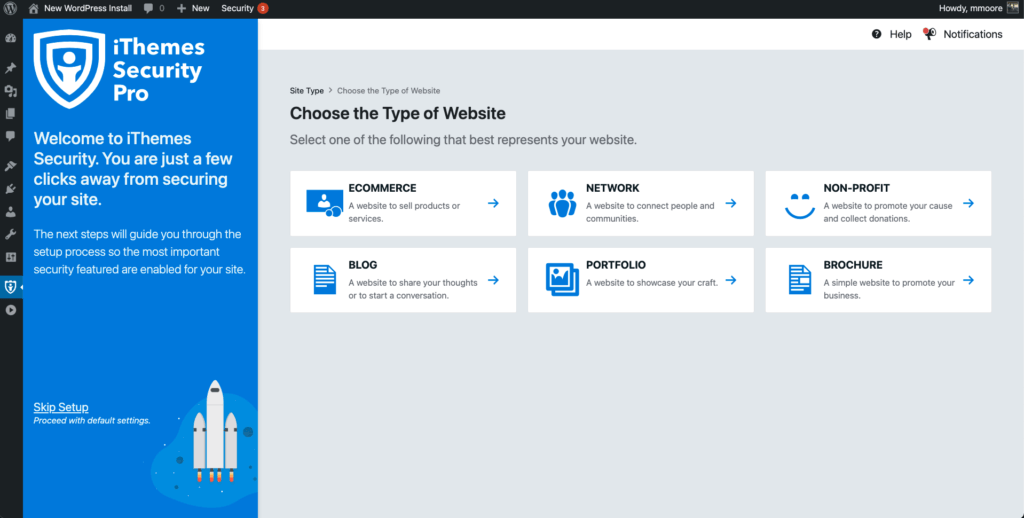
Why? [pullquote]An eCommerce site requires a different level of security than your average blog, so site templates help iThemes Security Pro auto-configure the best security settings for your website.[/pullquote]
You can now choose from six different site templates, including:
- Ecommerce – websites that sell products or services
- Network – websites that connect people or communities
- Non-Profit – websites that promote your cause and collect donations
- Blog – websites that share your thoughts or start a conversation
- Portfolio – websites that showcase your craft
- Brochure – simple websites that promote your business
To make choosing your site type even easier, iThemes Security Pro checks to see if you have any LMS plugins, ecommerce plugins, donation plugins, or network plugins installed and recommends the best site type for you. For example, if you have a membership site using Restrict Content Pro, we will recommend that you use the ecommerce site template.
User Groups: Protection Levels for Users Great for Clients!
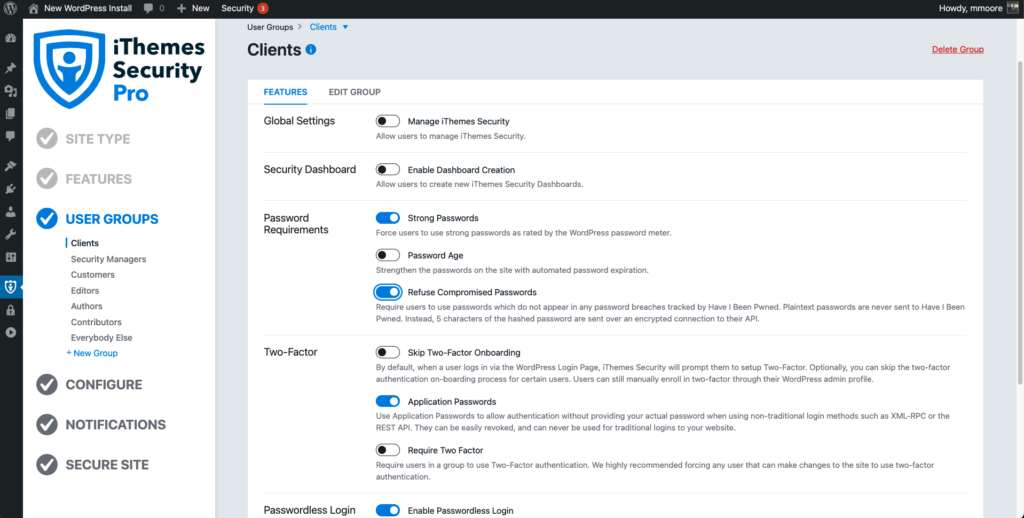
[pullquote]Similar to the type of website you have, different types of users require different levels of security.[/pullquote] During the iThemes Security Pro setup process, you will be asked a series of questions to identify your website’s key user groups. Once the different types of users are identified, you can decide the right level of protection for each group.
How are user groups useful? Here are a few examples of how User Groups are useful for securing your site:
- For Clients – Let’s say you are configuring iThemes Security Pro on a client’s website. You will decide whether or not they are required to use two-factor authentication and if they should have access to the iThemes Security Pro settings.
- For Customers – If you have an eCommerce website, you will decide whether or not you want to protect customer accounts with a password policy.
Need to change something? Don’t worry. If you are the type of person who likes to double-check your work, you will have a chance to review the settings enabled for each user group before they are applied. If you are the type to not second guess your work, you can skip the review process.
Settings Configuration Guidance
Most iThemes Security Pro settings only need to be enabled within the plugin to start protecting your site. But, some settings like reCAPTCHA require you to enter a little extra configuration to start blocking bad guys.
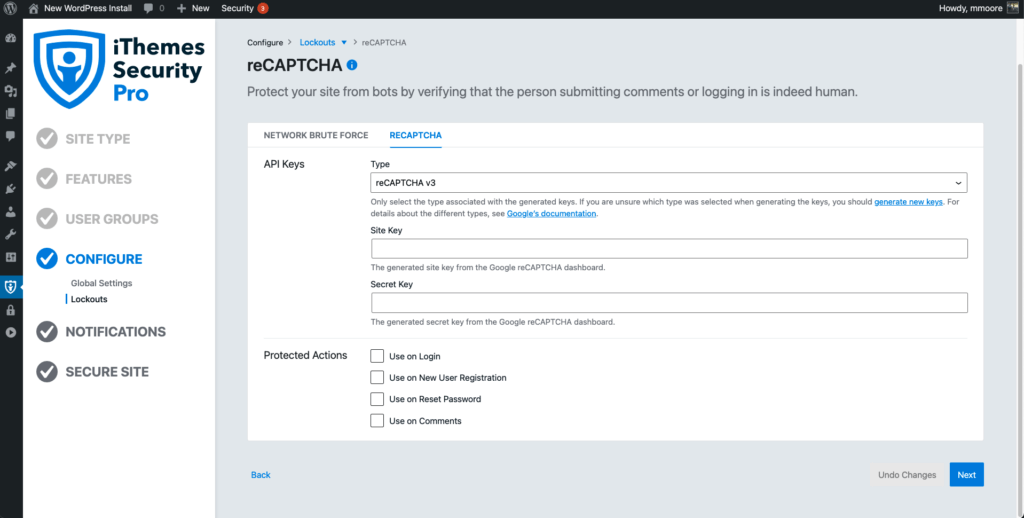
In the onboarding flow, we now highlight the most important settings for you to configure to ensure you are getting the most out of iThemes Security Pro.
Redesigned & Reorganized Settings to Simplify Site Security
Setup and onboarding isn’t the only new thing in iThemes Security Pro. We overhauled the security settings inside iThemes Security Pro, and trust me. It is a lot more than a paint job!
[pullquote]The most obvious upgrade in iThemes Security Pro 7.0 a totally new look and feel for the security settings. (I think it is safe to say that WordPress security has never looked better.)[/pullquote] In iThemes Security Pro 7.0, settings are now redesigned and reorganized to help simplify site security.
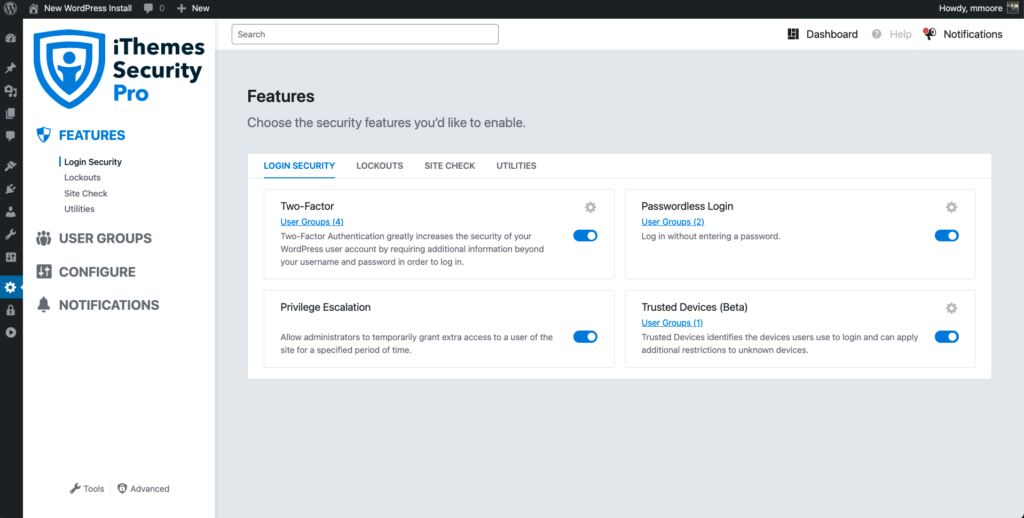
6 New Security Settings Groups
Settings have been consolidated and simplified into 6 settings groups, including:
- Login Security
- Lockouts
- Site Check
- Utilities
- Tools
- Advanced
Let’s take a look at each setting group:
1. Login Security
The Login Security group includes the security features designed to lock down your WordPress login.
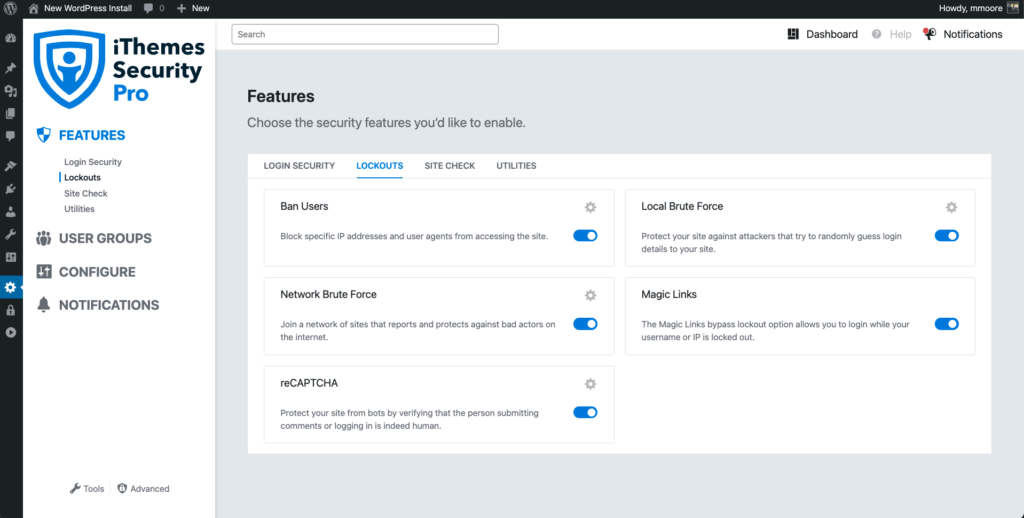
2. Lockouts
The Lockout group includes the security features designed to identify and lockout the bad guys.
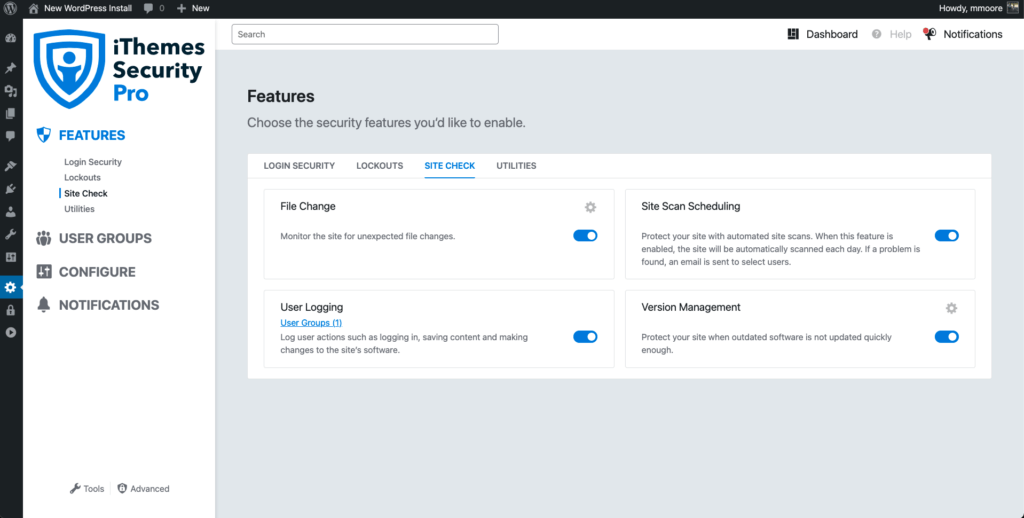
3. Site Check
The Site Check group includes the security features designed to spot vulnerabilities and malicious changes.
4. Utilities
The Utilities groups includes the various security utilities available in iThemes Security Pro.

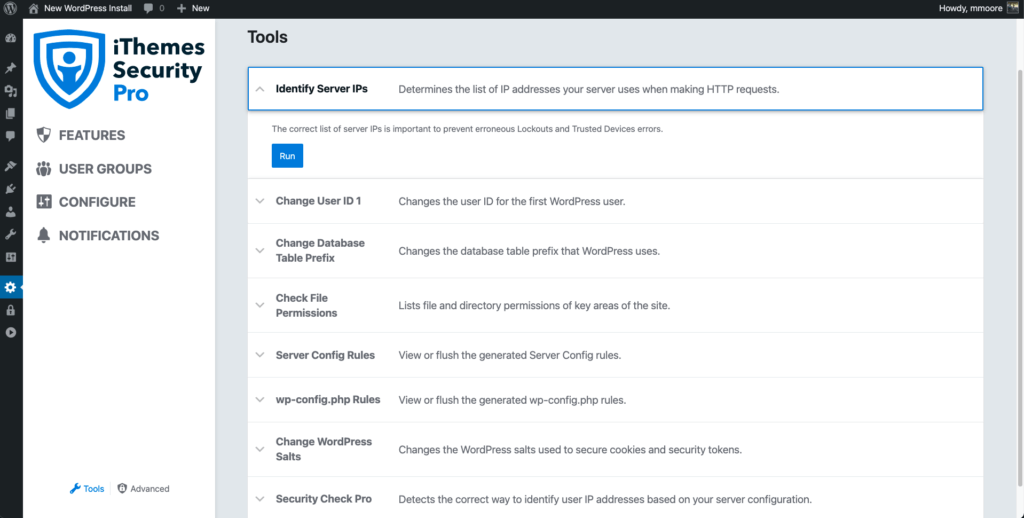
5. Tools
The Tools group of settings includes most of the security checks and tools you can run.
6. Advanced
The Advanced group of settings includes all of the security features that can cause conflicts or aren’t recommended to use on every site.
Questions? New In-Plugin Help for Settings
If you ever run across anything in iThemes Security Pro that you don’t quite understand, don’t worry. Help is only a click away. On just about every page of the security settings you will find a help icon.
Clicking the Help icon will give you additional information relevant to the page you’re on.
Click the More link in the Help icon text box to see a Help Page with links to blog posts, tutorials, and documentation relevant to the page you’re on.
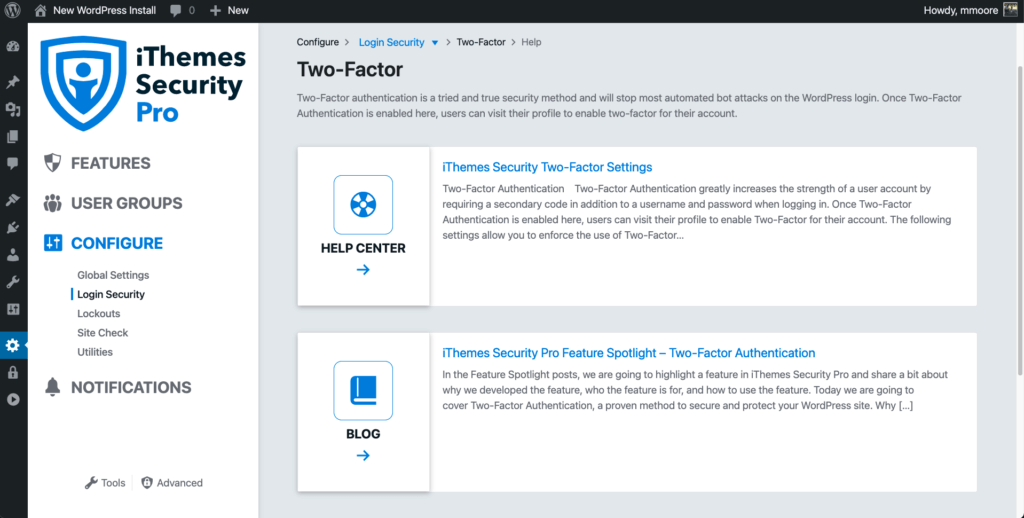
The new in-plugin help inside iThemes Security Pro 7.0 is there to make sure you have the right help when you need it.
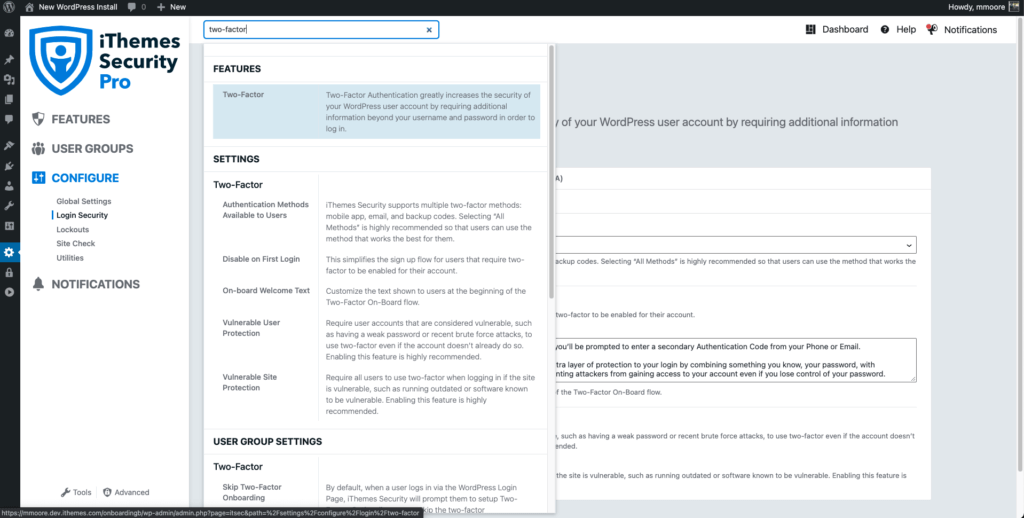
New Powerful Settings Search
The new search makes it easier to find what you need. Not to brag, but it may be the best search tool in the history of WordPress plugins.
Bonus: Settings Now Use React JS
We mentioned earlier that the settings redesign was a lot more than just a paint job. iThemes Security Pro’s codebase has been updated to use React JS. Upgrading to React JS allows us to take advantage of all the cool things getting added to WordPress. And eventually, it will lead to deeper integrations with other iThemes products.
Security Dashboard Updates: 24/7 Monitoring of All the Most Important Security Events
Every day, lots of activity is happening on your site that you may not notice. Many of these activities can be related to your site’s security, so monitoring these events is vital to keeping your site secure.
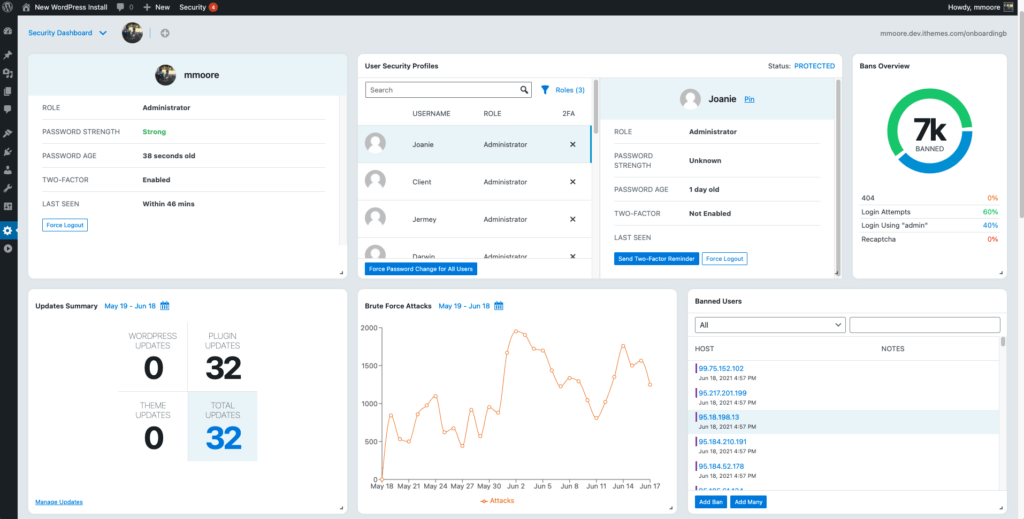
The iThemes Security Pro plugin provides a real-time WordPress security dashboard that monitors security-related events on your site 24 hours a day, 7 days a week. All of your website’s security stats are organized into security cards in the dashboard view within the plugin.
Instead of Settings, Dashboard is New Default View
[pullquote]As one of the biggest changes in iThemes Security Pro 7.0, the Security Dashboard is now the default view of the plugin.[/pullquote] Instead of a boring grid of settings, you now see real-time stats related to the security activity happening on your site.
The dashboard also got some design upgrades in iThemes Security Pro 7.0. The Security Dashboard now has a new simplified design that allows you to check your site’s security at a glance, and perform security-related actions.
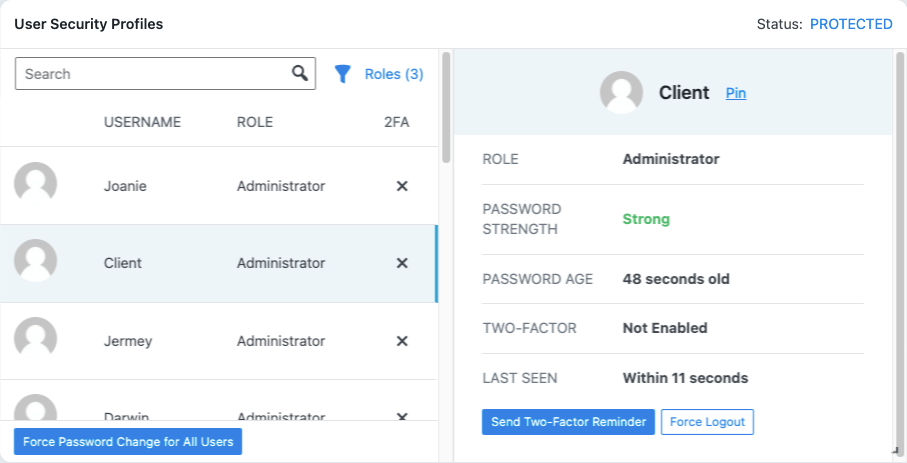
New Actions You Can Take within the Dashboard for User Security
The User Security Profiles card now allows you to filter by user role. Now, from the security dashboard view, you can take these actions to help secure your users:
- Force password change for all users – From the list of all users, you can force a password change for all users.
- Send two-factor reminder – From the individual user role, you can send a two-factor reminder email if the user has not set up two-factor authentication.
- Force logout – Again from the individual user role, you can force a user to logout.
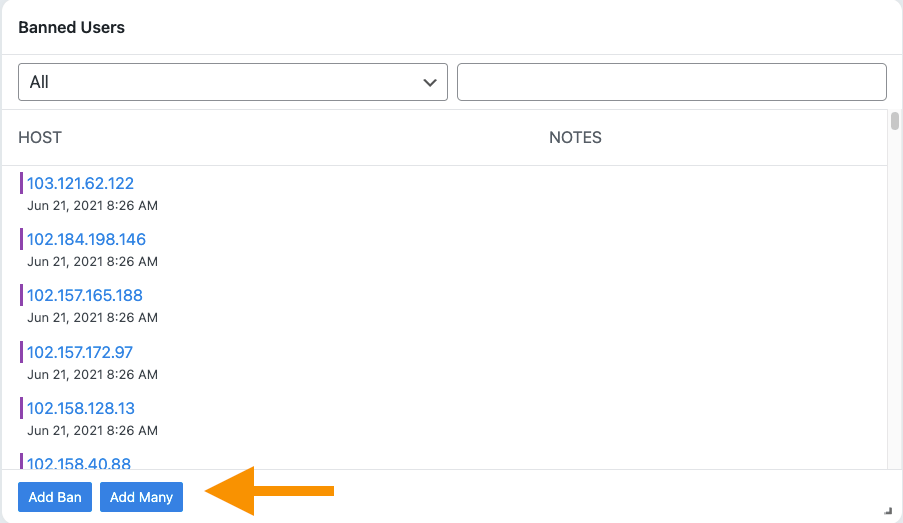
Add Multiple Bans from the Dashbaord
The Banned Users Card can add multiple bans at once.
Improved Accessibility
We worked hard on improving the accessibility of iThemes Security Pro in this release. You should be able to navigate the full interface by keyboard and screen readers should announce the page’s contents and controls appropriately. There are more improvements coming, and if you spot anything we could do better, let us know! We’re committed to making iThemes Security Pro as accessible as WordPress.
Addition by Subtraction: Settings Removed in 7.0
iThemes Security Pro has been securing and protecting WordPress websites for seven years. In that time, the number of features and settings in iThemes Security Pro has grown dramatically.
With how much everything has changed since iThemes Security Pro 1.0, we thought 7.0 would be a great opportunity to reassess the existing security features and settings in iThemes Security Pro 7.0 to see if they still made sense in 2021. [pullquote]We only want to include security features that make a real impact on securing your website.[/pullquote] Not only that, the level of security features we offer need to outweigh the frustration of using it.
iThemes Security Pro adds to the user experience by subtracting settings that no longer make sense in today’s world. [pullquote]In 7.0, we’ve removed settings that were an outdated approach to site security or that caused more frustration than provided a security benefit.[/pullquote]
To recap, we’ve removed certain settings in iThemes Security Pro 7.0 based on these reasons:
- The security setting didn’t actually provide any meaningful security – Again, we only want to include security features that have a real impact on securing your website.
- The security setting no longer makes sense in today’s world – In the past seven years, there have been many changes to WordPress, including the security tools and strategies used to identify and stop cyber-attacks. Some approaches to site security 5+ years ago have simply become outdated.
- The security setting caused more frustration than a security benefit. The level of a security feature needs to outweigh the frustration of using it. As we’ve helped customers through some headaches with certain features, we’ve learned which features are problematic and simply not worth keeping when the security benefit does not outweigh the problems a feature causes.
Here is the list of the settings removed in iThemes Security Pro 7.0, along with a explanation of why it was removed..
404 Detection
More often than not, the 404 Detection setting ended up locking out legitimate visitors to your site. On sites with lots of broken links, it could even end up blocking crawlers like Googlebot, which is a problem for SEO.
Away Mode
Attackers don’t stop trying to break into your website based on the time of day. The Away Mode feature often created a false sense of website security, and caused conflicts with third-party plugins that need access parts of the WordPress admin at any time of the day. Away Mode represents an outdated approach to security, as much stronger methods are now available for securing the WordPress Admin dashboard.
Change Content Directory
The Change Content Direction setting falls into the category of security by obscurity, but it was a pretty ineffective form at that. When used on an existing site, this feature could break your site which is ultimately why we decided to remove it.
Multisite Tweaks
This settings module didn't provide security features, only UI tweaks that aren't particularly relevant to keeping your website safe and secure.
WordPress Tweaks
WordPress Tweaks are settings designed to harden some of WordPress’s potential soft spots, but these settings are no longer beneficial or are ineffective at providing security in 2021.
- Remove Windows Live Writer Header - This feature doesn't have any security benefit, it could hide the URL to your WordPress install's
wp-includesdirectory. But this URL is exposed in many other ways. Additionally, knowing that URL doesn't give attackers a foothold of any significance. - EditURI Header - Hiding the URL of the XML-RPC API on your site is also an ineffective security measure. Instead, we recommend keeping the "Allow Multiple Authentication Attempts per XML-RPC Request" setting disabled in WordPress Tweaks. If you don't make use of any services that require XML-RPC, you can disable it entirely in WordPress Tweaks.
- Comment Spam - The method used to block spam is no longer effective in 2021. Instead, we recommend enabling reCAPTCHA for your comments section.
- Login Error Messages - This setting caused significant friction for legitimate users trying to use your site and provided little security protection. Learn why WordPress doesn't consider disclosing usernames a security issue.
- Mitigate Attachment File Traversal Attack - This protection was added to WordPress core.
- Protect Against Tabnapping - This protection was added to WordPress core and is no longer exploitable in most browsers.
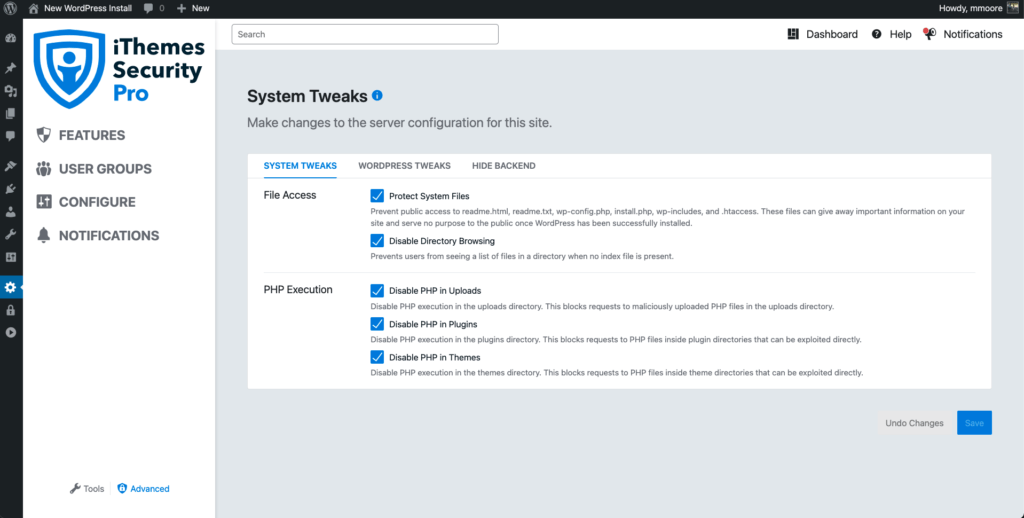
System Tweaks
These settings have been removed from System Tweaks.
- Suspicious Query Strings, Non-English Characters, Long URL Strings - These features provided little deterrence to a motivated attacker and were the most common cause of conflicts with other plugins.
- Filter Request Methods - This is no longer a relevant form of protection.
- Remove File Writing Permissions - This feature didn't offer much protection, since the server's web user would have the ability to change the permissions back. Instead, it would often create conflicts with other plugins and web hosts that expect to be able to write to the
wp-config.phpor.htaccessfiles.
Miscellaneous Settings
- The Backup Full Database setting in the Database Backups module has been removed. The Database Backups module is a simple tool for making backups of your WordPress site, but it isn't a general database management tool. If you have multiple WordPress sites sharing the same database table, we instead recommend configuring backups on each site separately. This will give you smaller and more relevant backups that will be easier to restore from if something goes wrong.
- The SSL module no longer has fine-grained controls for determining which parts of your website should use SSL, instead it enforces SSL for your entire site when enabled. Your whole site should be protected behind HTTPS, otherwise you're leaving sections of your website unsafe and causing your SEO to suffer.
- The Strengthen when Outdated setting has been removed from the Version Management module. This setting overrode your choices in WordPress Tweaks for how your site should be protected. It also caused confusion with the Two-Factor setting that requires users to use Two-Factor when your site is running outdated software. Instead, we recommend enabling "Disable File Editor", keeping "Allow Multiple Authentication Attempts per XML-RPC Request" turned off, and Disabling XML-RPC as appropriate at all times.
Changes to User Security Check & Password Requirements
You will no longer find the User Security Check or Passwords Requirements in the list of features, but all of the functionality is still available in iThemes Security Pro.
See What's New in 7.0 + Register for the Premier Event, June 29 & 30
iThemes Security Pro 7.0 is the most beautiful, easy-to-use security plugin for WordPress.
During this 2-day webinar event, we'll demonstrate the all-new interface and features of iThemes Security Pro 7.0. You’ll be thrilled to see how its new design and simplicity will make it so much easier to keep your WordPress website safe.
We'll also cover how to use iThemes Security Pro 7.0 for security services for clients so you can start selling website security as a service.
Coming Soon: iThemes Security 8.0
A new version of the free version of iTheme Security is right around the corner. iThemes Security 8.0 will include a few new premium features like the Security Dashboard and Refused Compromised Password. Plus, version 8.0 will have the updated design as iThemes Security Pro 7.0.

Celebrate iThemes Security Pro 7.0:
Save 30% Off Through June 30, 2021
[pullquote]iThemes Security Pro 7.0 represents months of hard work by our entire team, from customer interviews to development to testing, all with one goal in mind: make WordPress security effortless.[/pullquote]
With all of the upgrades in iThemes Security Pro 7.0, it's now easier than ever to secure and protect your website.
We never want anyone to have to experience a hack or security breach, so we're dedicated to providing an easy-to-use but powerful solution for securing every single WordPress site on the planet.
There's never been a better time to upgrade to iThemes Security Pro. To celebrate iThemes Security Pro 7.0, we're offering 30% off all iThemes Security Pro plans through June 30, 2021. Just use coupon code 7POINTOH at checkout.*
Save 30% Off iThemes Security Pro
*Offer good on any *new* iThemes Security Pro plan purchase. Coupon can't be used to renew or extend an existing membership. Subscriptions renew at full price, but you can cancel any time. Want to upgrade your iThemes Security Pro plan? Take advantage of our upgrade policy. Questions? Contact our account services team now.
Get Release Notes for SolidWP products delivered right to your inbox.
Sign up
Join us for the next Solid Academy Webinar!
Free weekly webinars that will help you master WordPress and increase your business's bottom line.
What is a WordPress Phishing Attack?
Learn how to identify and prevent phishing attacks on WordPress websites.
Kiki SheldonWebsite Protection: 5 Ways to Keep Your Website Safe
Robust website protection is the shield that stands between your business and relentless cyber attacks. Prioritizing website protection enables businesses to fortify defenses to safeguard their online presence and preserve the trust of their customers in the face of ever-evolving cybersecurity threats.
Kiki Sheldon23 Ideas To Grow Your WordPress Business in 2023
WordPress is the most popular website-building platform worldwide, trusted by numerous brands. WordPress enables you to build a user-friendly and highly reliable site, together with tools and plugins to enhance your marketing and work like a lead magnet. All these features make WordPress the platform chosen by more than 43% of businesses globally.
SolidWP Editorial TeamSign up now — Get SolidWP updates and valuable content straight to your inbox
Sign up
Get started with confidence — risk free, guaranteed

