The WordPress Database Explained
The WordPress database provides the foundation of your WordPress website. Without a database, your WordPress website simply couldn't function. The WordPress database powers your website to load and run, plus stores and saves the content of your blog, such as posts and comments, plus the changes that you (or even your visitors) make.

The WordPress database provides the foundation of your WordPress website. Without a database, your WordPress website simply couldn’t function. The WordPress database powers your website to load and run, plus stores and saves the content of your blog, such as posts and comments, plus the changes that you (or even your visitors) make.
In this article, we’re going to look at what the WordPress database is and how it works. By the end of this post, you’ll have a much more thorough understanding of the data that drives your WordPress website. Let’s dive in.
Does WordPress Have a Database?
As you probably already figured out, yes, WordPress requires a database. WordPress is a database-driven, open-source content management system or website platform, written in PHP. WordPress uses a database to store and retrieve the content of your website or blog.
Essentially, a WordPress website is “a friendly face on a database.”
WordPress uses the MySQL database management system. If you’re not familiar with MySQL, it an open-source relational database management system (RDBMS) that is commonly used to create databases. MySQL uses Structured Query Language (SQL), a popular language for databases. MySQL works best with other open-source applications like WordPress, Apache web server, the Linux operating system and PHP.
Before you can install the WordPress software, you first need to have a MySQL database. When looking for a hosting provider for WordPress, you’ll notice that all of them have MySQL already included in their packages. During installation, you provide WordPress with the information about your specific database and WordPress sets up the rest.
Most WordPress users will never need to interact with the WordPress database. It simply operates behind the scenes. But it’s helpful to understand what the WordPress database is and how it works if you’re interested in theme or plugin development or contributing to WordPress core.
What Is the WordPress Database?
The WordPress database is a MySQL database that stores your website’s data into tables, rows and columns. The WordPress database is dynamic, which means you can add, modify and delete information contained within it (provided that you have administrative access).
Here’s more on the WordPress database description.
Get SolidWP tips direct in your inbox
Sign up
Get started with confidence — risk free, guaranteed
Why Does WordPress Need a Database?
Generally speaking, every WordPress site consists of a lot of different data types. All of this data has to be stored somewhere. That is where the WordPress database comes into play.
The database concept is not unique to the WordPress platform. A database can be simple or complex. It can be small or large. But what all databases have in common is that they store information in a way that’s fast and simple to access.
Some examples of the different types of data that is stored in the WordPress database include:
- Pages, posts and additional content
- Tags, categories and other organizational information
- User comments and profile data
- Theme and plugin-related data
- Full-site settings
It’s easy to see how nearly everything that comprises your website is stored in the WordPress database. This alone is a good reason to learn more about how the WordPress database works.
How Does the WordPress Database Function?
When you first install WordPress to create a new site, a database is created. Most often during WordPress installs, the database is created automatically. However, it’s also possible to manually create a database or use a database that already exists. Regardless whether it’s automatically created or if you create one manually, your new database will be stored on the server of your hosting provider (sometimes called a database host).
When a user lands on your website, their browser pings a request to the server of your site. The server sends that required data to properly display your site and allow it to work for your users the way in which you intended.
Any database needs software to function. In the case of the WordPress database, that software management system is called MySQL, an open-source software.
Because the WordPress database uses the MySQL platform, you’ll often hear the database for your site called the “MySQL Database.” But don’t let that intimidate or confuse you. All that means is that MySQL is what enables your database to store info and give you direct access to the data. When you need to store, delete or alter data, WordPress will send a MySQL query to your database instructing it to perform the specific actions that you requested in the administration panel.
WordPress Database Structure
Without the MySQL platform, you wouldn’t be able to access the WordPress database. Think of MySQL as the engine that powers your database.
What data is stored in the WordPress database? And how do you find and access the database for your WordPress account?
Let’s look closer at the WordPress database structure, as well as the types of data and tables included in the database.
What Is Stored in the WordPress Database?
At the beginning of the article, we talked briefly about how the information within your WordPress database is organized. For gigantic amounts of data to be accessed easily and quickly, it gets organized into database tables.
Think of a database table as a folder inside of a large filing cabinet. Each folder, or table, is organized into different specific categories of data.For example, the physical filing system in your home might include one folder for receipts and another for upcoming bills. Similarly, the WordPress database has different tables for posts, user comments, user data and so forth.
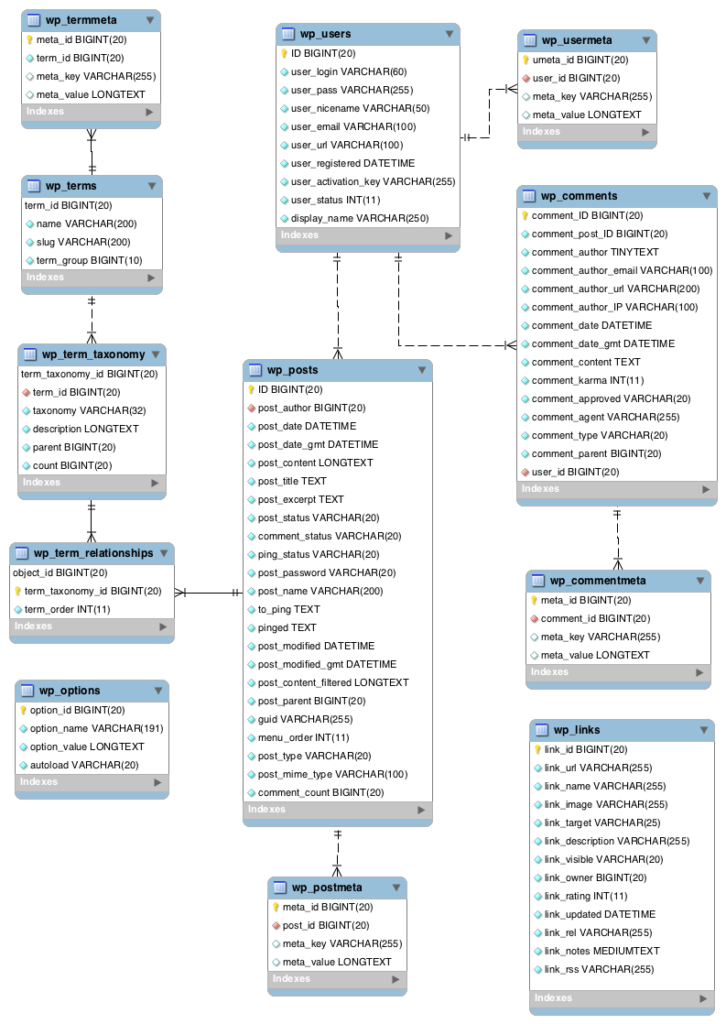
Default WordPress Database Tables
Every brand new WordPress database install will includes 12 tables. The names of the tables give you a pretty solid idea of what each table is responsible for storing.
Additionally, each table will contain a variety of fields and columns that store even more specified bits of data. For example, the wp_comments table has all of the data related to user comments on your posts and pages.
| Table Name | Description |
|---|---|
| wp_users | The list of users on your WordPress website. Users of all WordPress user roles are stored here (administrator, editor, author, contributor, subscriber, etc.) Additional user information stored in this table includes username, first name, last name, nickname, password, email, registration date, status and role. |
| wp_usermeta | Each user features information called the meta data. Metadata stored here includes a unique user ID, meta key, meta value, and meta ID. These are all unique identifiers for users on your site. |
| wp_term_taxonomy | WordPress uses three types of taxonomies, including category, link, or tag. This table stores the taxonomy associations for the terms. |
| wp_term_relationships | This table stores the relationships between posts, categories and tags. The association of links to their respective categories are also kept in this table. |
| wp_termmeta | Each term features information called the meta data and it is stored in wp_termmeta. |
| wp_terms | The categories for both posts and links and the tags for posts are found within the wp_terms table. |
| wp_posts | The core of the WordPress data is the posts. This table stores the content of any post or page that you’ve published, including autosave revisions and post option settings. Additionally, pages and navigation menu items are stored in this table. |
| wp_postmeta | Each post features information called the meta data and it is stored in the wp_postmeta. Some plugins may add their own information to this table. |
| wp_options | All settings set from the WordPress admin dashboard’s Settings page are stored here. This includes all theme and plugin options. |
| wp_links | The wp_links holds information related to the links entered into the Links feature of WordPress. (This feature has now been deprecated, but can be re-enabled with the Links Manager plugin.) |
| wp_comments | All comments published to your site are stored here, along with additional information about the comment author (name, URL, IP address, email address, etc.) |
| wp_commentmeta | Each comment features information called the meta data and it is stored in the wp_commentmeta, including comment ID number. |
WordPress Database Table Example: Comments
Any WordPress database table can be expanded to reveal all the data stored within the table. Take the wp_comments table, for example.
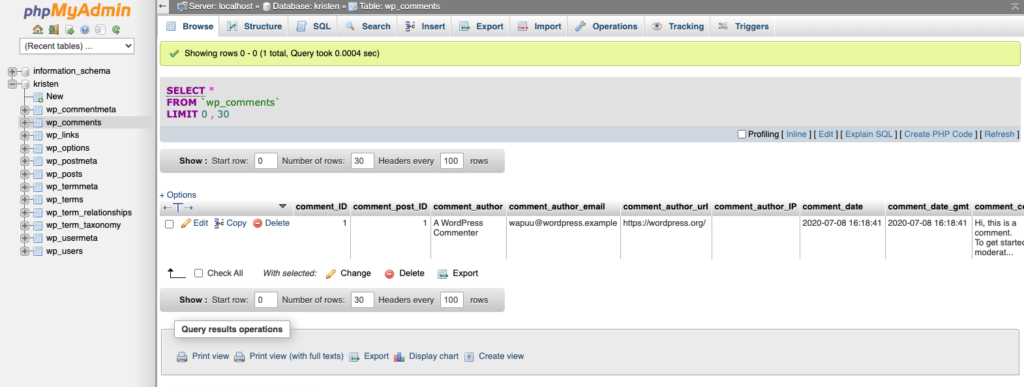
As you can see, the WordPress database tables wp_comments is broken down even further into the these columns:
- comment_ID
- comment_post_ID
- comment_author
- comment_author_email
- comment_author_url
- comment_author_IP
- comment_date
- comment_date_gmt
- comment_content
- comment_karma
- comment_approved
- comment_agent
- comment_type
- comment_parent
- user_id
As you can see, your database stores a lot more information about each user comment on your site than you probably thought. It stores info on each comment’s author details, unique user ID, where the comment can be found, and much more.
How Do I Access My WordPress Database?
Your WordPress database is mostly self-sufficient and regular users won’t likely ever need to access it. For example, you won’t have to constantly access the database in order to run your site or create/modify site content. However, there are situations where it’s important to know how to access and understand what’s within your database.
Some of the reasons you may want to access the WordPress database include:
- Learning and better understanding of how your website is structured
- Performing tasks that can’t be done in the WordPress dashboard
- Troubleshooting common errors in WordPress
You will also want to access the WordPress database when you want to reset, repair or optimize your site to make it run faster. With these things in mind, let’s take a look at how to access and manage the database.
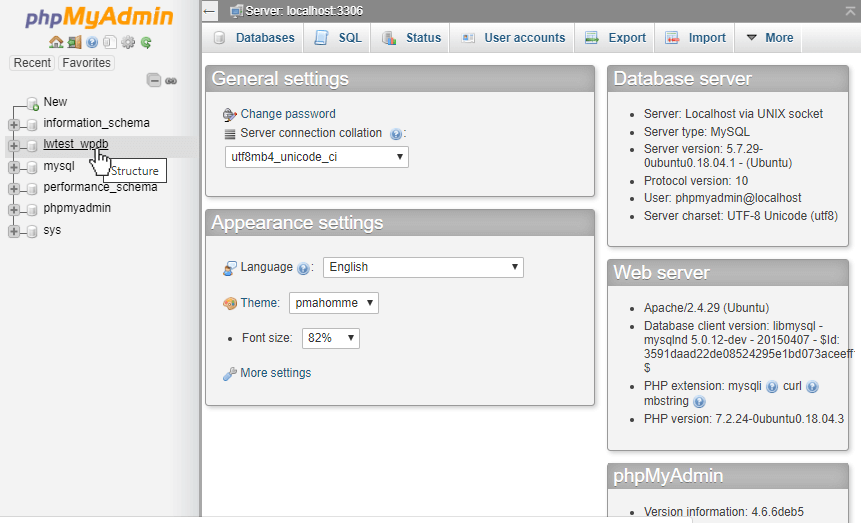
phpMyAdmin
Remember how we mentioned that your database is stored on the server for your site? Because of this, you’ll have to access your WordPress database via your hosting provider.
Depending on the hosting provider you’re using, the process of accessing the database can vary a bit. But in almost every case you’ll access it through a utility that’s called phpMyAdmin.
What is phpMyAdmin? phpMyAdmin is a free software tool that allows you manage the MySQL database of your website.
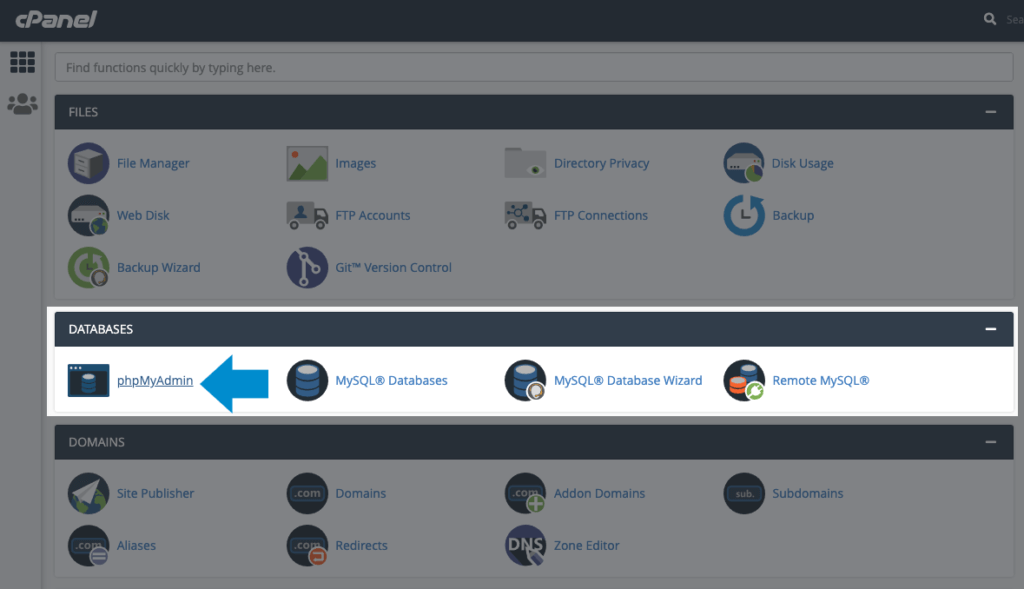
cPanel is one of the most common web hosting control panels used by hosts, so your web hosting dashboard will probably look something like this screenshot. Also note that if your host uses a unique, non-standard management system this process may be a bit different.
After logging in to your web hosting account’s dashboard, you should have an option to open phpMyAdmin. Locate the phpMyAdmin icon within the Databases section of your cPanel control panel.
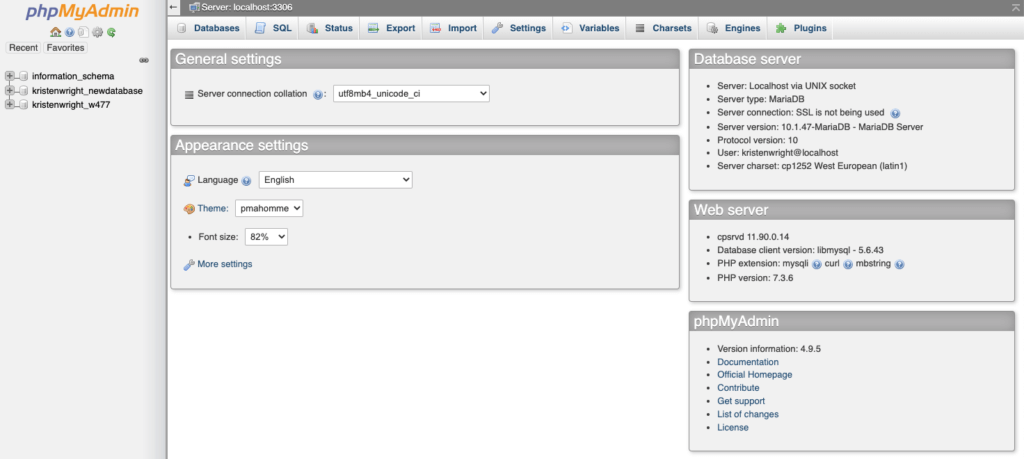
When you open phpMyAdmin, you’ll see a login screen. Here is where you’ll enter your database username and password. This information is shown within the dashboard of the Database access section. You are now in the phpMyAdmin manager.
Accessing the WordPress MySQL Database and Making Changes
No matter what host you use to access it, phpMyAdmin will have the same consistent look.
At the top of the screen, you’ll see the “Databases” tab where you’ll find a complete list of databases. You’ll see a few that are related to phpMyAdmin and one that is named after your site.
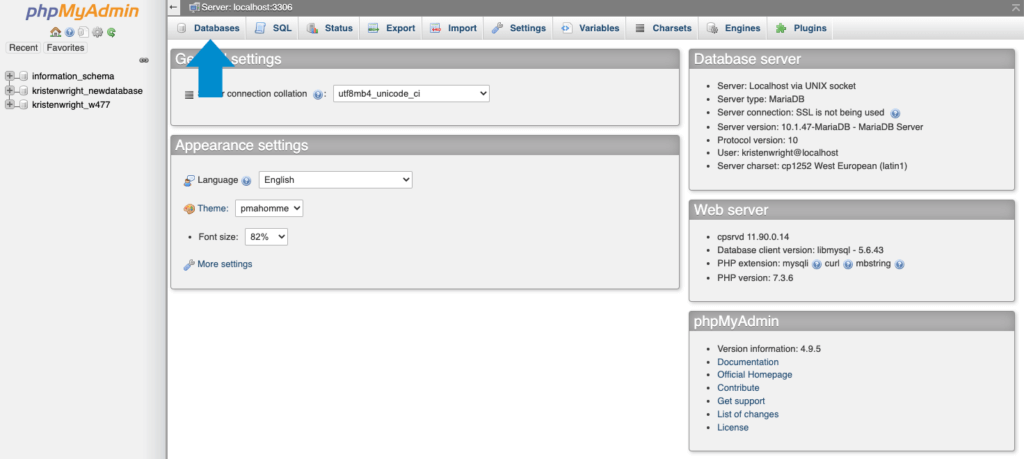
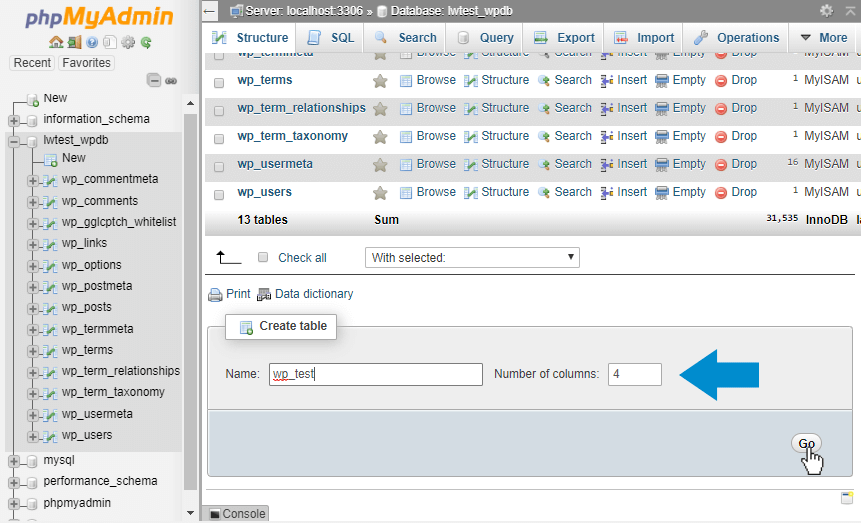
Click on the one named after your website and you’ll see your website’s full database. As you’ll notice, this list includes the database tables detailed earlier in this article. You can access each one individually to see the fields and columns within it.
From this position, you can use the options to search for, modify, delete or add data. For example, let’s say that you want to change the username on your WordPress account. There’s no way for you to do this in the WordPress dashboard, but it’s quite easy when you access the WordPress database.
All you need to do is select the wp_users table, click on “Edit” next to the name you want to change and simply add the new username to the “Value” field that’s under user_login.
When it’s time to finalize the changes, select “Go.” Your account’s username is now updated in WordPress.
A Word of Caution
As you dig into the WordPress database you’ll find that a lot of tasks related to the database are just as simple as that. All that you really need to do is locate the correct piece of data and make a simple change.
However, it’s important to be careful when you make changes. It’s always a good idea to know the exact task you want to accomplish before you start. Then do a few searches for a tutorial or guide that’ll show you where to find the data you’re looking for (and what you need to do when you find it).
You can also search for plugins that help you manage your database. There are quite a few free options available in the WordPress repository.
If you don’t consider yourself to be a professional web developer, you might be a little intimidated by the thought of interacting with your database. But keep in mind that it’s a task definitely worth learning.
When you learn about your database you’ll be able to make more changes to your site than you thought were possible. And the majority of WordPress site hosts make it quite easy to access and manage the database. You’ll get good at this faster than you might think.
How Do I Create a WordPress Database?
The easiest way to create a WordPress database is by using the WordPress install functionality provided by your web host.
When you install a new application of WordPress, the MySQL database is created automatically without any required interaction from you. However, there are other times when you may want to create a new WordPress database manually.
There are a few different ways that you can create a WordPress database on your own.
- The MySQL Database Wizard in your web hosting control panel. The fastest and easiest way to create a WordPress database is with the MySQL Database Wizard located in your web host’s control panel (or cPanel).
- Through phpMyAdmin. The user interface isn’t nearly as easy to use, but database creation can happen in phpMyAdmin, if your user has privileges.
- Through the command line in MySQL (more on that later).
Here are a few important tips to know before you create a new WordPress database.
- When naming your database, avoid using names that are predictable such as “mydatabase” or “blogdata.” If there’s a malicious attack and the user is trying to get into your database, it’ll be more difficult for them if your name is something that isn’t quite so obvious.
- Keep in mind that you should also avoid using usernames that are too predictable, like “blogger” or “admin.”
- Use a strong password from a password generation tool or create one that has a minimum of eight characters, including letters, numbers and special characters. Avoid using names or dictionary words as database user passwords. A good example of what a strong password should look like is:
Once the new WordPress database is created and you’ve made a username and password to access it, you’ll need to set the user privileges.
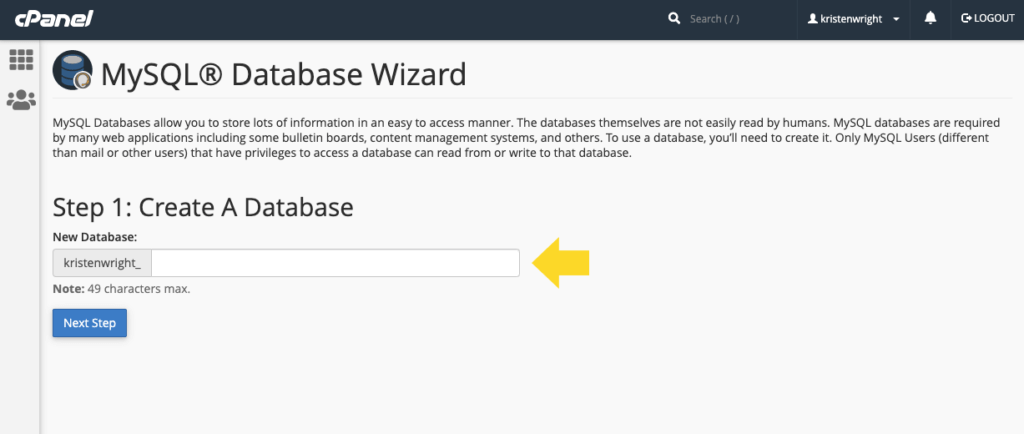
Creating a new WordPress database from the MySQL Database Wizard
Log in to your new hosting account to access cPanel. Note: your host may use a different hosting backend service other than cPanel, but the process will be similar.
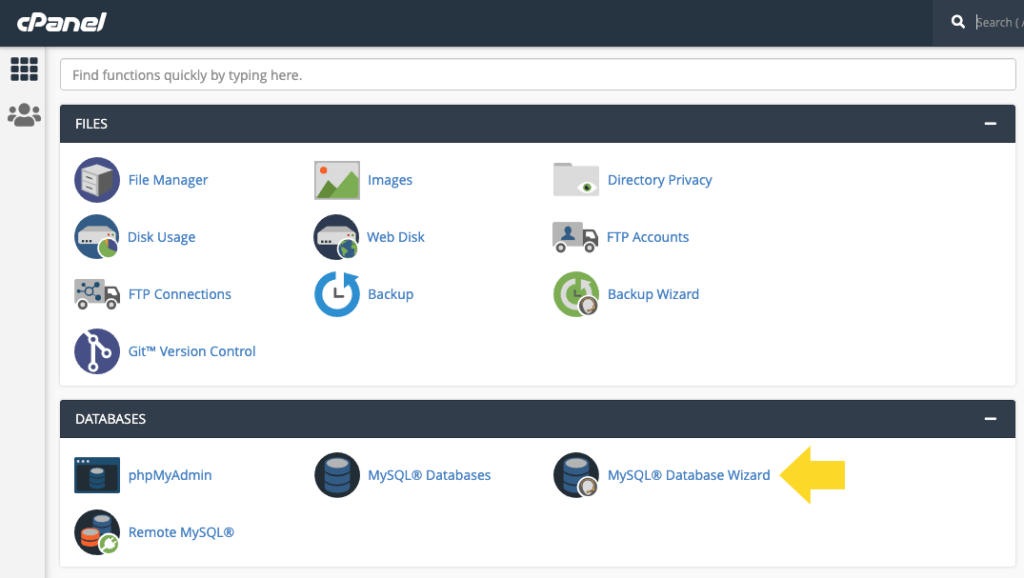
From cPanel, locate the MySQL Database Wizard icon in the list and click on it. The MySQL Database Wizard will guide you through the next steps. First, add the name of the new database. Click “Next Step.”
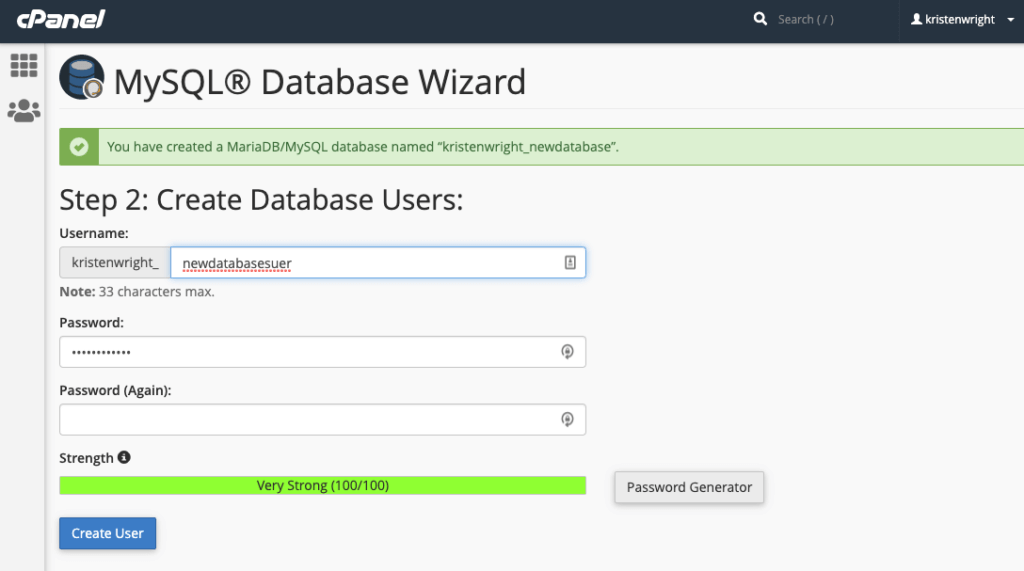
Next, add a database user. Use the password generator to create a strong password. Don’t forget to copy the username and password you create here to a secure location using a service like 1Password. Click “Create User.”
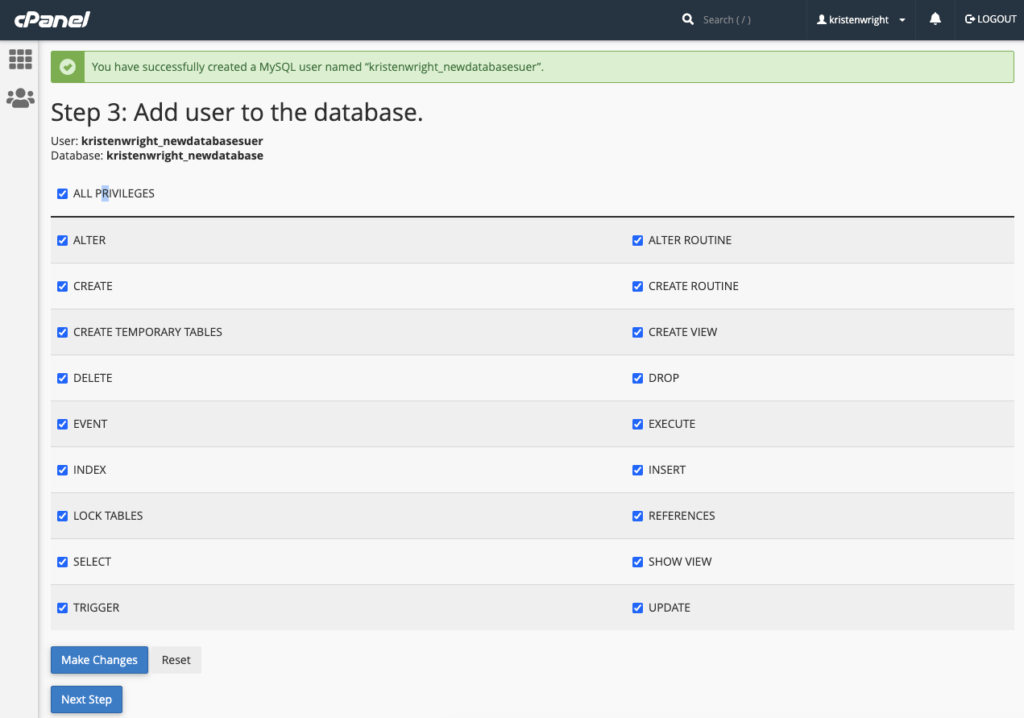
The next screen will add the new user to the database. Click the “All Privileges” checkbox and then click “Next Step.”
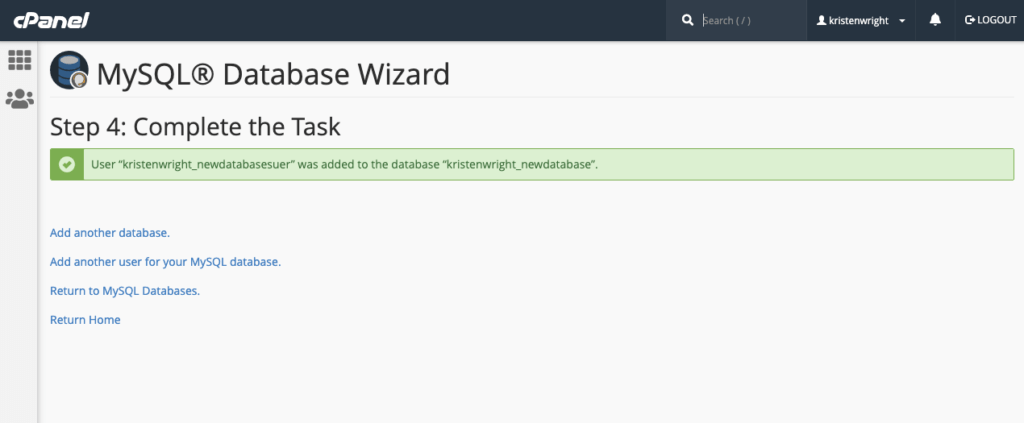
The final screen confirms the creation of the new database and the new user.
Using phpMyAdmin To Create the MySQL WordPress Database
Log in to the phpMyAdmin interface as described in the “phpMyAdmin Login” section above. Once you’re logged in, find and click on the Database tab.
You’ll want to specify a name for your database in the “Create New Database Input” file. Click on the button that says “Create.”
Now that the database is created, it’s time to set up a new user to access it. To do this, you’ll want to navigate to the tab that says “Privileges” and click on “Add New User.” On the “Add New User” page, enter a new username, host and password. You can ignore the other fields.
If you’re installing WordPress on the same server as MySQL is hosted, (this is the most typical scenario) set the host to Localhost. What this means is that the user will always connect from the same host computer. Any requests using credentials from remote servers will be immediately denied.
Once you’ve created the new user, from the “Privileges” tab click “Edit Privileges” for the new user. Scroll down to the privileges section that is specific to the database and assign user privileges to only the newly created WordPress database. You’ll be able to select the database from a drop-down menu.
After you choose the new database, you’ll be redirected to a page where you’ll specify the specific user privileges for it. When you’re installing WordPress, it’s safe to assign a user all privileges except administrative, unless you’re comfortable with the new user having administrative privileges as well.
Using the Command Line To Create the MySQL WordPress Database
If you want to create your database without using phpMyAdmin, you can use command line.
At the command line, log into MySQL as the root user.
>mysql -u root -p
Enter password: ********
Once your password is specified, you’ll get connected directly to the MySQL database. You should now be at a MySQL prompt that looks very similar to this:
mysql>
To create a new MySQL database, issue the following command, where database_name is the name of the database you want to create:
CREATE DATABASE database_name;
Once you’ve created the database, you’ll want to create a new users. For your database named database_name, let’s say the new username is junglechild and you want to set the password to rX3V79#e^!) specifically.
In this case, the full command to type in would be:
GRANT ALL PRIVILEGES ON T8967RRT.* TO "junglechild"@"localhost" IDENTIFIED BY "rX3V79#e^!)"
Once you’ve created the new user and privileges are assigned, you’ll want to run the command FLUSH PRIVILEGES to flush out all old privileges and start using the newly assigned ones.
Recommended Permissions for the WordPress Database
For standard WordPress operation, the database user needs only SELECT, INSERT and UPDATE privileges. It’s highly recommended to use the absolute minimum of privileges when you’re running a WordPress database.
Additional privileges like CREATE, ALTER and DROP can occasionally be needed during major upgrades. They can also be needed when plugins are installed that need to change the structure of your database in order to function on your website.
In cases like this, the plugin developer will advise you that such changes are required to the user privileges of your database.
MySQL Queries
A lot of MySQL queries related to the database will run automatically. However, you also have the ability to directly access the database and run commands and queries by hand. A database manager helps you simplify the process.
Let’s take a look at a relatively straightforward example of a MySQL query:
DELETE FROM wp_comments WHERE wp_comments.comment_approved = 'spam'
This query will inform the database to look at all data related to comments made by users. It’ll find and delete all comments that you’ve already marked as spam.
By conducting queries by hand, you can better accomplish certain tasks that you can’t do from the dashboard. You can do things such as changing the username on your account, which the dashboard doesn’t allow.
How Do I Reset My WordPress Database?
There may be times when you want to reset your database to the original settings. For example, if you’re working on a test site or local server, you might want to restore the database back to how it was before you made changes.
Resetting your WordPress database can be done with only a couple of clicks.
If you don’t want to create a backup copy of the entire site, you can create a backup of just the WordPress database. More on this further below.
To reset the database to its default settings, you’ll first need to install and activate the plugin called WP Database Reset.
Once the plugin is activated, go to the page Tools > Database. From this location, you can click to select the tables you wish to reset. If you want to reset all of the tables in the database, click on “Select All Tables.”
If you select all tables, you’ll be given the option to reactivate your active plugins and the current theme. The plugin also preserves your active WordPress user account.
After this, the reset will need to be confirmed by entering a security code in the required text box and clicking on the “Reset Tables” link. When the warning popup appears on your screen, click OK to continue.
The plugin then proceeds to delete all of the data in your database tables. When the process is complete, you’ll notice a “success” message on the settings page of the plugin.
After several moments, you’ll be automatically logged out of your admin area in WordPress. At this point, you can log in again using the same account. Your database has been reset and the way your website now appears will reflect this when you refresh it.
How Do I Repair My WordPress Database?
If you’d like to repair your database rather than reset it completely, the first thing to do is open your WordPress host’s control panel area and log into your account.
Once you’re in, you’ll see all of the options that your host provides you with inside of the control panel. Find the phpMyAdmin icon like you did earlier in the article and click on it.
For most host’s control panels, you’ll be able to find phpMyAdmin under a header that says “Databases.”
Once you’re inside of the phpMyAdmin interface, you’ll want to select “Correct WordPress Database.”
Upon doing this, you’ll see that all of your internal folders will appear within the sidebar. All of the folder names will begin with wp_.
If you have more than one WordPress site on the server, you’ll see all of them when you select “Correct WordPress Database.” Double-check that the correct database has been selected before proceeding any further with the repair.
Once the correct database has been opened, make sure that every part of the database gets repaired (unless, of course, the error message you received told you that only one specific part of the database was corrupt).
To repair all parts of the WordPress database, head to the bottom and select “Check All” within the main directory. This highlights all subdirectories within the database.
After you see that all subdirectories are selected, open up the list that’s next to the “Check All” field.
Select the option that says “Repair Table.”
After the process runs, check to see that it worked on the repair results screen. There, it will tell you if the repair was successful.
How Do I Optimize My WordPress Database?
With time and use, WordPress databases can become corrupted or need good overall housekeeping. This is where database optimization steps in.
You should optimize your WordPress database on a regular basis to keep it clean and functioning at its best. Without regular optimization, you’ll notice that your WordPress site speed will slow down over time. WordPress database optimization is a relatively simple process with a couple of different ways of getting it done.
Easy WordPress Database Optimization with iThemes Sync
iThemes Sync is great tool to help you manage multiple WordPress sites. Within the iThemes Sync dashboard, you can perform several database optimizations all at once, for all your WordPress sites.

Here are a few of the WordPress database optimizations performed by iThemes Sync. You can select all of these to run and iThemes Sync will go to work deleting the unnecessary bloat from your website.
- Delete Trackback URLs – Deletes URLs added to the “pinged” and “to_ping” columns in your posts table.
- Delete All Revisions – Deletes all revisions from posts, pages, and all other post-types.
- Delete All Trackbacks – Deletes all trackbacks from other sites stored in your comments table.
- Delete All Pingbacks – Deletes all pingbacks from other sites stored in your comments table.
- Delete All Auto-Drafts – Deletes all auto-drats from posts, pages, and all other post-types.
- Delete All Trashed Items – Deletes all posts, pages, menus, and all other post-types that have been trashed but not yet deleted.
- Delete Unapproved Comments – Deletes all comments waiting to be approved.
- Delete Trashed Comments – Deletes all trashed comments that have yet to be deleted.
- Delete Spam Comments – Deletes all comments that have been marked as spam.
- Delete Orphaned Commentmeta – Deletes all commentmeta that references a deleted comment.
- Delete Akismet Metadata – Deletes all metadata attached to comments by the Akismet plugin.
- Delete Stale Transient Options – Deletes all transient options that expired more than a week ago.
Optimize Database via phpMyAdmin
The first way of doing it is by logging back into phpMyAdmin and clicking on “Databases.” Here, you’ll see listed the database you want to optimize. Again, you’ll see all of the tables related to your website database.
From there, all you need to do is scroll down the page and click on “Check All.” Then navigate to the “With Selected” drop-down menu and choose “Optimize Tables.”
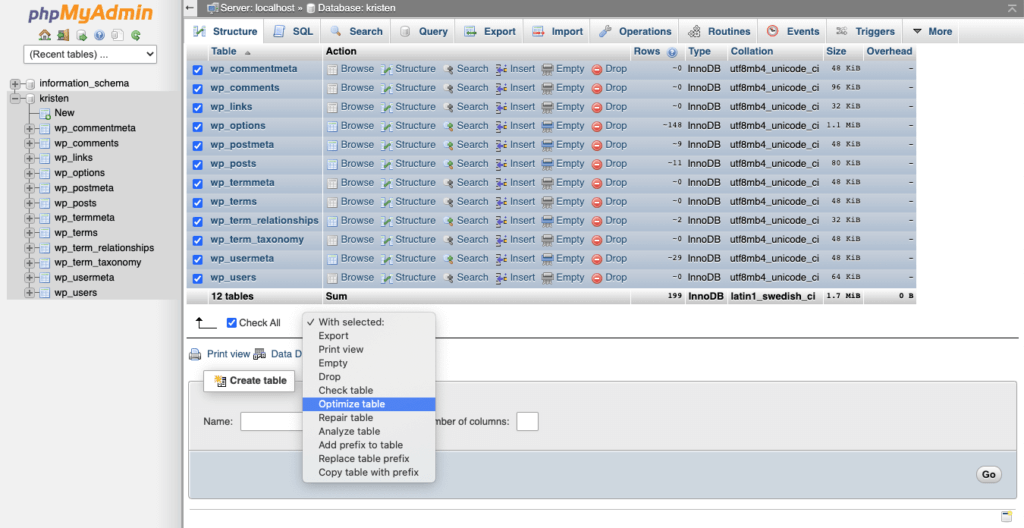
The system now optimizes all of your selected tables.
WordPress Plugins for Database Optimization
If you’d rather optimize your WordPress database with a plugin, there are a couple of different ones that you can use. This may be a more comfortable option for you if you’re not excited about poking around in the database manually.
The first one is called WP-Optimize and can be found on the WordPress plugin repository.
This plugin is simple to install and operate for nearly anyone that manages a WordPress database. You can also use it to schedule an automatic optimization at any time of the day or night.
How Do I Backup My WordPress Database?
We strongly recommended (and we do mean strongly) that you always backup your WordPress database at regular standard intervals (once per month is a good idea) with a reliable WordPress backup plugin like BackupBuddy. (Here are some more tips on WordPress backup schedules.)
We especially recommend that you backup your databases prior to performing site upgrades or even optimizations. This way, if something goes wrong, you’ll be able to restore the database (and your website) without any panic.
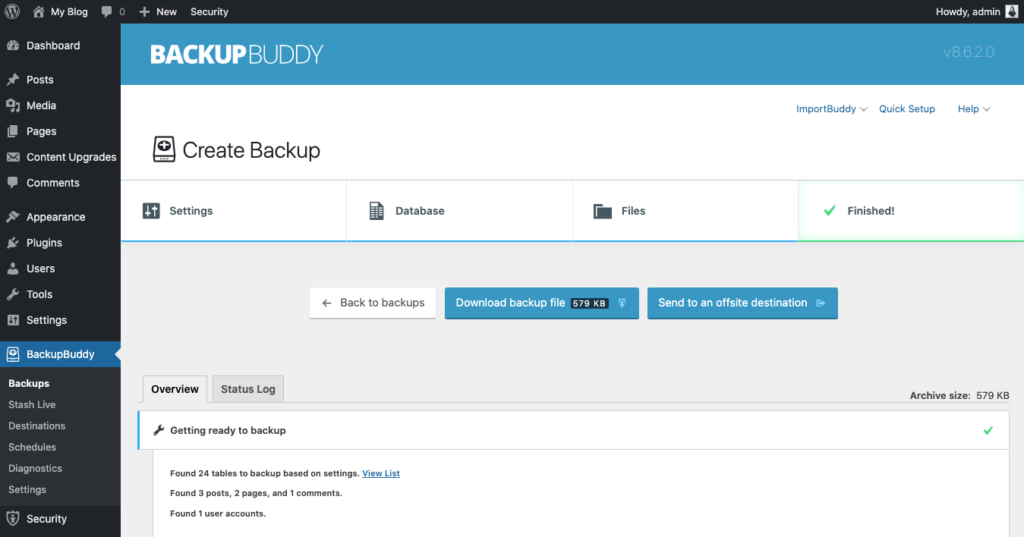
The Easy Way: Database Backup with BackupBuddy
By far the easiest way to backup your WordPress database is by using the WordPress backup plugin, BackupBuddy. BackupBuddy allows you to easily backup, restore and migrate your WordPress website to a new server or domain name.
After you download and install the BackupBuddy plugin, it will take you step-by-step through the process of backing up your site and database in a way that any novice can easily understand.
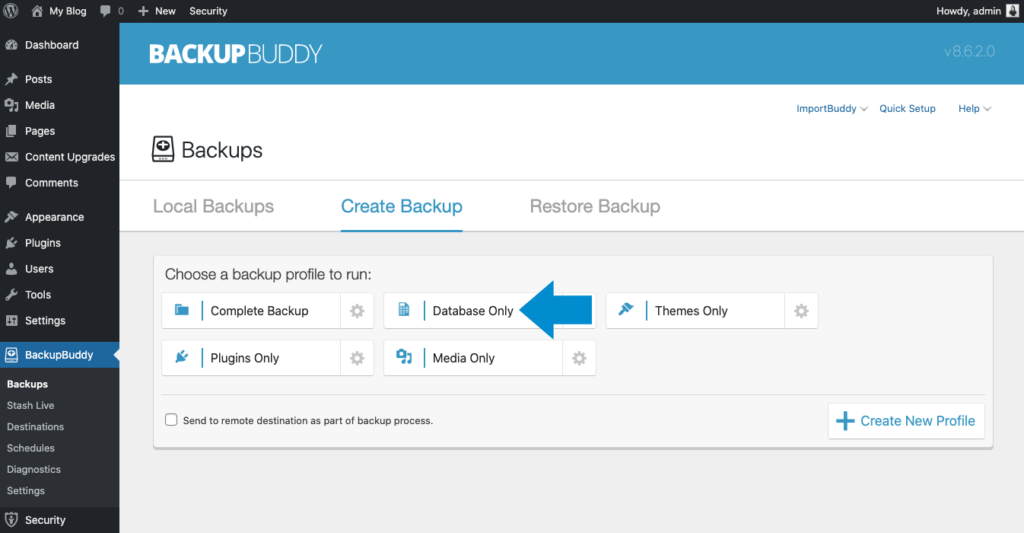
BackupBuddy is a powerful plugin that’s perfectly suited for backing up your database on a regular basis. In fact, it performs 5 types of WordPress backups.
The Manual Method: Database Backup Via phpMyAdmin
But if you’d rather tackle the job manually, you can do that as well. The first thing to do is to log into phpMyAdmin on your server. From the window on the left side of your screen, select the WordPress database that you want to backup.
The window on the right side will display all tables that are within the WordPress database. You’ll want to click on the “Export” tab on the top set of tabs.
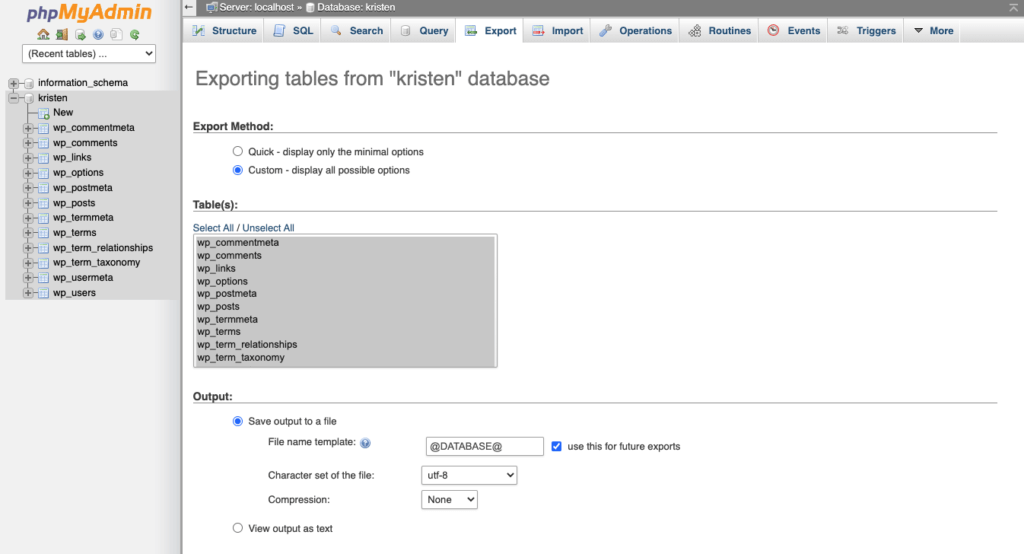
Select the Quick option and then click on “Go.” You’ll then get a prompt asking you to download a file.
Save this file to your computer. If the database is large, the download may take a few moments.
You can also choose the Custom backup option if you want to change the default behavior. In the above step, choose the “Custom” option instead of the “Quick” option. From there, you’ll see detailed options displayed.
The Table section is where you can select from all of the different tables in the database. If other programs are using the database, choose only the tables that correspond with your install of WordPress. They’ll be the ones starting with “wp_” or a “table_prefix” you already specified within your “wp-config.php” file.
If you only have WordPress installed, leave as is or click on “Select All” if the selection was changed. In the Output section, select “gzipped” or “zipped” from the Compression box. This will allow you to compress the data when you download it.
In the Format section, make sure to select SQL. This will export a sequence of SQL commands rather than other data formats such as CSV, which wouldn’t work for this backup process. When you see the Format-specific section, go ahead and leave things exactly as they are.
In the Object creation section, select the following:
- Drop Table
- View
- Procedure
- Function
- Event
- Trigger
Prior to the creation of the target database, it’ll call a DROP statement that deletes any old existing tables if they exist. After this, you’ll want to make sure to leave the Data creation options section exactly as they already are.
Head to the bottom of the window and click “Go.” You’ll be prompted to download a file. Save this file on your computer. Keep in mind that this process does not back up all your files and folders (like images). However, all of the things like blog posts and user comments have been backed up with this manual database backup process.
How Do I Restore My WordPress Database?
Hopefully, you’ll never need to restore your WordPress database, but if you do, there are a few ways to do so.
Using BackupBuddy to Restore Your WordPress Database
Hopefully, you’ve already downloaded and installed the BackupBuddy plugin to backup your WordPress database. If you’ve done that, restoring your database can be performed within the plugin.
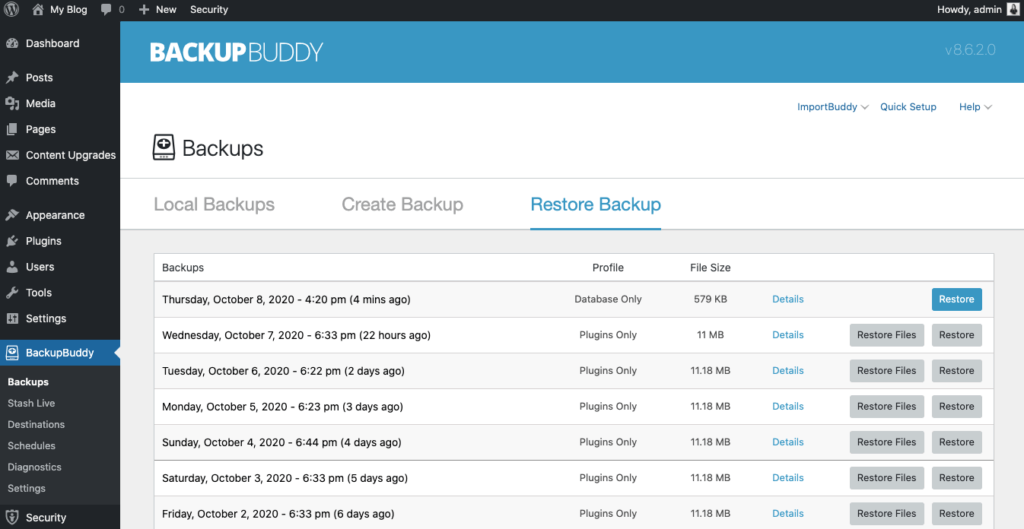
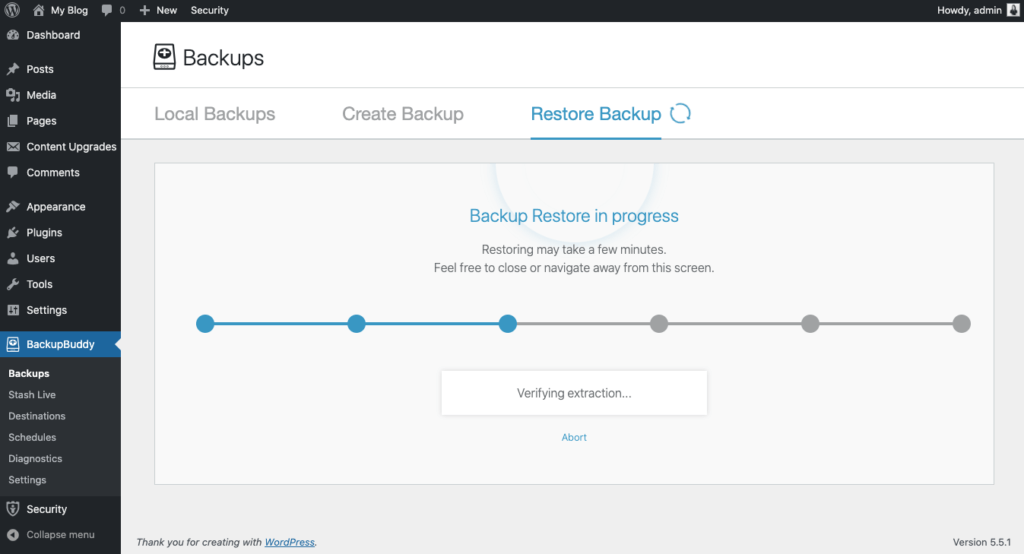
Navigate to the Backups page within the plugin and then the Restore Backup tab. Use the button to the right of the Database backup to restore your database.
You can then watch BackupBuddy restore the database to the version contained within the backup.
Restoring via phpMyAdmin
If you’d like to take the more difficult route, you can again use phpMyAdmin (are you seeing a trend here between phpMyAdmin and your WordPress database?) to accomplish the task.

Here are the steps to take:
- Login to the phpMyAdmin platform.
- Click on “Databases” and select the database you’ll be importing data into.
- You’ll see either a screen telling you that no tables exist or a list of tables that are already inside the database. This will depend on how you have things set up.
- Click on the “Import” tab near the top of your screen.
- On this screen, click on “Browse” to find the database backup file that you stored on your computer.
- Double check that SQL is selected in the drop-down menu titled “Format.”
- Click “Go.”
Now feel free to grab a coffee or a hot tea because this will take a while. When the process is complete you’ll see a screen proclaiming success.
Wrapping Up: The WordPress Database Explained
Although you may not have been aware, your WordPress site is much more complicated than it appears. There’s a ton happening behind the scenes that makes WordPress function the way it does. This is true for all WordPress sites, whether they’re large corporate sites or tiny personal blogs.
Hopefully, you now know a lot more about the WordPress database, including how to create one, access it, repair it, back it up or optimize it like a professional.
Knowing this detailed information about the WordPress database puts you in a position of knowing a lot more than most WordPress users. And while it may take a while to get comfortable working with the WordPress database, you’ll now be much more confident than you were before.
Get BackupBuddy, the Original 3-in-1 WordPress Backup Plugin
Easily backup, restore and move a WordPress site to a new host or server … in one easy to use plugin! Backup your database, entire WordPress installation, just your plugins, themes, or Media Library files … and set up automatic backup schedules.
Join us for the next Solid Academy Webinar!
Free weekly webinars that will help you master WordPress and increase your business's bottom line.
What is a WordPress Phishing Attack?
Learn how to identify and prevent phishing attacks on WordPress websites.
Kiki SheldonWebsite Protection: 5 Ways to Keep Your Website Safe
Robust website protection is the shield that stands between your business and relentless cyber attacks. Prioritizing website protection enables businesses to fortify defenses to safeguard their online presence and preserve the trust of their customers in the face of ever-evolving cybersecurity threats.
Kiki Sheldon23 Ideas To Grow Your WordPress Business in 2023
WordPress is the most popular website-building platform worldwide, trusted by numerous brands. WordPress enables you to build a user-friendly and highly reliable site, together with tools and plugins to enhance your marketing and work like a lead magnet. All these features make WordPress the platform chosen by more than 43% of businesses globally.
SolidWP Editorial TeamSign up now — Get SolidWP updates and valuable content straight to your inbox
Sign up
Get started with confidence — risk free, guaranteed
