WordPress Permalinks: The Essential Guide
WordPress permalinks provide the full URL address of a post or page on your website. Permalinks are the "permanent address" of where a specific piece of content is available on a WordPress website. The way your WordPress permalinks are formatted can have big implications on your SEO (search engine optimization), so it's important to understand WordPress permalink settings and configuration.

WordPress permalinks provide the full URL address of a post or page on your website. Permalinks are the “permanent address” of where a specific piece of content is available on a WordPress website.
The way your WordPress permalinks are formatted can have big implications on your SEO (search engine optimization), so it’s important to understand WordPress permalink settings and configuration.
In this guide, we’re going to show you exactly what WordPress permalinks are, how they work, how you can optimize permalinks on your WordPress site, how to configure them and a lot more. Now, let’s take a look.
What Is a WordPress Permalink?
In a nutshell, a WordPress permalink is a permanent URL. This is the address that visitors use to address certain parts of your website from their browser.
Think of WordPress permalinks as you would physical addresses and road signs. Your website is divided into different areas and WordPress permalinks serve as the maps that distinctly denote these areas.
For example, every page on a WordPress website has its own individual permalink, including:
- Posts
- Pages
- Archive pages (for categories and tags, for example)
- 404 pages
- Custom post types
- Ecommerce products
So, if your home page is at example.com, the permalink for your blog is at something like example.com/blog.
If your blog has a featured category, it may be located at one of several different URLs, such as:
- example.com/category/featured
- example.com/blog/featured
- example.com/featured
All of your unique pages have individual permalinks as well.
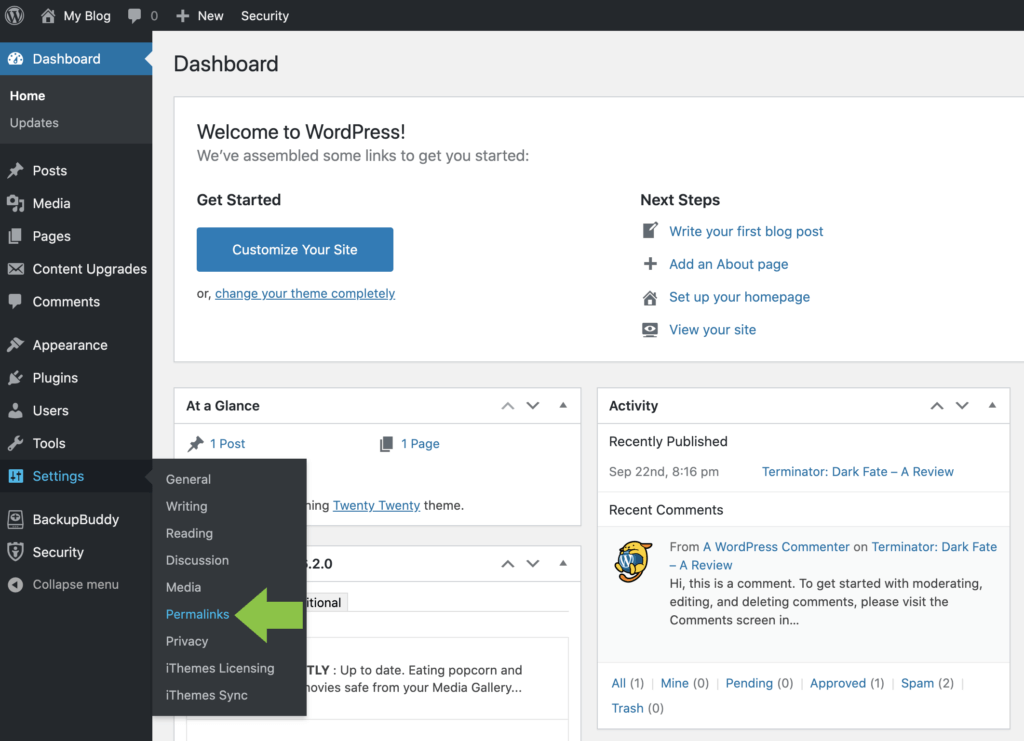
WordPress allows you to customize your permalinks. You’ll find these settings available from the WordPress admin dashboard in Settings > Permalinks. If you’re ready to dive into WordPress permalink settings, you can jump ahead in this article as we cover permalink settings and configuration.
How WordPress Permalinks, Slugs and Links Are Different
To fully understand permalinks in WordPress, we also need to understand exactly what slugs and links are. What are the differences between them?
- A permalink is the full link to a page or post. For example, this post on our blog (https://solidwp.com/wordpress-block-patterns-ultimate-guide/) is a permalink.
- The slug is only the part of the URL that reads “wordpress-block-patterns-ultimate-guide.” It’s the last part of the permalink and is unique to only that post. When you apply a title to a post, WordPress generates the slug for it automatically based on that title you choose. If you prefer, you can also create a manual slug for a post right within your post editor.
- A link usually refers to the hyperlinks you use within your content on your website. Internal links help your readers navigate to content on your website, while external links are ways of referencing other websites, articles or blogs.
How Do I Find My Permalinks in WordPress?
To find your permalinks, you have a couple of different options.
Permalinks in WordPress Admin Dashboard
First, you can quickly view your permalink structure by logging into your WordPress admin dashboard and going to Settings > Permalinks.
This is where you can change the structure of your permalinks for your entire site.
Permalink Settings In Plugins
There are also some WordPress plugin options that allow you to create custom permalinks for different sections of your site, like for custom post types or e-commerce products.
These WordPress plugins override the default permalink settings in WordPress. But before we get to the plugins, let’s first talk about permalink settings.
WordPress Permalink Settings
Within WordPress, there are a number of different ways to change permalinks and permalink settings.
Within WordPress permalink settings, you can:
- Use the permalinks screen to edit permalink structure for categories and tags
- Edit the slugs for your posts by changing them manually
- Specify your link structure, choosing to use the default (not recommended) or overrule it with a more SEO-friendly structure
- Use various plugins to further customize the settings and structure of your permalinks
- Utilize redirects to make out-of-date permalinks pointing to current ones
Let’s look closer at each of these.
Common Settings for WordPress Permalinks
The first place to head when you want to configure and customize your permalinks is the settings screen at Settings > Permalinks.

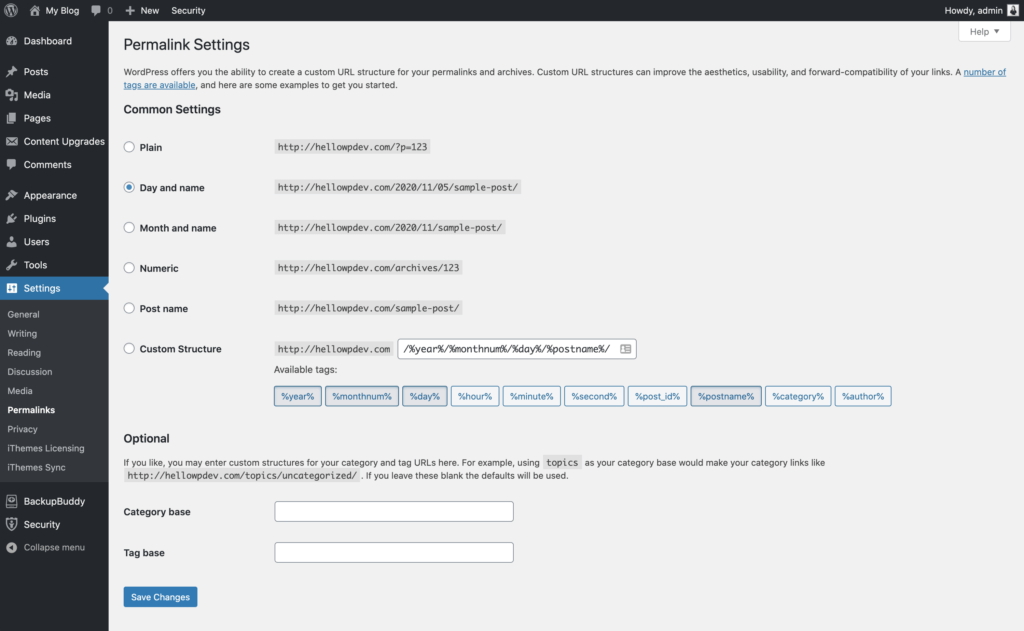
This section is where you can universally change settings for single posts. You have several options to chose from, which are:
Plain Permalinks
This permalink option will use your Post ID for the permalink. Browsers will recognize it, but it won’t make a lot of sense to search engines or the human eye. Permalinks with this setting look like this:
example.com/?p=321
Day and name Permalinks
Choose this permalink setting to include the post date and name (or slug) in your permalink. It’ll look like this:
example.com/2020/10/16/my-post/
Month and Name Permalinks
This permalink setting provides a slightly shorter version of the day and name option which only shows month and year. The day is excluded. It looks like this:
example.com/2020/10/my-post/
Numeric Permalinks
This permalink setting is similar to the plain option. It uses your post ID, which isn’t good for users or the search engines. Here’s an example:
example.com/archives/321
Post Name Permalinks
This permalink type uses only your post slug to create the permalink. There are no dates or numbers attached. For example:
example.com/my-post
Custom Structure Permalinks
This permalink settings area allows you to create custom permalink structures. You can use permalink tags that will fetch information based on post data. You can also add static text if you want to include text that will be on every post.
Permalink tags are unique keywords that are wrapped a percentage character. WordPress allows the use of these tags:
- year% – year of publication
- %monthnum% – month of publication
- %day% – the day that the post was published
- %hour% – the hour it was published
- %minute% – you guessed it
- %second% – you guessed it again
- %post_id% – the unique ID of the post
- %postname% – post slug
- %category% – category slug
- %author% – author slug
To try out a custom structure, click on the radio button and add one of these tag strings to the text field:
/%author%/%postname%/
/%category%/%postname%/
/%year%/%postname%/
Each of these tag strings will generate different permalinks with your specifically chosen values. They’ll look something like this, respectively:
example.com/edjackson/my-amazing-article
example.com/travel/my-amazing-trip
example.com/2020/everything-that-i-know
The URL in our first example highlights the post’s author. The next two examples give us the post category and the post year published within the permalink structure. You’ll have to decide which format best suits your site.
After you’ve made your decision and selected the best option, save your changes or continue on to the Optional section.
Optional Settings for WordPress Permalinks
Beyond setting your permalink structure for single posts, the Optional settings for WordPress permalinks allow you to set custom structures for tag and category archives.

If you don’t want to set custom tag and category structures, the default includes /category/category-slug/ at the permalink’s end. In a case that you have a category called “travel,” you’d be able to find the archive page at example.com/category/travel/.
If you’d like to amend this, you can do so within the Optional section. For example, you can change your category archive permalink to mysite.com/blog/travel/ simply by entering the word “blog” into the Category base field.
Keep in mind that you don’t need to use any tags or backslashes when entering the new data.
How Do I Change the Permalink in WordPress?
WordPress allows you to change site-wide permalink settings or permalink settings for a post or page that has already been published. We’ll cover both approaches here.
Why change a permalink? You may want to change a permalink because it’s too long. Or perhaps you want to optimize it by making it more descriptive than it currently is. Or maybe, after reading this guide, you decide you want to change your permalink settings for SEO reason.
Before You Change Your WordPress Permalinks: A Note of Caution
The best time to change a permalink is when you’re originally creating the post content before the post is published. Why? If you change a post’s slug after it has already been published, beware that you’re also changing the post’s URL, so the permalink change may create a 404 page.
Any links that have been shared online using the old URL will not work any longer and will need to have redirects set up to the new URL. By customizing your post slug prior to publishing the content, you’ll have an optimized permalink the second your hit the publish button.
How to Change Permalink for a Post or Page That is Already Published
If you’re changing the permalink for a post that’s already published, simply go into your WordPress dashboard’s Posts section and select the post that you want to make edits to.
In the editing screen, first select the Document panel and go into the permalink section. If it’s not currently open, click on the arrow that’s to the right.

The current slug of this post is displayed in the field that says URL Slug. In this field, you can make edits by shortening the slug or making it more descriptive and SEO-friendly.
If you’re updating a post that was previously published, copy and paste the old slug into Notepad so that you can set up your redirect after you’ve made your changes.
Save the changes you’ve made by clicking on Update or Publish.
Don’t forget to immediately set up your redirects (if needed) before doing anything else.
Changing WordPress Permalink Settings For an Archive Page
Earlier, we were exploring the Optional permalinks settings that allow us to change our settings for categories, tags and archive pages. We talked about how you can edit your settings for the tag and category base and how to change the slugs.
Let’s look at the nitty gritty of how these are done. Then we’ll move on to how you can edit a permalink for custom post types and taxonomies when you register them.
Changing the Slugs for Tags and Categories
First, for categories you’ll want to go in your WordPress dashboard and navigate to Posts > Categories.
For tags, it’s Posts > Tags.
Locate the tag or category that you want to make edits to, then click on the name of it.
You’ll notice that WordPress automatically generated a unique slug based on the name given to the tag or category when it was first created.
But you’re not stuck with it. At this point, you can type in a new slug for the tag or category.
As with your posts, it makes more sense to customize your slugs for tags and categories when you first set them up. If you’re changing existing ones, you’ll need to set up more redirects.
If a custom taxonomy has been created by a plugin, or if you set one up yourself, you’ll be able to make edits to the slug for individual terms within the taxonomy in the exact same way. However, if you’re looking to edit the actual slug for a taxonomy, you’ll need to dig into some code.
Permalinks and SEO Considerations
Your website’s URLs do have an impact on SEO (search engine optimization). That’s where your permalinks come into the picture, as they help give structure to your URLs.
To optimize every one of your blog posts to the best SEO settings, you must modify your WordPress permalink settings away from the default and to either the recommended best WordPress permalink settings or create your own unique Custom Structure.
Let’s look at the three main benefits for using permalinks to enhance search engine optimization.
- Semantics – A quality URL on the web should make sense when someone looks at the link. The URL should reveal the subject of the link simply by seeing the link. This is helpful both to humans AND to search engines. Don’t forget that without humans visiting your site, it doesn’t really matter how many search engines like your products … search engines don’t buy products, humans buy products.
- Relevancy – Having a search term or keyword(s) in the URL can assist in generating search engine referral traffic. These keyword(s) in the URL can operate similar to title tags and are used in determining relevancy and even the computational rankings compiled by search engines.
- Links – When pasting a quality URL link to other online sites, the search engine indexing robots tends to give ranking credit to the page in terms of the URL keywords.
With this understanding of the importance of the WordPress URL in relation to search engine optimization, we now need to look at how to maximize the WordPress Permalinks settings page to take advantage of this powerful SEO setting.
The Problem with Default WordPress Permalink Settings
New users of WordPress may not have much technical SEO knowledge. Because of that, too often new WordPress users and even developers make the mistake of using the default permalink setting on their website.
The problem is that the default setting isn’t at all friendly to SEO (search engine optimization) or to your website users.
Using the default permalink setting presents us with several problems:
- The default setting doesn’t contain any keywords for search engines to crawl and find. Search engines don’t do well at promoting these kind of URLs.
- Site navigation isn’t user-friendly. When a user sees your link, they can’t immediately determine what the content is about or figure out your site hierarchy. This leads to a loss of potential site traffic.
- You may end up with duplicate content if two or more permalinks point to the same content.
This leads to the question of what setting you should use for SEO and a better user experience?
What is the Best WordPress Permalink Setting for SEO?
The best WordPress permalink setting for most WordPress websites is to choose the Post Name option under the Common Settings option.

This enables us to keep the URL as short as possible and, at the same time, offload some of the search engine optimization work to the specific page or post editor screen.
From the post or page edit screen, the WordPress permalink can be edited to craft a better URL that will contain the necessary keyword(s) and eliminate unnecessary words (and, the, it, a, etc).
What About the Other Permalink Structures?
If only two of the available permalink structure options should be used, why does WordPress even feature the additional options? It may be best for us to not overthink that.
The default option, mysite.com/?p=321 is extremely unkind to SEO because of the lack of a keyword within URLs. There’s also no visible navigation path. The nearly-naked URL doesn’t give any information about the page or post that it leads to.
As an example, the URL ithemes.com/wordpress-block-patterns-ultimate-guide/ gives users a great idea about what kind of content they’ll be consuming once they click on the link.
If the same article has a URL generated by the standard permalink structure, it would look like this ithemes.com/?p=556.
How likely would you be to click on that link if someone sent it to you?
But what’s wrong with permalink structures that include the dates that the content was published, along with the assigned slug in the URL, such as mysite.com/2020/10/16/smart-words-to-read/ or mysite.com/2020/10/smart-words-to-read/?
The major issue with these structure options is that they automatically date your posts. For example, if you’re running a news site or blog, do you want the published date of every article you write to live in infamy within the URL?
If a reader sees your link, then notices by the URL that it was published over two years ago, there’s a chance they may think twice about clicking on it.
It’s better to let your descriptive post slugs be the entirety of what’s contained in your permalinks.
And remember, if you want to change your entire structure after you already have published posts, you can certainly do so. But don’t forget to set up those redirects for the old URLs.
7 WordPress Permalinks Best Practices
When it comes to WordPress permalinks best practices, there are two different permalink structures that are the best options to use across your WordPress site. These two are the most friendly to SEO and the links make visual sense to users when they get shared.
- As we covered in the previous section, the very best option to use is mysite.com/%category%/%post-name%/. This structure makes site navigation easier for your users and allows you to feature custom slugs in your URLs. Just make sure to use category names that are simple and short.
- A second option is using just your post name, like this: mysite.com/&post-name%/. This structure is the most commonly used because it’s the best. It makes your URLs simple and short. If you’re just staring out on WordPress, using this permalink structure is your best bet.
Not all permalinks are created equal. While a content management system like WordPress offers several options to choose from, it behooves you to learn what the best practices are for WordPress permalinks so that you can choose the best strategy.
1. Use Keywords in Your Permalinks
Keywords are an important part of SEO. Getting ranked for specific keywords is also a sure-fire way to get more clients for your business. Rather than choosing to have random strings of characters in your permalinks, it is preferable to include keywords that are relevant to your content.
Include your main keyword and, where possible, try to incorporate as many words and phrases related to your products and services as possible. You will need to do some basic keyword research in order to find the most effective ones to use.
Start your keyword research by taking a look at your Google Analytics. You will find a list of the keywords that bring users to your website. This is a good starting point as it will give you an idea of what kinds of keywords your users find useful.
Google Ads, formerly known as Adwords, is another tool way of getting keyword ideas. Although Google Ads is an advertising platform, you don’t have to spend money in order to gain valuable insight from it.
By using the keyword tool, you can search for your main keyword and get suggestions for other words and phrases related to your brand. The keyword tool also gives you average monthly searches for these keywords, a metric that can help you decide on whether it’s worth focusing on each keyword or not.
Furthermore, you can use the Google search engine as a research tool. Run a query on a keyword related to your brand. When the search results appear, scroll to the bottom of the page. You will see a list of other recommended searches that Google offers. These are keywords that other users are commonly using in order to find information on niche-related topics.
Finally, click on some of the top results for the searches you conduct. Look at the permalinks of some of the biggest players in your space. What kinds of keywords do they include in their URLs? Try to spot common trends in your competition’s permalinks and see if you can adopt some of their methods. If they are ranking at the top, they must be doing something right.
2. Choose Concise Permalinks Over Lengthy Ones
While a URL can contain 2,048 characters, it is not advised that you exhaust this limit. Specifically, the average URL of pages that are ranked number one in Google’s search results is 59 characters long. Therefore, it is a good idea to try and keep your permalinks within that limit while including a good mix of short and long-tail keywords.
Long-tail keywords are phrases consisting of 3 or 4 keywords and are very specific to the products and services you are selling. The more of these you include in your permalinks, the more pages on your website you will find rising through the rankings.
3. Keep a Consistent Structure
WordPress offers a few options to choose from. You can include the date of your post as part of your permalinks or the name of the post. Another option is to have a unique string of characters for each post, an option that you’ll want to shoot down from the start as it doesn’t allow you to use keywords in your URL.
The best way to structure your website is to create a diagram where you branch out your categories according to your content. Being consistent with our example from earlier, let’s assume the sporting goods website sells equipment for basketball, soccer, tennis and volleyball. These will be your main categories.
Under basketball, you may have subcategories like shoes, shorts and jerseys and basketballs. Therefore, specific permalinks may look something like www.sportsgoodsexample.com/basketball/shorts/ or www.sportsgoodsexample.com/basketball/chicagobulls/scottypipenawayjerseys.
4. Tailor Permalinks to Content Titles
Google rewards websites that offer users the content they are searching for. That’s why it is important that your page and post titles are descriptive of what users will find within your content. Your permalinks need to be a direct reflection of your post and should be very close to the post title.
5. Reconsider the use of www.
In WordPress, you have the option of whether or not you will choose to have the www. as part of your domain name. You can toggle this under the ‘Settings’ option in WordPress. While this is mostly a visual improvement, it reduces the number of characters that are a part of your permalink. This gives you the flexibility to try and keep your URLs around the 59 character mark.
6. Don’t Bog Your Content Down With the Use of Dates
Studies have shown that including dates in your permalinks can be counterproductive. While it is good to keep your content current and to let your users know when it was created, you don’t have to do this in your URL. Include the date your posts were published within the actual content. The search engine algorithms will pick up the information and communicate it to their users.
7. Use SSL to Enhance Your Permalink Effectiveness
Securing your website through the use of SSL is something you should do regardless of any other factor. The difference between HTTP vs HTTPS may only be one character but makes all the difference to search engines.
Get SolidWP tips direct in your inbox
Sign up
Get started with confidence — risk free, guaranteed
WordPress Template Tag
In the template files for your theme, there’s a template tag that looks like this:
the_permalink()
This template tag used to fetch a post’s URL and create a link from it.
The template tag code only needs to be used one time to fetch all of your links to any page or post that’s on your website. Your theme doesn’t need to have any links hard-coded into it to accomplish this.
As an example, our homepage here at iThemes is https://solidwp.com/, our blog is located here https://solidwp.com/blog/ and one of our blog posts looks like this https://solidwp.com/wordpress-block-patterns-ultimate-guide/. These are all permalinks.
You’ll also use permalinks for static pages, archive pages or any site content that requires its own unique URL.
How Do I Fix Permalinks in WordPress? What to Do If Your WordPress Permalinks Not Working
On occasion, you may find that your permalinks aren’t working they way that they’re supposed to. Here are a few scenarios you might face where you’ll need to fix your permalinks.
When Permalinks Don’t Work After You Register a Post Type
If you’ve just registered a new taxonomy or post type and the links to relevant archive posts or pages aren’t working, don’t panic.
The reason this happens is because WordPress doesn’t automatically detect that the custom taxonomy or post type means that the permalink settings are changing.
To rectify this, go to Settings > Permalinks and the settings will be refreshed automatically. In fact, you don’t even need to make a change or click “Save Changes.” All you need to do is open up the screen.
When Permalinks Aren’t Behaving Properly
If you’re dealing with permalinks that generally don’t work the way you expect them to, and it’s not because you’ve just registered a taxonomy or custom post type, give these steps a try to fix the issue:
- Make sure that you typed the URL into your browser correctly.
- Head to Settings > Permalinks in your WordPress dashboard and check your setup. Are your tags all correct? Double-check that you haven’t used incorrect syntax or missed anything obvious.
- If you use a caching plugin, clear the cache of your website. In general, caching interferes with link changes.
- After you’ve changed the settings of your permalinks, you’ll probably have links within the body of your content that now lead to a 404 page. Make sure to edit those links in your content to the new structure, or set up some redirects.
- Check to see if you’ve manually changed any post slugs and if any of them need editing.
- Check to see if you’re using a redirect plugin or one that includes redirection as a feature. If you are, look into the settings to see what redirects are set up and if they’re accurate.
- If your site runs plugins that impact links or post types, deactivate them and see if the problem is resolved.
- If you’re completely unable to log into your WordPress dashboard and access the permalinks settings page, you can edit and fix permalinks using phpMyAdmin.
By following these eight steps, you’ll be able to fix whatever the issue is that ails your permalinks.
Top WordPress Permalink Plugins
While WordPress core offers many options to customize your permalinks in any way that you choose, there are also dozens of plugins available in the WordPress repository that will help you do further permalink customization.
Some of the best options are:
Spend some time researching what each of these plugins does and how you can use them to customize your permalinks in the best way for your site.
Wrapping Up: WordPress Permalinks Explained
If you’ve come this far, you now know a lot more about WordPress permalinks than you did a few minutes ago.
The skills that will allow you to optimize the structure of your WordPress permalinks will carry over to the work you do for your clients. Effective keyword research and website structuring can only benefit your SEO efforts. Learning to apply SSL will make you more security-conscious. To make a pop culture reference, learning SEO through proper permalink implementation is like learning karate by waxing a car or painting fences.
If you someday plan to manage multiple WordPress sites, you’ll soon learn that the permalink structures tend to vary widely from site to site.
As a professional, and before making major changes to an established site’s permalink structure, we highly recommend that you download and install a powerful WordPress backup plugin like BackupBuddy. That way, if the worst happens and you can’t access the site that you’re updating, it can be easily restored from a safe backed up version.
And while you’re being so responsible with the maintenance of your website, now is the perfect time to step up your security protocol with a robust WordPress security plugin like iThemes Security Pro that will keep your site safe and hacker-free.
Thanks for stopping by and learning about permalinks. We’ll see you in the next article!
Get SolidWP tips direct in your inbox
Sign up
Get started with confidence — risk free, guaranteed
Join us for the next Solid Academy Webinar!
Free weekly webinars that will help you master WordPress and increase your business's bottom line.
What is a WordPress Phishing Attack?
Learn how to identify and prevent phishing attacks on WordPress websites.
Kiki SheldonWebsite Protection: 5 Ways to Keep Your Website Safe
Robust website protection is the shield that stands between your business and relentless cyber attacks. Prioritizing website protection enables businesses to fortify defenses to safeguard their online presence and preserve the trust of their customers in the face of ever-evolving cybersecurity threats.
Kiki Sheldon23 Ideas To Grow Your WordPress Business in 2023
WordPress is the most popular website-building platform worldwide, trusted by numerous brands. WordPress enables you to build a user-friendly and highly reliable site, together with tools and plugins to enhance your marketing and work like a lead magnet. All these features make WordPress the platform chosen by more than 43% of businesses globally.
SolidWP Editorial TeamSign up now — Get SolidWP updates and valuable content straight to your inbox
Sign up
Get started with confidence — risk free, guaranteed
