How to Move Your Website to iThemes Hosting
iThemes Hosting is a simple yet smarter approach to WordPress hosting, using the easy but powerful iThemes Sync dashboard to manage your website. In this post, we'll walk through all the steps for how to move your website to iThemes Hosting, including a live demo video tutorial and written instructions.

How to Move Your Website to iThemes Hosting
Before you begin this process, create your iThemes Hosting account. You should also be familiar with how to use SFTP. To perform the migration, you’re going to use BackupBuddy and ImportBuddy to get your site from your original hosting service to iThemes Hosting.- 1. Create your iThemes Hosting site. Check out this creating your hosting site article from the iThemes Help Desk for more details.
- 2. Install BackupBuddy on your current website using the following instructions.
Downloading & Installing BackupBuddy
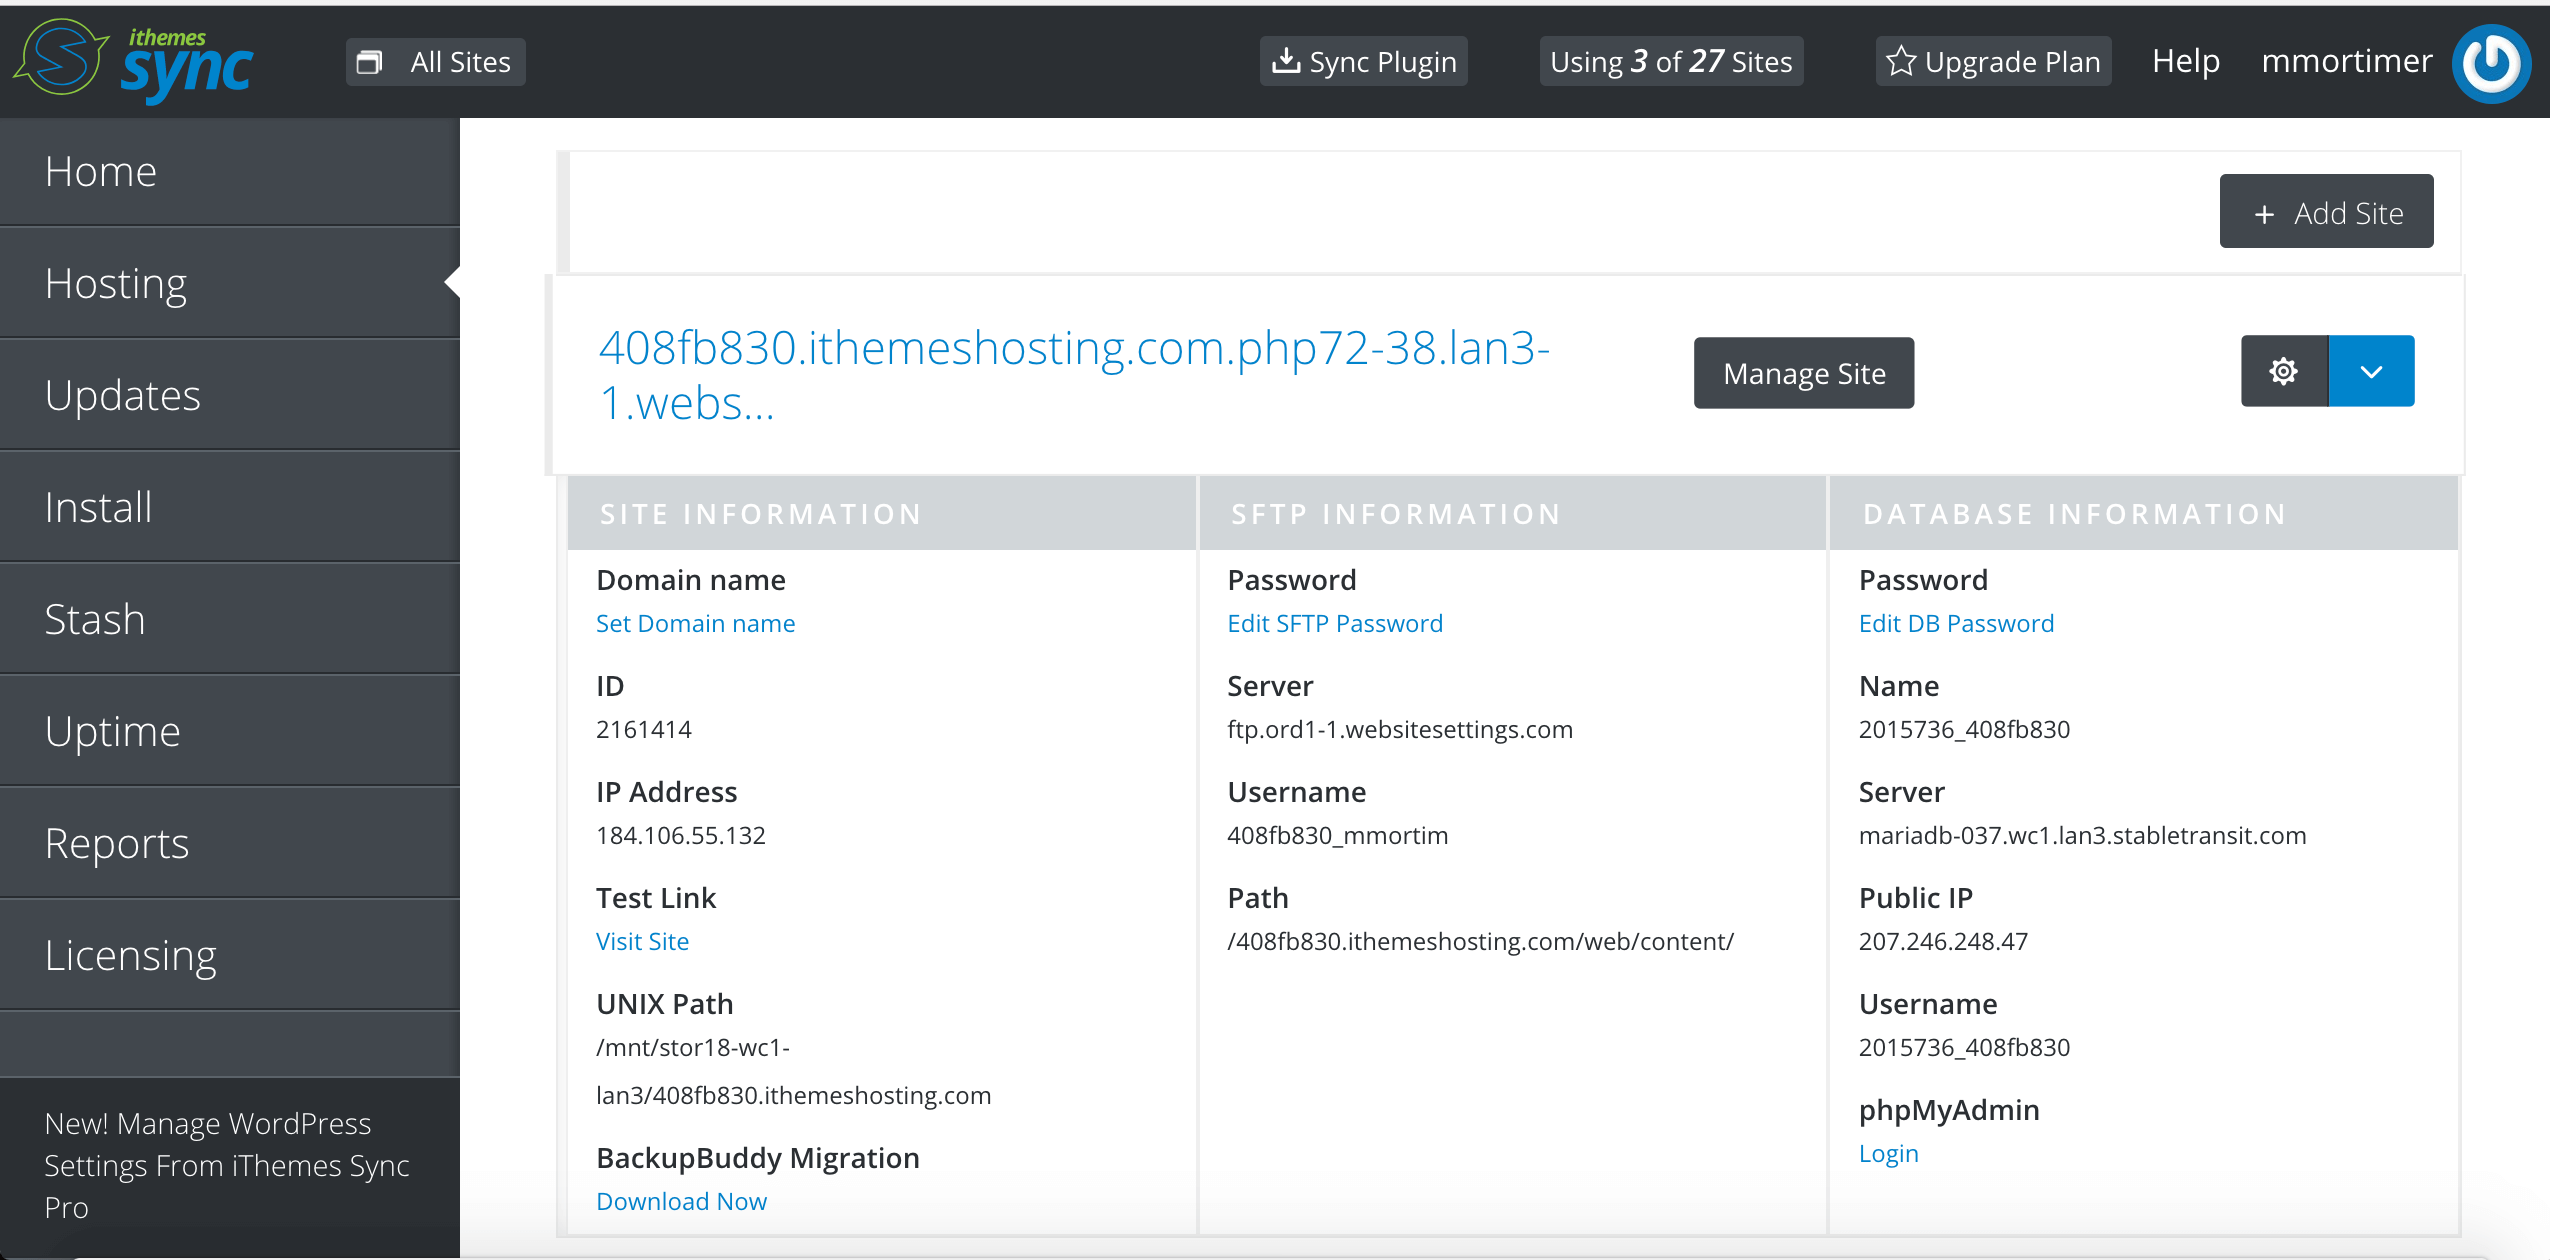
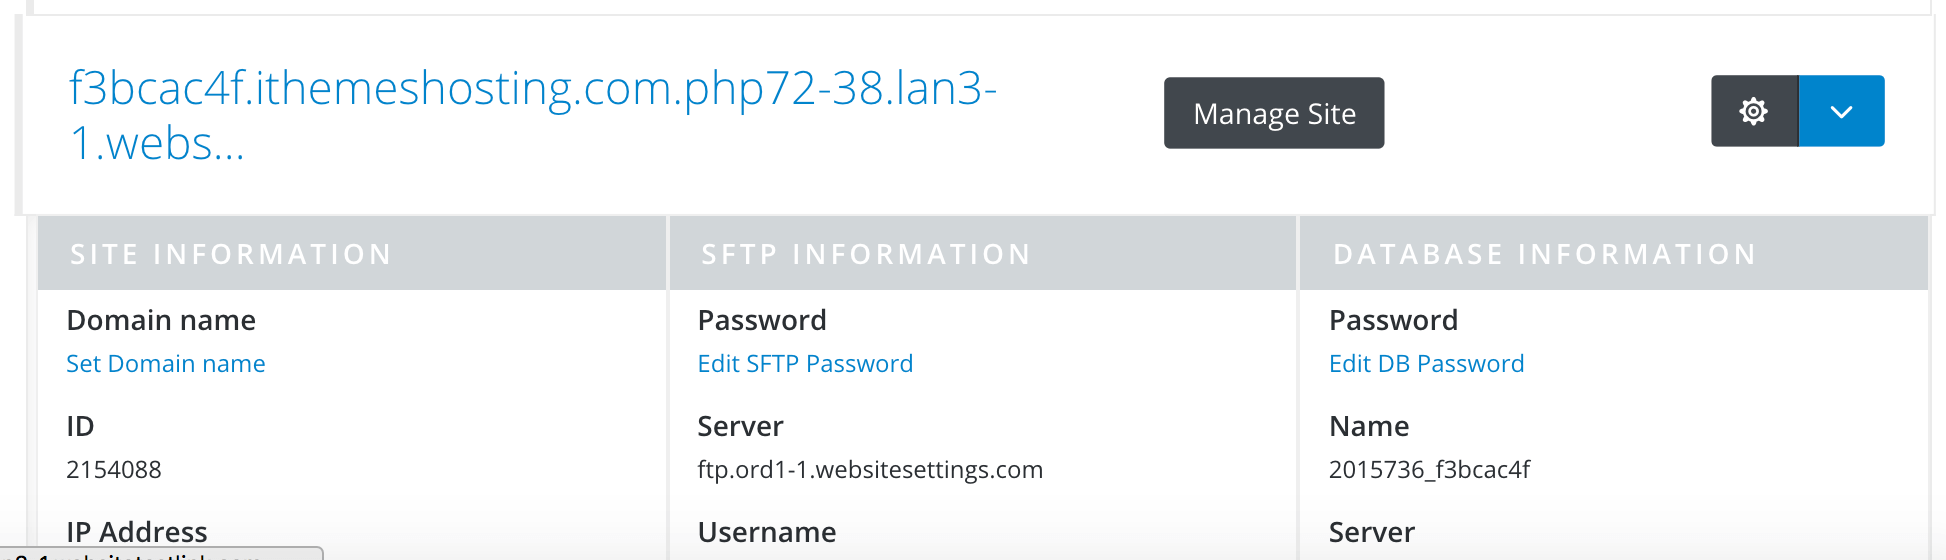
- To download BackupBuddy, log in to the iThemes Sync dashboard and navigate to the Hosting menu item.
- Expand your iThemes Hosting site using the drop-down arrow.
- Under Site Information, you will find BackupBuddy Migration.
- Click the Download Now link to download the current version of BackupBuddy.
- Save the BackupBuddy zip file to your local computer.
- Login to your website’s wp-admin area and navigate to the Plugins > Add New Plugins section. From here, you will select the Upload Plugin option.
- You will then be given the option to upload a new plugin by using a .zip file. Choose the file option and then navigate to the folder where you saved your BackupBuddy zip file from the previous step.
- Once you locate and select that file, you will then choose the Install Now option.
- BackupBuddy will now be installed. Once complete, select the Activate Plugin option. Once activated, you should find BackupBuddy showing in the left-hand panel of your WordPress admin dashboard.
- Navigate to BackupBuddy > Backups and ignore the quick setup wizard. (Since we are only going to be simply generating a backup and then moving the site, we don’t need to go through this step at this time.) Scroll to the bottom of that page and select the Skip Setup Wizard for Now option.
Generate a BackupBuddy Backup File & Download ImportBuddy
- 3. Generate a complete backup of your website on your original host.
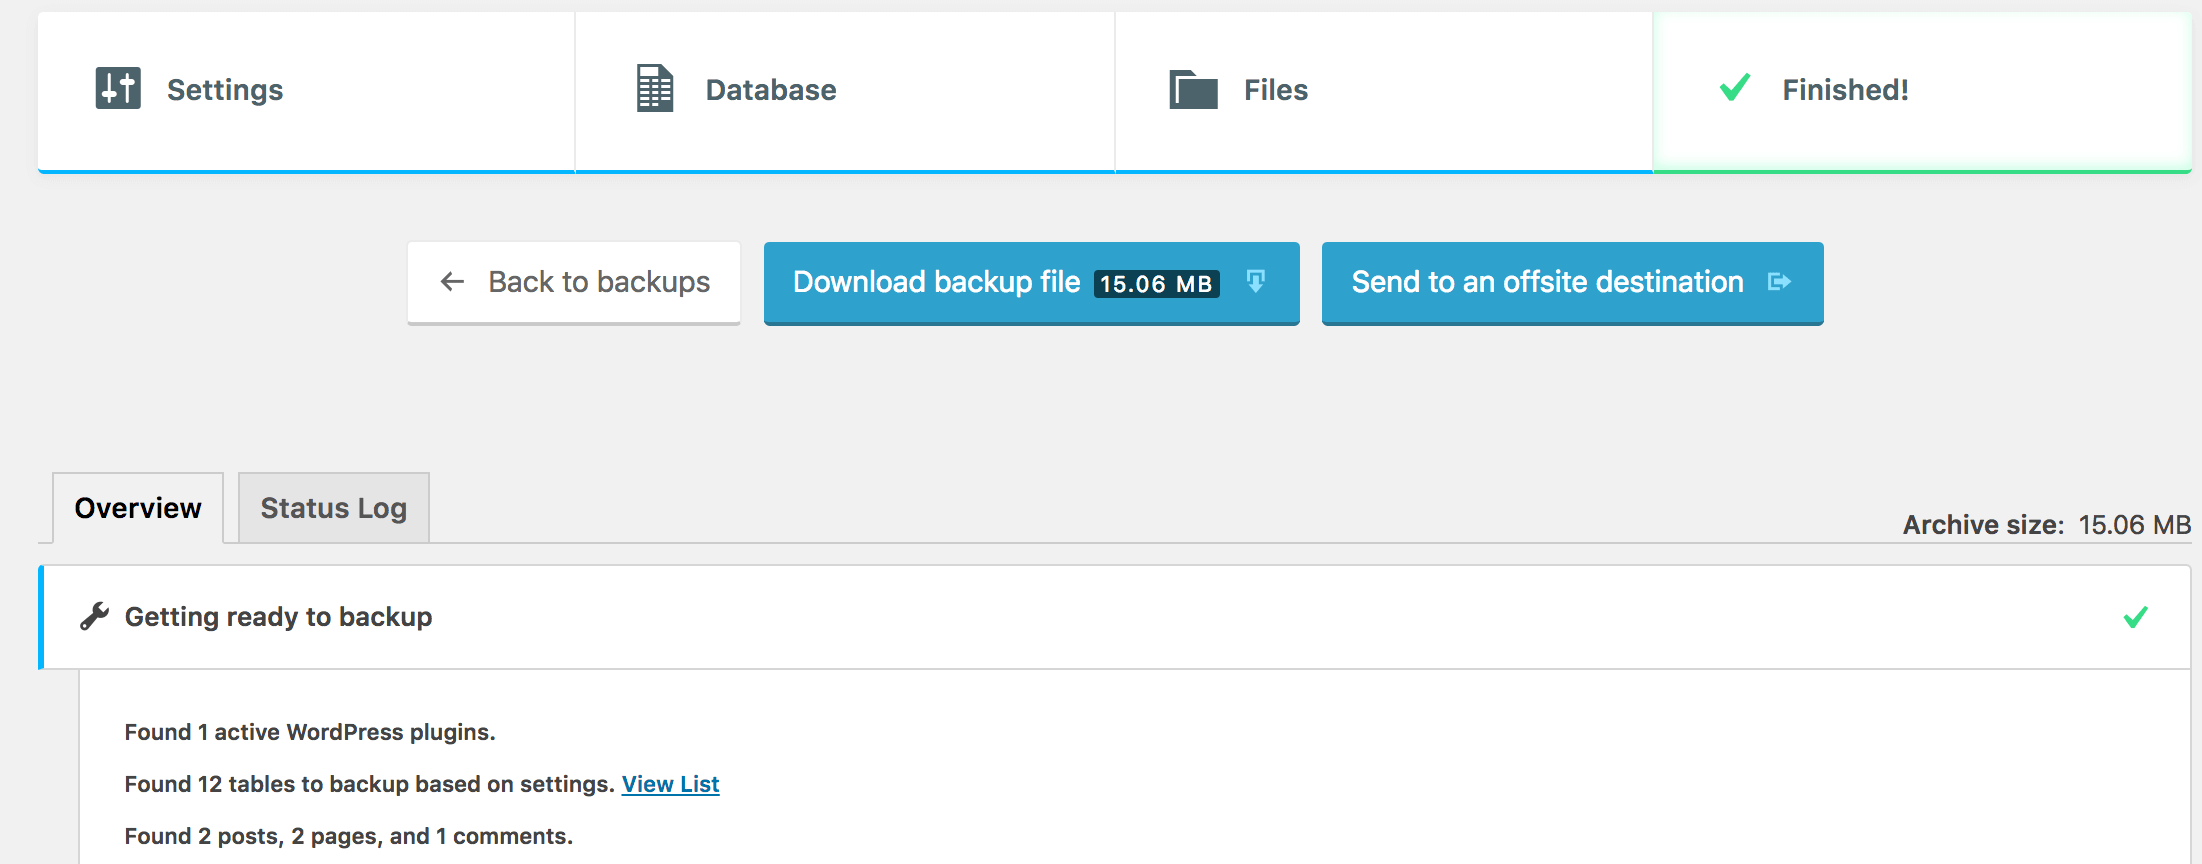
 In order to migrate your site, you will need a complete backup of your site. A complete backup includes all the files in your WordPress installation, including the database, all media library files, plugins and theme files. Select the complete backup option and BackupBuddy will begin generating the backup file. Once the process completes, select the Download Backup file option.
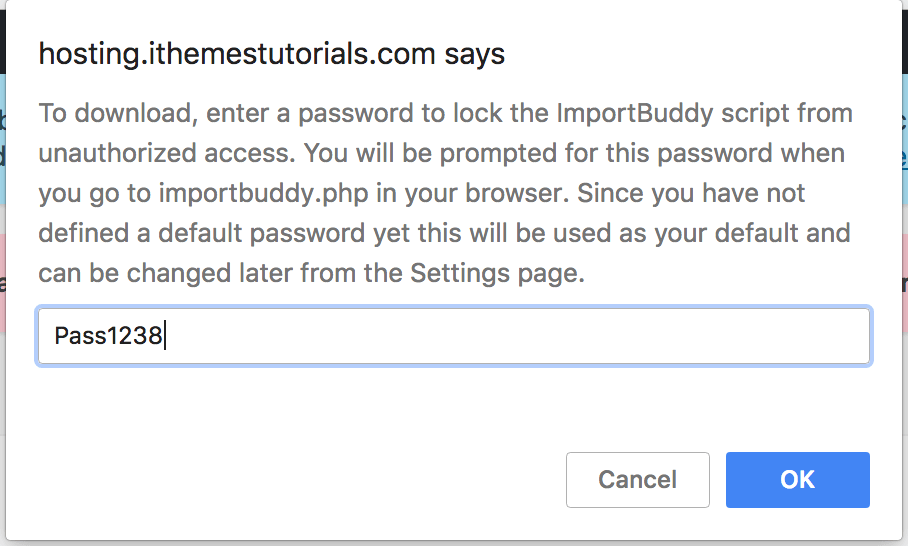
- 4. Download the ImportBuddy file.
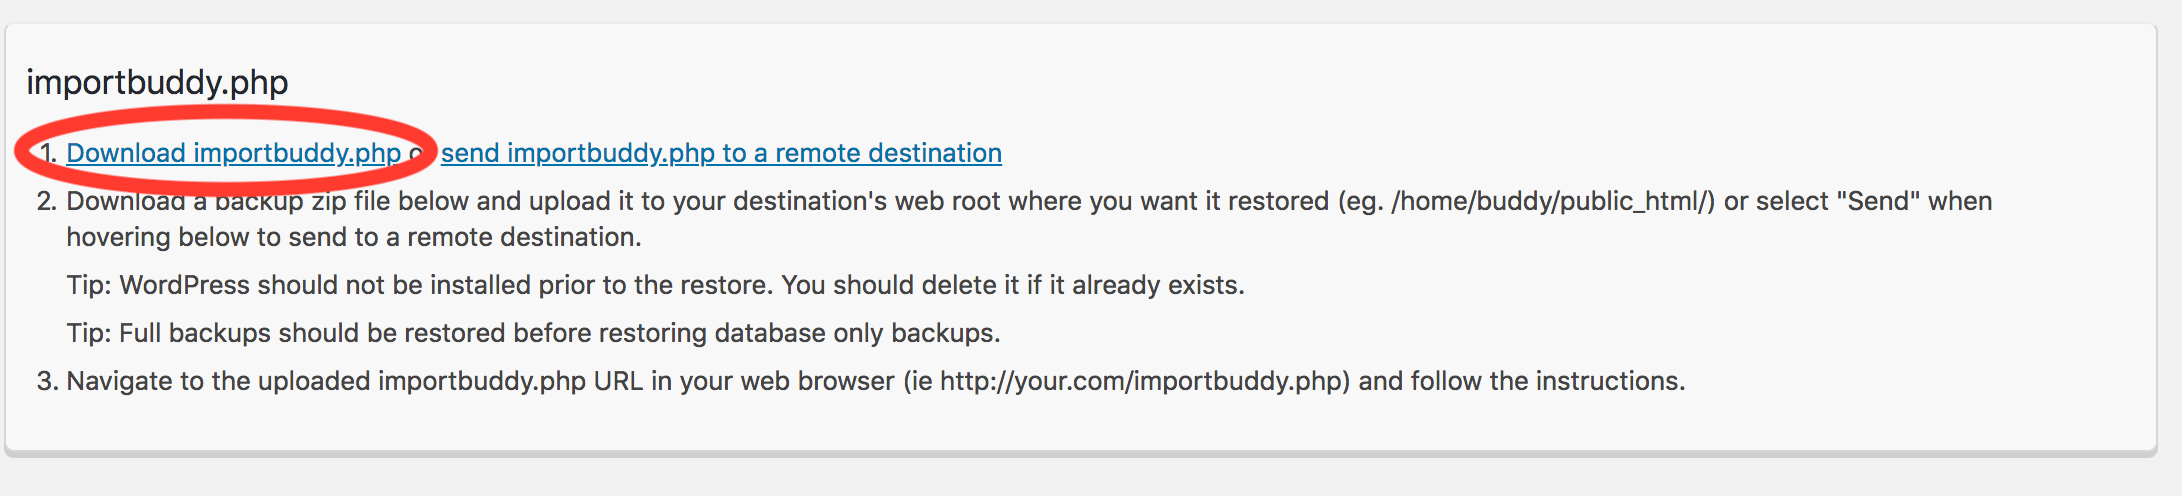 Enter a password for your importbuddy.php file. (Use any password you want, but make sure that you remember the password that you set.) Download the importbuddy file which you can use to restore your site on iThemes Hosting.
Site Migration with ImportBuddy
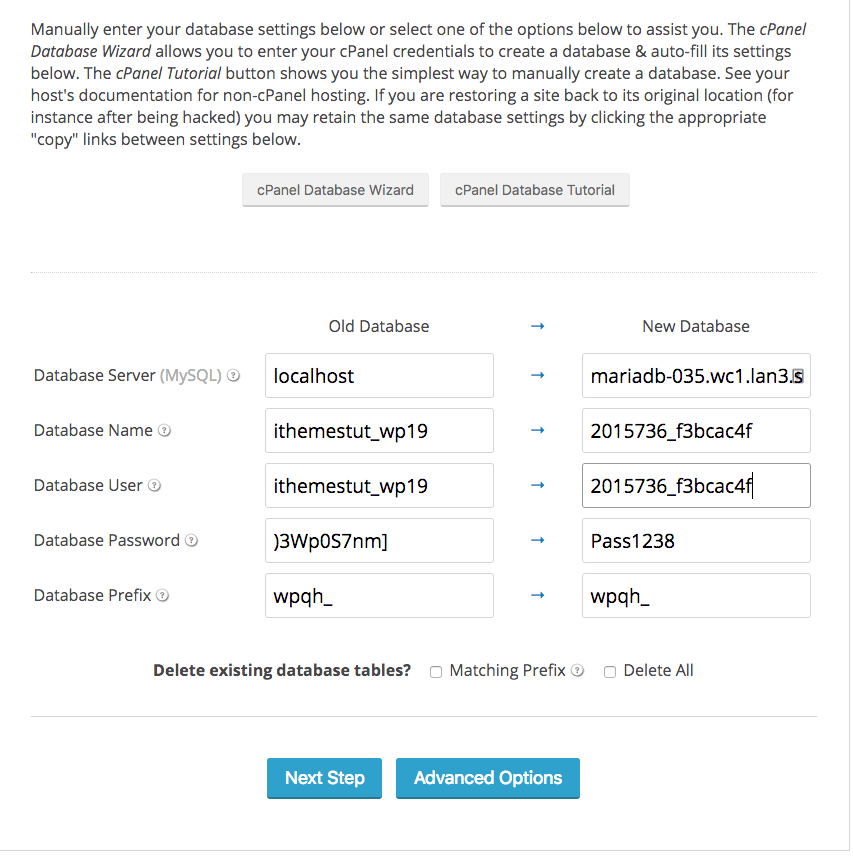
- 5. Gather your database information and set the DB password.
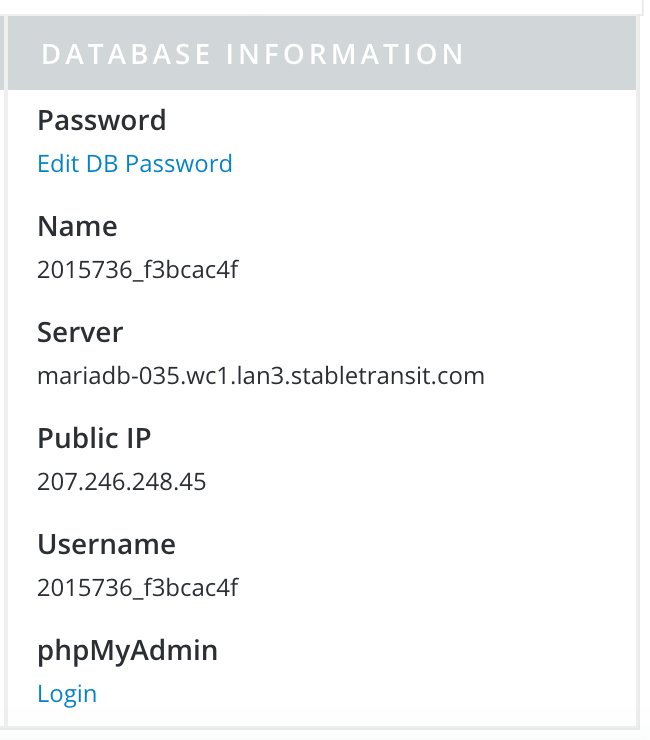 To set your Database password, simply select the Edit DB Password option and enter the password you wish to use. This should be a unique password that is exclusive to the database.
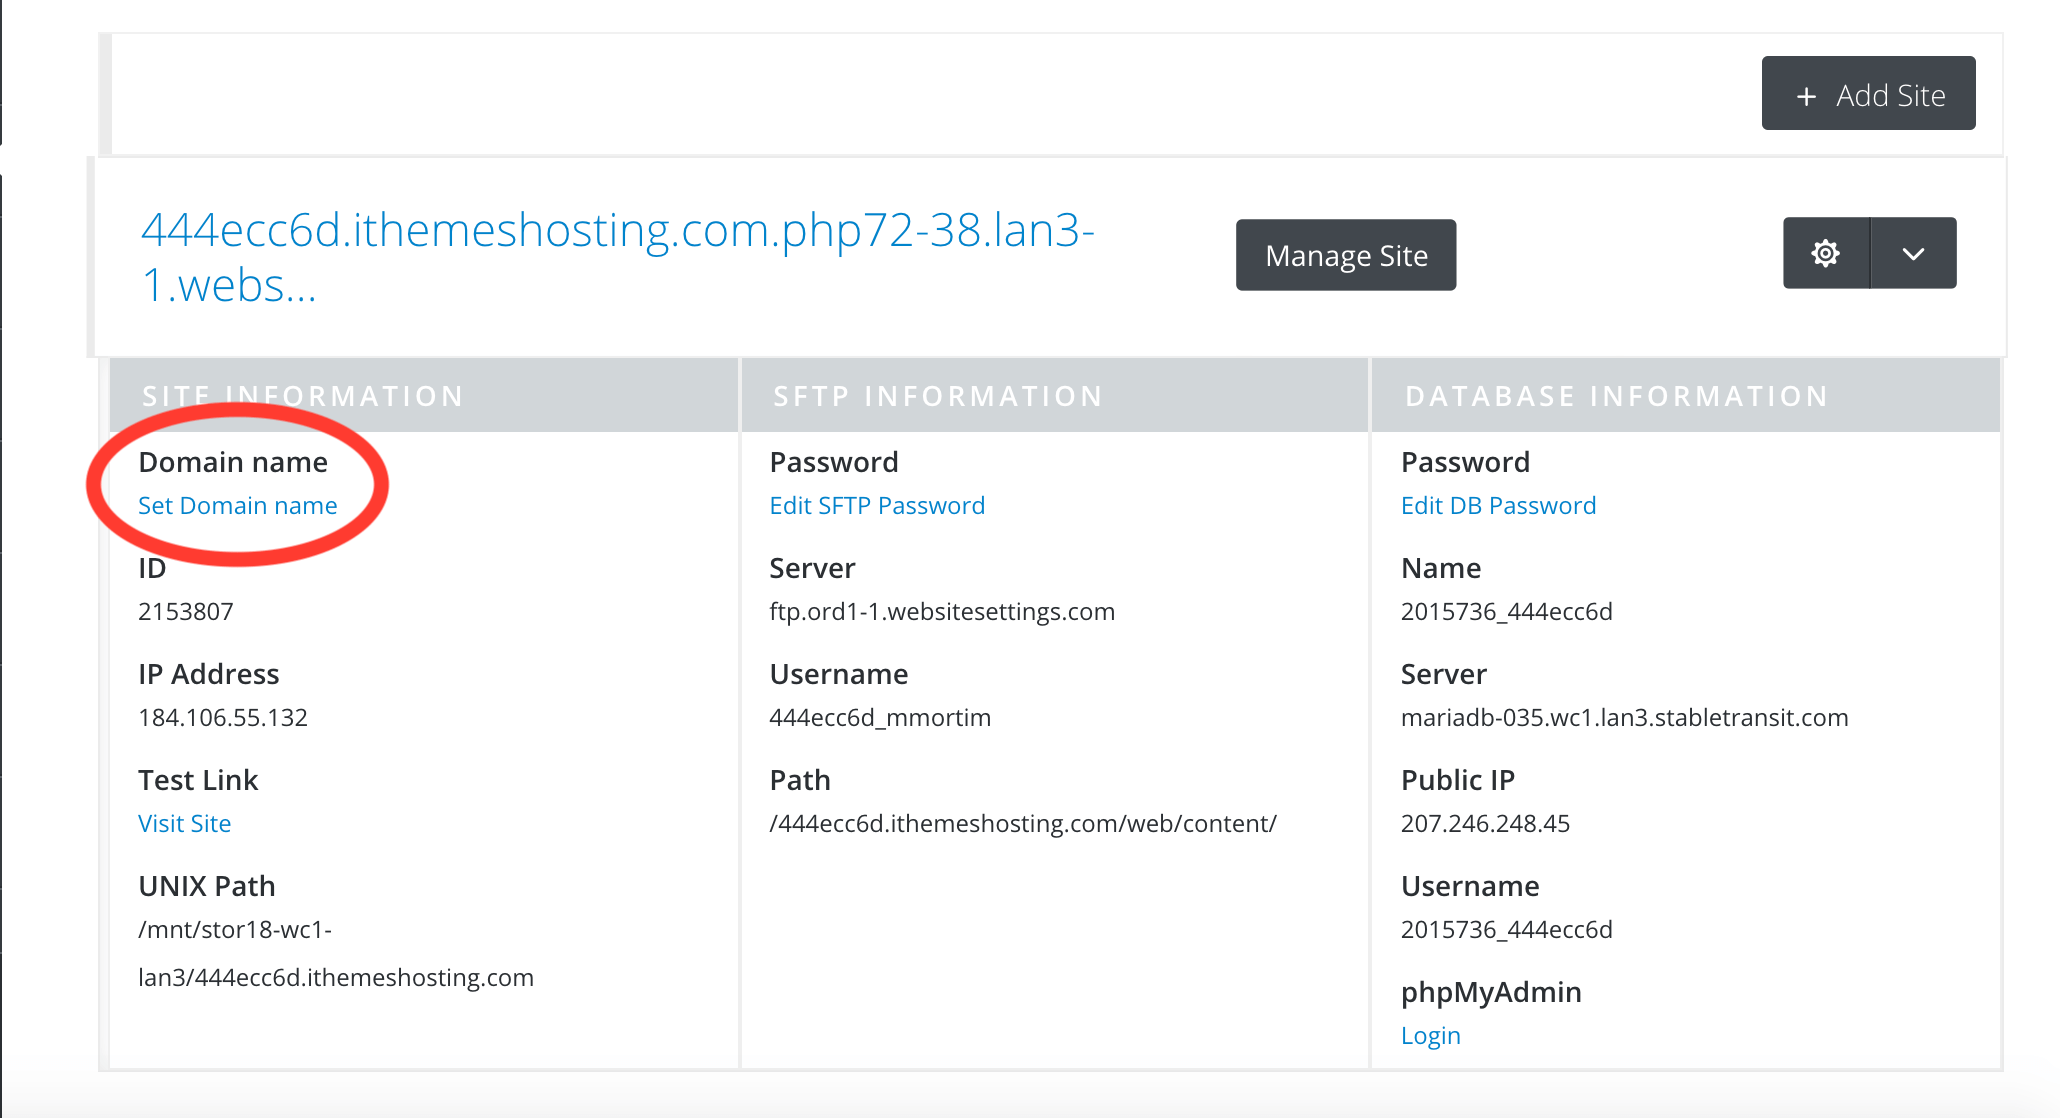
- 6. Upload the backup file and the ImportBuddy file to your iThemes Hosting account using SFTP.
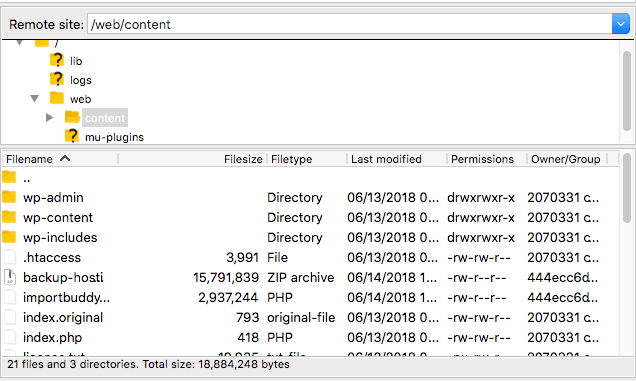 Upload the two files that you saved onto your computer: your backup file and importbuddy.php file, to the
 /web/content.
- 7. Restore the backup using ImportBuddy.
 Once the default WordPress site loads, add
 /importbuddy.php to the end of that URL. (Do not delete any of the URL that is already there, just add /importbuddy.php to the end of it.)
Load the page and you should see the ImportBuddy screen which will ask for your ImportBuddy password which you set earlier in step 4. (Please don’t confuse this password with the database password. The database password will be used later in this process). Enter your ImportBuddy password and begin the process of restoring the backup to your iThemes Hosting account. You’ll then see the following screen:
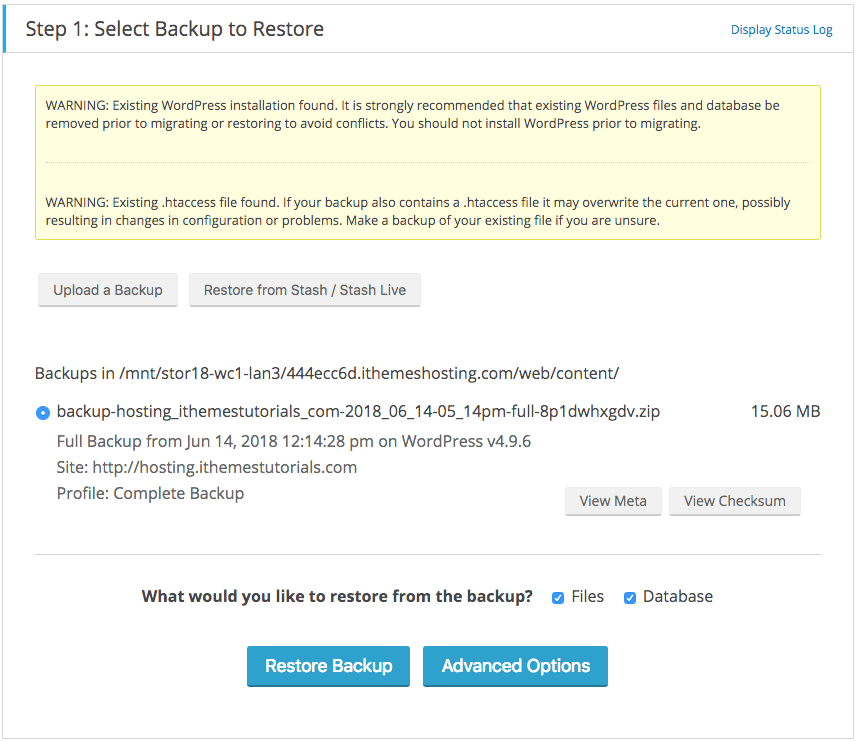 Scroll down to the bottom of the page and select the Restore Backup option. ImportBuddy will then perform the restore process and then bring you to the screen where you will need to enter your database information gathered at step 5. You will copy all the database information you retrieved into the ImportBuddy fields.
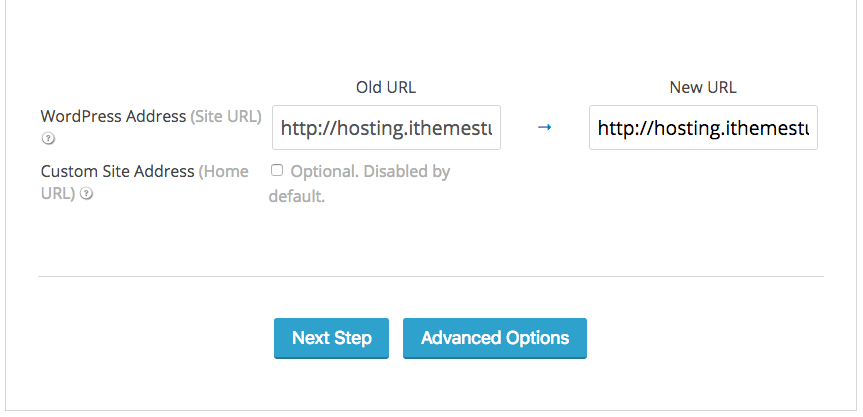
 Once you’ve finished setting the parameters, choose the next step. This step will perform the database import. From the next screen, you’ll be able to update the old and new URL through ImportBuddy. By default, ImportBuddy will use the URL that you are connected to for the new URL. Change the URL to match your old site or to the domain you wish to use for your iThemes Hosting account.
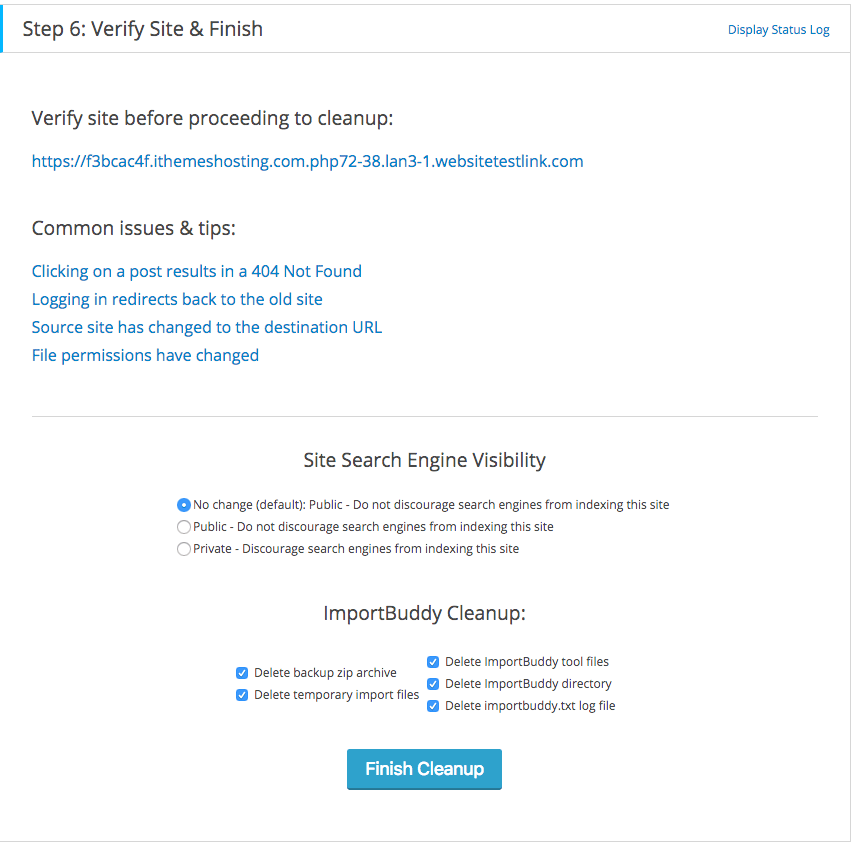
 Select Next Step and the database migration will complete. You will be presented with the opportunity to “Verify site before proceeding to cleanup,” and this will provide you with the current URL of the site restore so you can test and make sure everything looks correct.
If all looks good, choose your Site Search Engine Visibility (we recommend leaving this as No change) as well as the different ImportBuddy Cleanup options (leave this as the default). If everything is working, go ahead and select the Finish Cleanup option.
Select Next Step and the database migration will complete. You will be presented with the opportunity to “Verify site before proceeding to cleanup,” and this will provide you with the current URL of the site restore so you can test and make sure everything looks correct.
If all looks good, choose your Site Search Engine Visibility (we recommend leaving this as No change) as well as the different ImportBuddy Cleanup options (leave this as the default). If everything is working, go ahead and select the Finish Cleanup option.
 Once you finish the cleanup, you’ll come to the restore finished page which will once again provide you with the link to your site. You can follow the link and close the page. At this point, you are going to want to do some extensive testing in order to ensure that everything is working properly and that there are no gremlins hiding anywhere.
Site Cleanup & Final Steps
- 8. Finish old site cleanup.
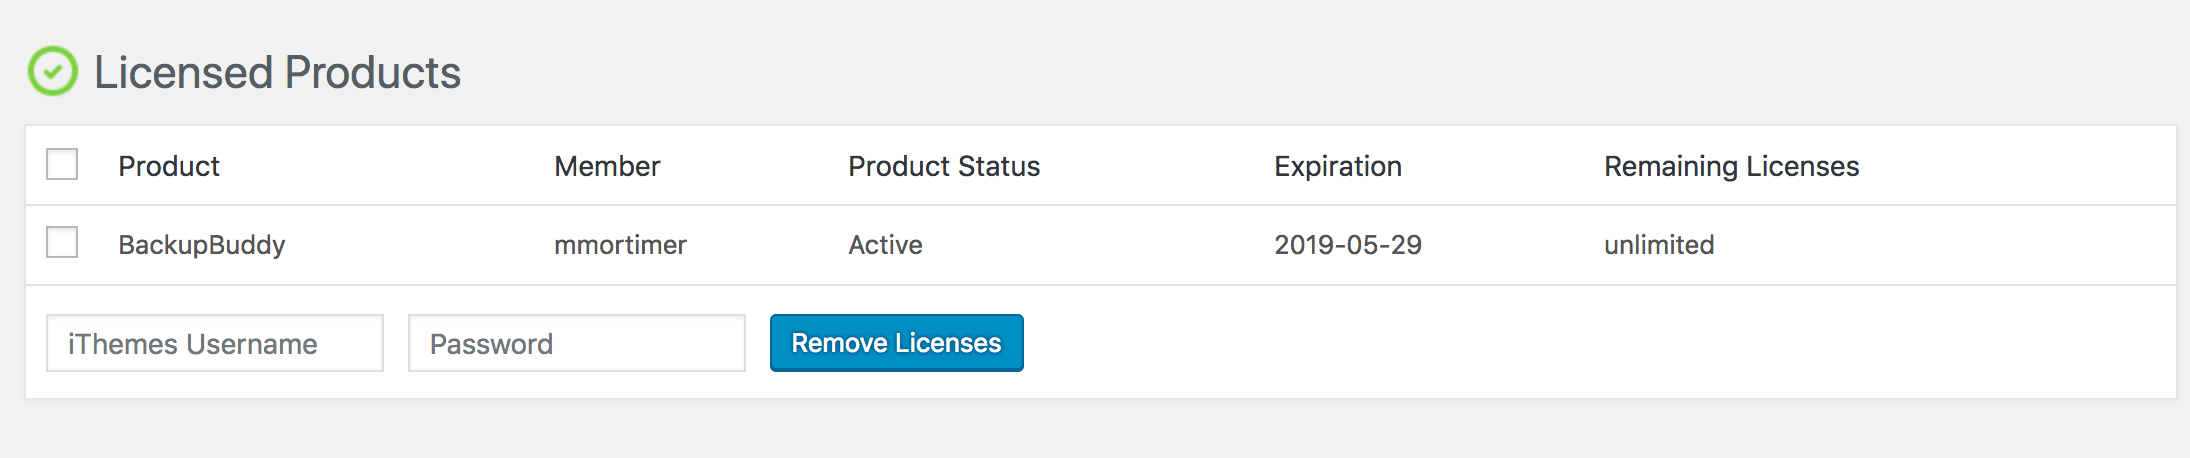
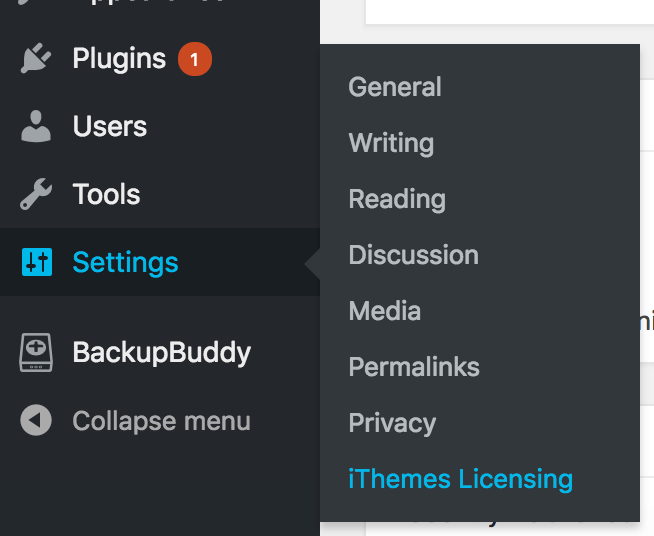 From this page, you will first check to ensure that it is showing Licensed Products with a list of the products you are using that are licensed. Under that, you should see the option to enter your iThemes Username and Password which will then allow you to remove the license and free it up to be used on another site.
 Once you remove the license, you will want to delete the BackupBuddy plugin from the old site, or you can delete the entire hosting account if you’re ready to do so, and use the license to activate the BackupBuddy plugin on your new iThemes Hosting account.
- 9. Update your DNS to point to iThemes Hosting.
- 10. Set your Domain name.
- 11. Connect your site to Sync.
More iThemes Hosting Tutorials
Check out the full list of documentation and tutorial articles in the iThemes Hosting Help docs.Get iThemes Hosting Today
Switch your website host or launch your new website today on iThemes Hosting. With instant WordPress setup and FREE, automatic SSL certificates, you can have your site running on hosting designed for WordPress.Get Your Site Going Today
Join us for the next Solid Academy Webinar!
Free weekly webinars that will help you master WordPress and increase your business's bottom line.
What is a WordPress Phishing Attack?
Learn how to identify and prevent phishing attacks on WordPress websites.
Kiki SheldonWebsite Protection: 5 Ways to Keep Your Website Safe
Robust website protection is the shield that stands between your business and relentless cyber attacks. Prioritizing website protection enables businesses to fortify defenses to safeguard their online presence and preserve the trust of their customers in the face of ever-evolving cybersecurity threats.
Kiki Sheldon23 Ideas To Grow Your WordPress Business in 2023
WordPress is the most popular website-building platform worldwide, trusted by numerous brands. WordPress enables you to build a user-friendly and highly reliable site, together with tools and plugins to enhance your marketing and work like a lead magnet. All these features make WordPress the platform chosen by more than 43% of businesses globally.
SolidWP Editorial TeamSign up now — Get SolidWP updates and valuable content straight to your inbox
Sign up
Get started with confidence — risk free, guaranteed
