How to Install a WordPress Staging Site on a USB Drive with BackupBuddy
The modern day freelancer tends to be more mobile in their work life. Wherever a computer resides or a laptop enables you to go… there a work environment can exist. With the latest 6.0 release of iThemes' BackupBuddy all freelancers can rejoice with the exciting new Deployment feature. In this tutorial, we will be showing how any freelancer can install a mobile WordPress staging site on a USB drive to further expand the mobile office of a freelancer.

 The modern day freelancer tends to be more mobile in their work life. Wherever a computer resides or a laptop enables you to go… there a work environment can exist. With the latest 6.0 release of iThemes’ BackupBuddy all freelancers can rejoice with the exciting new Deployment feature.
In this tutorial, we will be showing how any freelancer can install a mobile WordPress staging site on a USB drive to further expand the mobile office of a freelancer.
The modern day freelancer tends to be more mobile in their work life. Wherever a computer resides or a laptop enables you to go… there a work environment can exist. With the latest 6.0 release of iThemes’ BackupBuddy all freelancers can rejoice with the exciting new Deployment feature.
In this tutorial, we will be showing how any freelancer can install a mobile WordPress staging site on a USB drive to further expand the mobile office of a freelancer.
Getting Started: Installing XAMPP
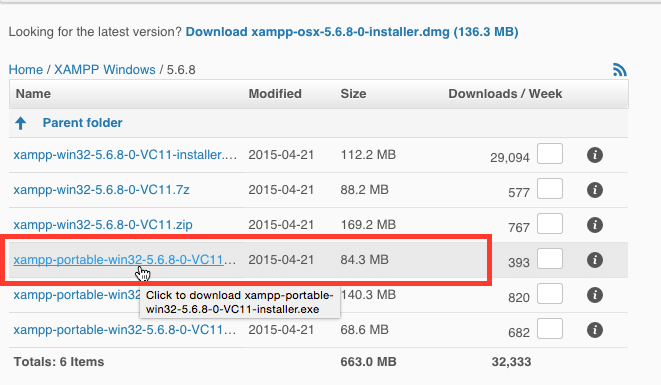
In order to accomplish this tutorial we are going to install XAMPP lite to a USB drive which will then enable us to install WordPress. XAMPP is a custom built software package that includes a web server (Apache), a database (MySQL), and PHP with phpMyAdmin. To get started you need to have a USB drive that has enough space to store a WordPress site. If you already use BackupBuddy you can look at the size of your latest backups to see how big of a USB drive you will need. (The geek answer is that there is no such thing as a “big enough” USB drive.) Let’s start by downloading XAMPP lite to our computer. (Note: you will need to be using a Windows based computer. There are Mac options that are in beta, but this tutorial will focus on setting things up using Windows.) To download XAMPP you will need to visit the XAMPP download page and click More downloads.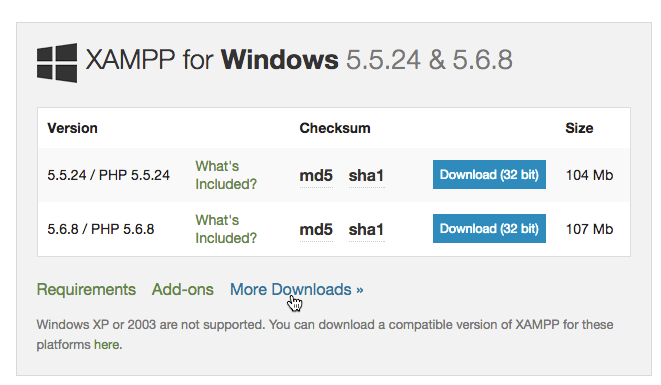 You will need to find the portable-win32 version of the latest XAMPP release as shown in the screenshot below.
 Once you have downloaded the xampp-portable-win32-xxxx file you can double click on the executable file to run the installation. During the installation, the program will ask you to select the location of where you want to install XAMPP. Make sure you select your USB drive.
Once you have installed XAMPP on your USB Drive, you simply need to run the xampp-control.exe from your USB drive to launch the XAMPP Control Center.
Once you have downloaded the xampp-portable-win32-xxxx file you can double click on the executable file to run the installation. During the installation, the program will ask you to select the location of where you want to install XAMPP. Make sure you select your USB drive.
Once you have installed XAMPP on your USB Drive, you simply need to run the xampp-control.exe from your USB drive to launch the XAMPP Control Center.
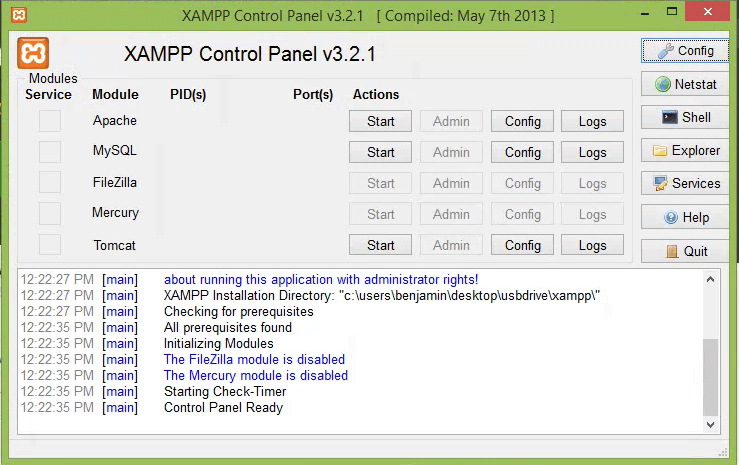 All you have to do is click on the buttons to start each of the applications (Apache & MySQL) and then visit http://localhost/ on your browser. (Note: You may have to deal with a Windows Firewall prompt when you “start” Apache & MySQL.)
Installing WordPress
We now have a functioning server environment on a USB Drive now. The next step is to install WordPress by following these quick steps:- Visit in your browser http://localhost/phpmyadmin/ and create a new database that your WordPress site will use. Remember the database name and the username/password (if your XAMPP installation has a password).
- Place your BackupBuddy backup file of the site you want to build a staging environment to sync into a folder located at USBDrive://xampp/htdocs/stagingsite/ or make your own folder. (All you have to do is download to your computer the latest BackupBuddy backup zip file from your live site.)
- Place a copy of importbuddy.php in that same folder.
- Visit in your browser http://localhost/stagingsite/importbuddy.php and follow the instructions to migrate your live site to your new staging area.
Connecting the Live Site with the Staging Site
Once you have the staging site running on your USB Drive, you can now follow the instructions on how to connect your LIVE version of your site with your STAGING version of your site.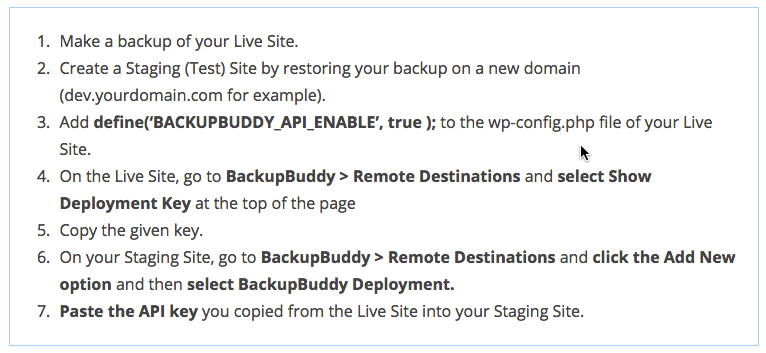 You now have a fully functional mobile development environment on your USB Drive. You can simply plug your USB Drive into any Windows computer and instantly push & pull versions of your LIVE site and your STAGING site. Enjoy the freedom and security that BackupBuddy, our WordPress staging plugin, provides to freelancers around the world.
Join us for the next Solid Academy Webinar!
Free weekly webinars that will help you master WordPress and increase your business's bottom line.
What is a WordPress Phishing Attack?
Learn how to identify and prevent phishing attacks on WordPress websites.
Kiki SheldonWebsite Protection: 5 Ways to Keep Your Website Safe
Robust website protection is the shield that stands between your business and relentless cyber attacks. Prioritizing website protection enables businesses to fortify defenses to safeguard their online presence and preserve the trust of their customers in the face of ever-evolving cybersecurity threats.
Kiki Sheldon23 Ideas To Grow Your WordPress Business in 2023
WordPress is the most popular website-building platform worldwide, trusted by numerous brands. WordPress enables you to build a user-friendly and highly reliable site, together with tools and plugins to enhance your marketing and work like a lead magnet. All these features make WordPress the platform chosen by more than 43% of businesses globally.
SolidWP Editorial TeamSign up now — Get SolidWP updates and valuable content straight to your inbox
Sign up
Get started with confidence — risk free, guaranteed
