iThemes Security Settings Checklist: How To Set Up iThemes Security
The iThemes Security plugin includes a one-click WordPress Security check, but you may still have questions about the other settings and how to configure the plugin properly on your website. In this post, we’ll walk through a complete iThemes Security setup checklist with an explanation on settings, Pro features and basic WordPress security fundamentals.

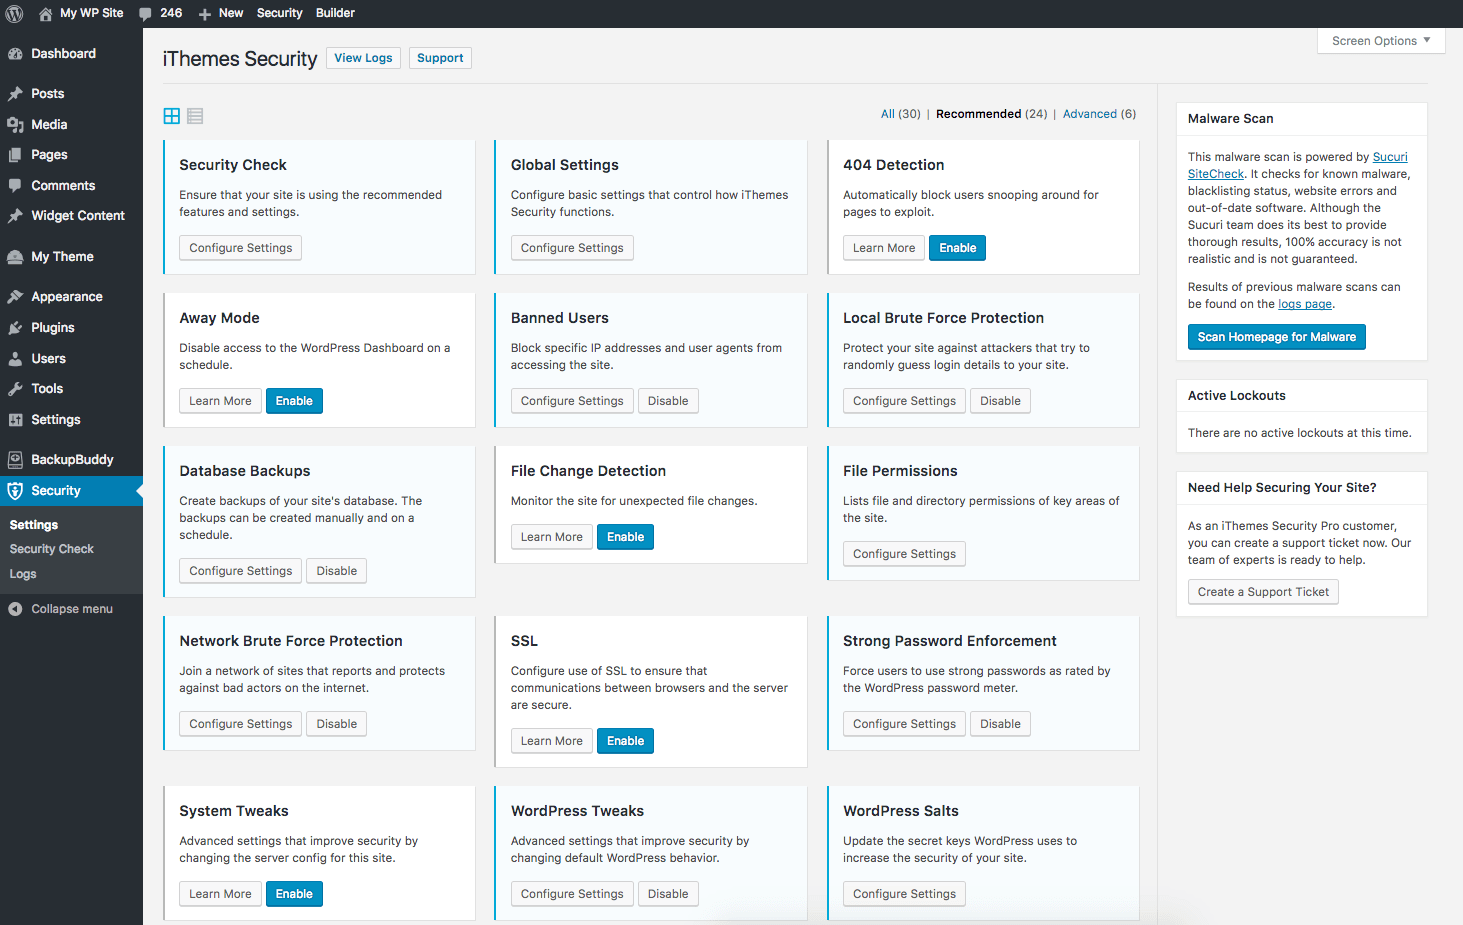
One-Click Setup WordPress Security Check
- Run the Security Check. The first thing you’ll want to do after activating iThemes Security is to run the Security Check. This feature is designed to save you time by enabling our suggested settings that we know won’t interfere with your environment. Note that some features like Two-Factor will still need additional configuring.
Global Settings
- Make sure your email for the Security notifications is correct.
- Enable Send Digest Email to help with the notifications load.
- You can customize the various lockout messages.
- Here are the master ban settings. This is the criteria the features use to determine when to permanently ban IPs. The banned IPs are written to the .htaccess file.
- Whitelist your IP here to avoid it from being locked out.
- Choose whether to store your Security logs in the database or in a file stored on your server.
- Choose how long to keep the logs to help conserve resources
- If you’re using the InfiniteWP service, you’ll want to enable compatibility for it.
- Don’t enable the Disable File Locking feature unless instructed to do so by support.
- If you know you’re not using a proxy service like Varnish or Cloudflare you can enable Override Proxy Service to better identify IPs.
- Enable Grade Report if you’d like to identify vulnerabilities on the site. You can adjust who’s able to see it in the Grade Report Module.
404 Detection
- Before enabling 404 Detection you’ll want to check your site with a 404 checker. If your site has many 404s, you can lock out legitimate users and bots.
- In the About Lockouts section, you’ll notice your lockout criteria that was in your Global settings. Once your 404 Detection lockout settings meet this criteria, the IPs will be written to the .htaccess and permanently banned.
- If you have known 404s that you don’t want to result in lockouts you can place them in the 404 whitelist.
- You can specify file extensions you’d like to not result in lockouts.
Away Mode
Away Mode gives you a way to completely lock down your login page, including from yourself, when it’s not needed.- Before configuring what time you’d like to activate it, make sure your current time matches the site time.
- Choose for it to be enabled one time or recur daily.
- If you need to get into the site while Away Mode is enabled you’ll need to delete the itsec_away.confg file found in wp-content > uploads > ithemes-security.
Banned Users
Hack Repair Default Blacklist enables a blacklist with several known bad actors and bots you may not need. However, some sites that make use of third-party applications need some of these. Check the full functionality of your site after enabling it.- The list of IPs and IP ranges to be banned from your site. You can use IPv4 or IPv6 formats.
- You can ban specific user agents.
Local Brute Force Protection
In the About Lockouts section, you’ll notice your lockout criteria that was in your Global settings. Once your Brute Force lockout settings meet this criteria, the IPs will be written to the .htaccess and permanently banned.- You can choose to automatically lock out a user trying to log in with the username “admin.” If you don’t have a user on your site with this username, you should enable this feature.
Database Backups
- Manually create a backup and set a schedule.
- Choose the backup method and how many backups to retain. If you have tables you don’t need to be backed up like logs or temp tables, you can exclude them to save resources.
- If you choose to enable scheduled backups, you can set how often it will run.
File Change Detection
Depending on what’s happening with your site, this can be the most resource-intense feature in the plugin.- Enable Split File Scanning to make the scans more efficient.
- You can choose to include or exclude files and directories scanned. I typically suggest excluding files with known processes to help quiet the white noise. An example of this would be caching files, backup directories and the .htaccess file. Of course, this is personal preference.
- Choose how to be notified of file changes.
- Compare Online Files will scan your iThemes and WordPress Core files and let you know if any change is malicious.
File Permissions
File Permissions gives you a quick overview of your directory and file permissions and gives suggested values. Different environments use different permissions and that’s fine.- Make sure your directories aren’t 777 and your files aren’t 666.
Network Brute Force Protection
- When you enable this, you’re able to “crowd share” our iThemes blacklist. If any IP has been banned on any other site in our network, it will be banned from your site as well.
SSL
- The SSL module allows you to force SSL on the whole site, per page or in the dashboard if your site supports SSL. Note that sites with SSL don’t necessarily need this, only ones that aren’t forcing redirects to https.
Strong Password Enforcement
- You can force users by role to use strong passwords as rated by the WordPress password meter.
System Tweaks
- System Files – Protects sensitive files from being viewed by the public.
- Directory Browsing – Prevents users from seeing the directory list of the site when an index.php file isn’t present.
- Disable Request Methods – Filter hits with the trace, delete and trace request methods. This prevents these HTTP protocol methods from accessing your site. While they can be used legitimately, then can also be used in a cross-scripting attack. If you make use of the REST API, you should not disable these.
- Suspicious Query Strings – Helps combat SQL injections.
- Non-English Characters – Helps combat SQL injections, but should never be used on non-English sites.
- Long URLs – Helps combat SQL injections.
- File Writing Permissions – Changes the .htaccess and wp-config.php files to a more secure 444 permission. By default, they are a less secure 644.
- Disable PHP in Uploads – This does not affect functionality. It prevents outside sources from executing potentially malicious scripts.
- Disable PHP in Plugins – This does not affect functionality. It prevents outside sources from executing potentially malicious scripts.
- Disable PHP in Themes – This does not affect functionality. It prevents outside sources from executing potentially malicious scripts.
WordPress Tweaks
- Windows Live Writer – If you aren’t using a third-party app for blogging outside of your dashboard disable access to this file.
- Really Simple Discovery – If you aren’t using a service that makes use of it, disable it.
- Comment Spam – Enabling this helps reduce spam.
- File Editor – Enabling this disables the File Editor limiting editing the theme and plugins to only those who have direct access to the server.
- XML-RPC – This file can allow access to your site. If nothing on your site uses it, disable it. If you use Jetpack or the WordPress Mobile app, set it to Disable Pingbacks.
- Multiple Authentication Attempts per XML-RPC Request – The XML-RPC file can allow a brute force attack to make hundreds of attempts per request. This should be disabled.
- REST API – By default, the REST API can provide public access to posts, users and media. It should be restricted to only those logged in users that have access to this information.
- Replace jQuery With a Safe Version – This feature will ensure you’re using the correct jQuery version for your WordPress version.
- Login Error Messages – Disabling the error messages hides the reason the login failed making it more difficult to further isolate the attack.
- Force Unique Nickname – This helps combat user enumeration by forcing new users and users that update their profile to use a nickname to prevent harvesting of their usernames.
- Further prevent username harvesting.
- Protect Against Tabnapping – Prevents phishing attacks when linked to an outside site.
- Login with Email Address or Username – Choose if users are able to login with their username, email or both.
- Mitigate Attachment File Traversal Attack – WordPress versions 4.9.6 and earlier can potentially allow a user with certain capabilities to attempt to delete files outside the uploads directory.
WordPress Salts
Without getting overly technical, WordPress uses cookies (or information stored in your browser) to verify the identity of logged in users and commenters, so WordPress also includes secret authentication security keys and salts in the wp-config.php file. Like other passwords, changing your WordPress salts from time to time is good practice.Advanced Features
- Hide Backend – The Hide Backend feature allows you to change your login slug. Changing your WordPress admin URL adds a good extra layer of security, but it should not take place of Two-Factor and Strong Passwords. This feature is on the Advanced settings page due to its possibility to conflict with other plugins and themes.
Admin User
Some installations of WordPress come with a standard username admin, with a database user ID of 1. This feature allows you to change both.- If your site doesn’t have a username admin, the option to change it will not be present.
- You should make a backup before using this feature. If something goes wrong during the update this is the easiest way to recover.
Change Content Directory
- This feature will allow you to obscure your wp-content directory by renaming it.
- There is a revert option if the site breaks, but you should still make a backup before using this feature.
Change Database Prefix
- By default, all WordPress sites have the prefix wp_. This feature further obscures your site by changing it to something random.
- You should make a backup before using this feature. If something goes wrong during the update, this is the easiest way to recover.
Server Config and wp-config.php Rules
- You may have chosen to not allow iThemes Security to write to these files, or it’s not able to for some reason. You can find them here to manually add them.
iThemes Security Pro Features pro
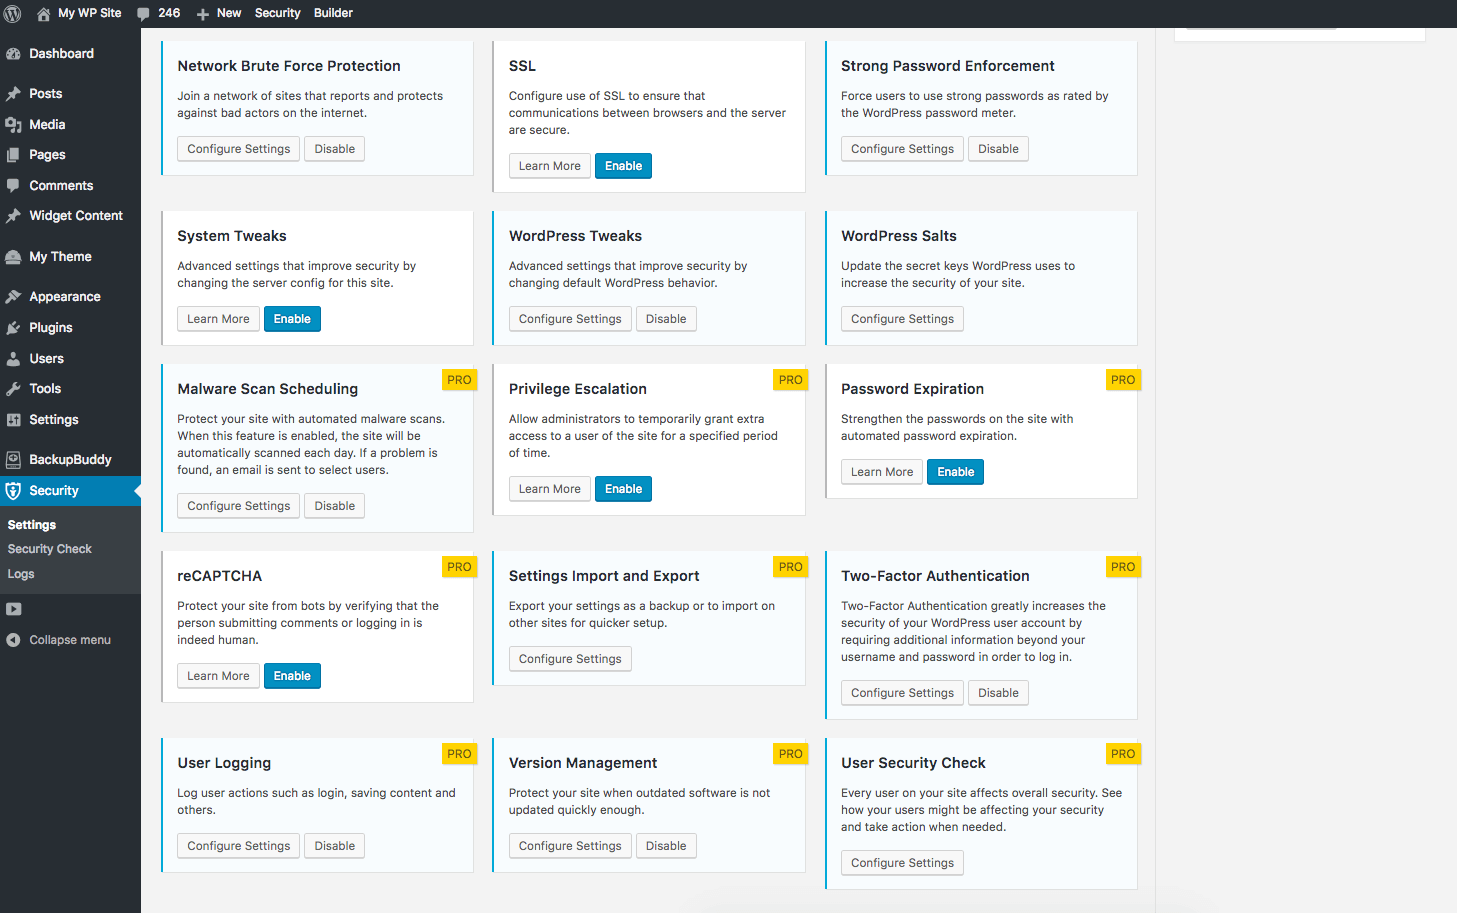
Magic Links
Enable Magic Links to receive an email when an alternate link to use when your username has been locked out due to a brute force attack.Malware Scan Scheduling
We’ve integrated the sitecheck.sucuri.net malware scanner. The scanner in the right sidebar will do a quick scan of your homepage.- Enabling scheduling will set the scanner to scan your full site twice daily. You can configure a notification email when issues are found or check the logs.
Privilege Escalation
- You can grant temporary Administrator privileges to any user and set it to expire in how many ever days you’d like.
Password Requirements
- Password Expiraion – It’s a best practice to routinely update your WordPress password. With Password Expiration, you can force users by roles to update their password in X amount of days.
- Strong Passwords – Enforce users to use strong passwords by user role.
- Refuse Compromised Passwords – Force users to use passwords which do not appear in any password breaches tracked by Have I Been Pwned.
reCAPTCHA
- With reCAPTCHA, you can add an extra layer of defense to your login page, registration and comments. You can choose between V2, which is the one most of us are familiar with, or the new Invisible reCAPTCHA that doesn’t even require a user to check a box.
- You can configure how many failed attempts will result in a lockout.
Settings Import and Export
- You may have many sites that you’d like to share your settings with or possible just have a backup of them. This feature makes it really easy. Either enter an email to create and receive an export or choose an export you already have to load the settings on the site.
Two-Factor Authentication
- This is one of the best, most secure features in the plugin. If an attacker somehow obtains your WordPress credentials they’ll also need your device, access to your email or your backup codes.
- Force users to use Two-Factor based on their roles or abilities.
- If you have users that don’t use Two-Factor or a site with outdated software, you can force them to use it as well.
User Logging
- This is useful for tracking user actions on the site such as logins and modifying content.
Version Management
Keeping everything on your sites up to date is paramount. Software always has the chance to have a vulnerability and, if you don’t stay up to date, it can be exploited once it’s discovered. These features will allow you to automatically update WordPress Core, plugins and themes, and adds an extra layer of security when the site is running outdated software.- Scan For Old WordPress Sites – Set a scan to run daily scan on your hosting account for old WordPress installations that could be compromised.
- Strengthen Site When Running Outdated Software – Enables extra security when available software updates haven’t been updated for at least a month.
- Auto Update WordPress Core, Plugins and Themes – Configure automatic updates for all software on the site.
User Security Check
This feature gives you a quick overview of your users. See if they have Two-Factor configured and, if not, send them an email to encourage them to enable it. See how strong users passwords are, the last time they were active, how many sessions they have open and temporarily adjust their user role.iThemes Security Logs
The iThemes Security Logs gives you an overview of all logged actions on the site. The All Logged Data section gives you an overview of all actions.- From the drop-down, you can select Invalid Login Attempts, User Actions, 404 Errors Found, File Change History and Malware Scan for more detailed Logs of the actions.
- Some have a details link that will show more specific information about the action.
Grade Report
Configure which users are able to see the Grade Report which helps identify and resolve vulnerabilities on the site.Watch the Webinar: iThemes Security Setup Essentials
Get iThemes Security Pro
Get iThemes Security Pro, our WordPress security plugin, with 30+ ways to secure and protect your WordPress site.
Get iThemes Security Pro
Join us for the next Solid Academy Webinar!
Free weekly webinars that will help you master WordPress and increase your business's bottom line.
What is a WordPress Phishing Attack?
Learn how to identify and prevent phishing attacks on WordPress websites.
Kiki SheldonWebsite Protection: 5 Ways to Keep Your Website Safe
Robust website protection is the shield that stands between your business and relentless cyber attacks. Prioritizing website protection enables businesses to fortify defenses to safeguard their online presence and preserve the trust of their customers in the face of ever-evolving cybersecurity threats.
Kiki Sheldon23 Ideas To Grow Your WordPress Business in 2023
WordPress is the most popular website-building platform worldwide, trusted by numerous brands. WordPress enables you to build a user-friendly and highly reliable site, together with tools and plugins to enhance your marketing and work like a lead magnet. All these features make WordPress the platform chosen by more than 43% of businesses globally.
SolidWP Editorial TeamSign up now — Get SolidWP updates and valuable content straight to your inbox
Sign up
Get started with confidence — risk free, guaranteed
