WordPress Featured Images: 3 Tips for Choosing the Right Image
We’ve all heard the old saying that “a picture is worth a thousand words.” But does that concept hold true when it comes to WordPress featured images? In this guide, we’ll dive into all things related to the WordPress featured image. By the end, you’ll be an expert on the subject. Let’s take a look.

We’ve all heard the old saying that “a picture is worth a thousand words.” But does that concept hold true when it comes to WordPress featured images?
In this guide, we’ll dive into all things related to the WordPress featured image. By the end, you’ll be an expert on the subject.
Let’s take a look.
What is a WordPress featured image?
Featured images on WordPress, also commonly referred to as thumbnails, are a standard feature that nearly every theme offers. In fact, all of the major WordPress themes support featured images by default.
Featured images are the main images that get attached to every one of your website posts. When you apply a featured image to a post, you’ll notice that it populates as a thumbnail when you promote a blog post on social media, directly under the title of your post.
They also populate on your website’s home page, where your site’s content is listed.
Featured Images Make a First Impression
Along with your post titles, feature images are the very first thing that your site visitors notice when they click through to your site. Because of this, it’s important to make sure you grab attention with your featured images, while properly conveying what people can expect to find on your site once they begin to dig into it.
To do this in the most effective way, it’s important to know how to choose the best featured image photos. You’ll also need to optimize them for the WordPress platform to ensure they make the best impact possible.
It’s important to understand how impactful visual components are when you’re trying to get a user to engage with your content. While well-written, thoughtful content certainly can take a site from average to extraordinary, often it’s the featured image that draws someone in to begin with.
By using featured images in a strategic way, you’ll be able to:
- Improve the appearance of your website
- Increase page visits and user engagement
- Generate more clicks on social media and from your site’s homepage
And you can use featured images for more than just blog posts. They can also be used on your site pages and custom post categories.

Why Is It So Important To Use WordPress Featured Images?
Quite surprisingly, there is a large number of WordPress website owners that don’t use featured images. And there could be a number of factors that contribute to this problem.
For example, there are still some low-level free WordPress themes that don’t even support featured images. If you’ve been trying to work with a theme that doesn’t allow you to use featured images on your posts, it’s time to look for a new theme.
But beyond that, some site owners aren’t exactly sure how to include featured images on posts, or don’t understand how impactful they are. However, if you understand the power of a featured post image, you will certainly take the time to learn how to choose the right image.
Some of the immediate advantages of using features images include:
- The ability to summarize written content into a single image
- Displaying your creativity
- Creating a pleasing and inviting site aesthetic
- Improving the SEO (search engine optimization) of your site
When you use featured images consistently, you’ll begin to define the style and message of your site. And you’ll also drive more traffic, which is the entire point of being a website owner.
According to recent research, articles and blog posts that contain an image will receive almost 95% more traffic than ones that don’t.
That reason alone is enough to drive any site owner into learning how to choose the right featured images.
Get SolidWP tips direct in your inbox
Sign up
Get started with confidence — risk free, guaranteed
Tips For Choosing the Right WordPress Featured Images
When it comes to choosing what featured images to use on your posts and pages, the sky really is the limit. But, given how significant they are to your overall success, it’s a good idea to employ a strategy to how you use them.
With that said, let’s look at the most effective methods for squeezing the most potential out of every single feature image you choose.
1. Always Use Images That Are Licensed Or That You Own
While it may be tempting to start downloading images right off of Google to use as your featured images, this plan won’t work out well in the long run. Almost all of these images are owned by someone else, and cannot be used freely on your WordPress website.
Rather, If you are good at photography, or have someone on your team who is, you can produce your own original featured blog images. Conversely, if you have a talent for illustrating and that style fits with the content of your site, illustrated images make for great featured images.
Producing your own original featured images is the best-case scenario. But it can be a challenge to keep up with, especially if you post frequent new content. If you do, you’ll need to put a lot of time into producing a large number of unique images.
For most WordPress site owners, using third-party photos tends to work out better. And if you decide to go the third-party route, you’ll have several different options.
Your first option is to pay for an image usage license from a stock image website. Or you can use content that’s licensed by Creative Commons.
While using licensed stock websites works out well for a lot of site owners, there are several key advantages to using Creative Commons:
- The images and photos on Creative Commons are free. Depending on the specific licensing, you can often use them on for-profit blogs
- There are a lot of options available with Creative Commons. And entire websites exist that are dedicated to collecting and sharing Creative Commons photos. Some of these sites include Unsplash, Freepik, and Flickr (just to name a few)
- Depending on image licensing, you can even customize many of the images from Creative Commons. This means you can begin with one of their photos, then modify it to your own unique branding
2. Keep the Style of Your Featured Images As Consistent As Possible
Featured images make up a large portion of the media available to your site users. This is because every article or post has its own unique WordPress featured image that can appear in multiple locations throughout your site.
Because of this, it’s important to consider how they represent your brand’s content and your site in general.
While a lot of website owners simply choose wherever images look relevant to each article, it’s better to have some similarity across all of your featured images.
For example, you can consistently use real-life photos, or shoot for a style that’s more abstract.
No matter which direction you choose, the images you use need to reflect the tone and branding of your website.
You can also opt to use a specific overall color scheme, or focus on one particular “theme” across all of the images you use.
If you have more than one author posting blog content to your site, make sure you communicate to everyone what the style should be for the featured images they use.
Another idea is to assign one team member to handle all of your featured images across the entire site. This helps make sure that all of the images work well together and have a consistent tone.
Remember to always use images that are wider than they are tall. These types of images display much better for site users, whether they are on your desktop or mobile site.
Furthermore, avoid using featured images that have large file sizes. Doing so will slow down your site and hurt its overall performance.
This leads into point number three:
3. Optimize All of Your Featured Images
To run a successful website, it’s important to have fast page-load times. In fact, if a user needs to wait more than about three seconds for your pages to load, they’ll probably back out and find another source of information.
And having a bunch of large, high-resolution images on your site can significantly slow it down.
The solution to this is to optimize every single featured image you use on WordPress before you upload it to your site.
You can also optimize your images during the upload process.
This is done by changing the file size of the featured images you use on posts and pages. As a result, the images will be lightweight and won’t slow down your page load times. When you use the right optimization tool for the job, you’ll be able to reduce your image sizes without sacrificing any of the quality.
Some of the best WordPress plugin tools to use for image optimization are:
- Optimole
- Imagify
- Smush Image Compression and Optimization
- ShortPixel Image Optimizer
- Compress JPEG & PNG images by TinyPNG
Adding, Changing, and Deleting a WordPress Featured Image
The process of adding, changing, and deleting WordPress featured images is relatively straightforward. Let’s look, step-by-step, into how this is done.
How To Add a Featured Image
To begin, create a brand new post. Or, if you’d like to add a featured image to an existing post, simply edit the post.
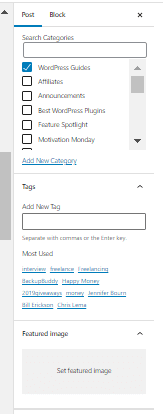
You’ll see that the tab for your featured image is located in the right-hand column of the WordPress content editor.
When you click on “Set Featured Image,” the WordPress media uploader will immediately appear. Here, you can either upload your chosen image from your workstation or device, or you can choose an image from your WordPress media library that you’ve already uploaded.
When you’re ready to set your feature image, all you need to do is click on the button titled “Set Featured Image” after you’ve selected the proper file.
After this is complete, you’ll see that WordPress gives you a preview of your featured image. You can now save or submit your post and preview it on your live site to see how it appears to your audience.
When the featured image is added, make sure that you set a description for it on your post. This way, site visitors (as well as Google and the other search engines) will know exactly what the image points to.
Also, don’t forget to include the featured image alt text in the post. You’ll find that on the right-hand side of your editor, in the image block, by scrolling down a bit.
Removing Or Replacing Featured Images
On occasion, you may need to replace or remove a featured image that you’ve already been using. Maybe you’ve found an image that’ll work better than the original one, or you had a technical issue with the first one.
Fortunately, it’ll only take a few clicks to make this change.
To do so, navigate to the “Featured Image” box located below the image thumbnail and click on the link titled “Remove Featured Image.”
Assuming that you want to change the image to a new one, simply repeat step one for adding a new image.
The Best Sizes For Featured Images
Completely changing the sizes of your featured images can be a significant adjustment to the way your site looks. So it’s important to take the process step-by-step to avoid any major surprises.
And of course, it’s always a good idea to test these types of changes on a nonpublic WordPress site before implementing them. This keeps any formatting mistakes you make from accidentally being viewed by users on your live site.
Understanding Image Sizes on WordPress
To change the size of your images on WordPress posts and pages, it’s important to first understand how WordPress handles default images sizes.
When you upload an image to your WordPress media, three different versions of the original image are automatically created:
- Thumbnail (150 x 150 pixels)
- Medium (maximum height and width of 300 pixels)
- Large (maximum height and width of 1024 pixels)
WordPress creates these copies so that the image can be used in multiple areas of your site without you needing to constantly resize and re-upload your original image. While this would certainly be a hassle, it would also slow down your page load speeds and increase bandwidth use.
For example, imagine if you used a featured image that had a resolution of 3500 x 2200 pixels. When that image is displayed at full size at the top of your post, the high quality and resolution make sense. But if that original-sized file needed to be crunched into a smaller space like a thumbnail, it wouldn’t be practical.
And that’s exactly why WordPress automatically compresses each file upload into several different sized, smaller copies of the original.
Change Featured Image Dimensions
If you want to adjust the size of your WordPress featured images, the first place to look is the
WordPress theme you’re using.
This is because a lot of popular themes include their own featured image dimensions that replace the WordPress defaults.
To change the dimensions of your featured images, look at the options under the Appearance tab within your theme. If your theme doesn’t have a dedicated setting for changing featured image dimensions, you’ll be able to adjust it in the WordPress core software.
All you’ll need to do is navigate to Settings > Media within the WordPress dashboard.
Here, simply fill in the required dimensions in the area next to Thumbnail Sizes.
Remember that on WordPress, the terms “featured image” and “thumbnail” are interchangeable.
Improving SEO With Featured Images
Last, but certainly not least, understand that not all of the advantages of using WordPress featured images are for your site users. Proper use of images also has a major impact on your site SEO.
This is especially true when they are optimized. By adding keywords and alternate tags, you can actually begin to rank higher on Google searches. And in today’s competitive online market, it’s important to employ every possible advantage that you can.
Installing Your WordPress Feature Image
You’ll find the option to upload a featured image in the sidebar of your admin post page.
Once you have the image loaded, it will show up in the location your theme had dedicated to feature images.
Using the Right WordPress Featured Images Increases Your Chances For Success
Featured images are a key part of WordPress that every WordPress site owner needs to pay close attention to. When you include impactful featured images in your posts, articles, and pages, you’re able to visually portray your brand to your audience.
And while featured images are a key part of your branding plan, they’ll also drive more site traffic and more fully engage your users.
There’s no better time than today to start improving how you use WordPress featured images.
Ready to get more from your WordPress website? Join iThemes Training. Each week, iThemes trainer Nathan Ingram puts together amazing webinars, including exclusive premium events, that you can attend live and get engaged with the chat. You will also have access to the full iThemes Training library of training with your membership.
Join us for the next Solid Academy Webinar!
Free weekly webinars that will help you master WordPress and increase your business's bottom line.
What is a WordPress Phishing Attack?
Learn how to identify and prevent phishing attacks on WordPress websites.
Kiki SheldonWebsite Protection: 5 Ways to Keep Your Website Safe
Robust website protection is the shield that stands between your business and relentless cyber attacks. Prioritizing website protection enables businesses to fortify defenses to safeguard their online presence and preserve the trust of their customers in the face of ever-evolving cybersecurity threats.
Kiki Sheldon23 Ideas To Grow Your WordPress Business in 2023
WordPress is the most popular website-building platform worldwide, trusted by numerous brands. WordPress enables you to build a user-friendly and highly reliable site, together with tools and plugins to enhance your marketing and work like a lead magnet. All these features make WordPress the platform chosen by more than 43% of businesses globally.
SolidWP Editorial TeamSign up now — Get SolidWP updates and valuable content straight to your inbox
Sign up
Get started with confidence — risk free, guaranteed
